Create custom 3D models for PowerPoint
- Written by: Ingrid Mengdehl
- Categories: PowerPoint design , PowerPoint animation
- Comments: 10

When Microsoft brought out 3D models support in PowerPoint, we were all a bit excited. From first experiments rotating objects with Morph to ambitious plans to recreate Star Wars in our favourite presentation software, we were determined to push boundaries. However, there are only so many times you can play around with the animated 3D T-Rex to make it look like he’s about to eat your audience. (I know, I’ve tried). There usually comes a point where you want to create your own 3D models in PowerPoint to add that little pinch of excitement to your presentation. If you don’t know where to begin, fear not. We have just the guide for you!
We decided to start with a cube. It’s easy to achieve, but we can guarantee it will raise your status amongst your friends and colleagues. (If they’re not that impressed, we recommend better friends. No one needs that kind of negativity in their life.) To see what you’ll be able to achieve once you’ve read this article, have a quick look at the video below.
Ready to give a go? Perfect.
For this tutorial, you’ll need two different pieces of software. The first one is PowerPoint, which you should already have. The second is a free Windows app called 3D Builder . You can get it from the Windows Store.

Step 1: Create your cube’s faces
Open PowerPoint and create a new presentation. Add a blank slide.
Insert six squares. Make sure the squares are the same size using BrightSlide’s Match Size tool. BrightSlide is our brilliant, free PowerPoint design and productivity add-in with lots of helpful tools perfect for PowerPoint people! You can download BrightSlide here .
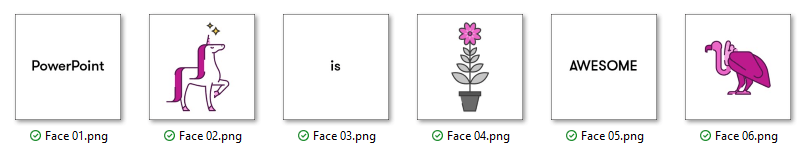
You can style your squares however you want to (colour fill, transparent, with or without outlines,…). Add text or pictures inside. We used a mix of illustrations and text.

Once you’re happy with how your squares look, save them individually as pictures. Select one square (and all its content), right-click, and select Save as Picture .

Select the destination and save as PNG . You should end up with six pictures like this:
Step 2: Create your 3D cube
Here comes the exciting bit. Once you’ve installed the 3D Builder, open it. On the welcome screen, click on New Scene .

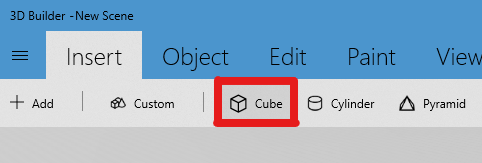
Once the scene is created, go to the top-left and click on Insert > Cube . Congratulations! You now have a 3D model of a cube.
The next step is to add the designed faces you’ve already made. To do that, make sure your cube is selected, then go to Paint > Texture .
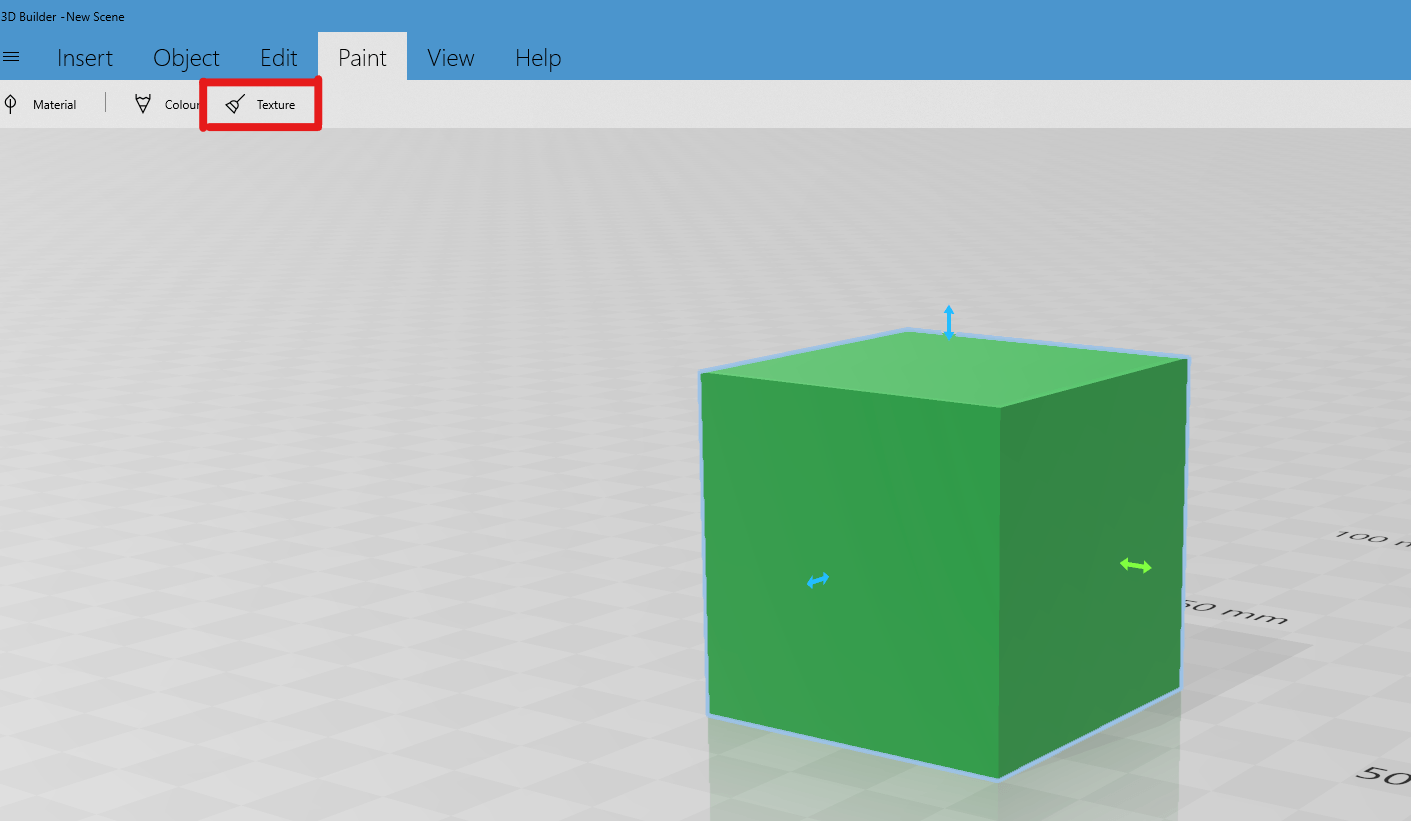
This will open the painting options. From there, click on Selected > Load . It will open a browsing window and you can navigate to the folder where you saved the faces. Select the first one.

If you now hover over the cube, your cursor will change to a little airbrush icon. Click on one face to apply it. It should now look like this (though, obviously, with your design instead):

Click in the grey area to rotate around the cube and repeat this process for each face. Remember, you’ll have to load the new surface every time. Once you’re happy with it, click the Apply button in the top left.

That’s it! Your model is ready. You just need to save it. Click on the Save icon in the top-right corner and select the destination folder. Make sure it is saved as a .3mf file.

There we go. Just one final step left before you create literal magic.
Step 3: Importing and animating 3D models in PowerPoint
Go back to PowerPoint. Either create a new file or use the one in which you created the faces. Go to the Insert tab, then 3D Models > From a File…

Find your cube and insert it. This will place your 3D cube on the slide. Arrange it however you want for its starting position:

Once you’re happy, select the slide in the panel on the left and hit Ctrl+D (or right-click and Duplicate Slide ). On the new slide, move the model so that it shows a different face. Repeat this process however many times you need.
When this is done, select all slides showing the cube, then go to the Transitions tab and select Morph in the drop down menu.

That’s it! You’re done. Hit F5 or go into Show Mode , and watch your 3D model rotating around with each click. You can also go back and forth using the Left and Right arrows on your keyboard.
This technique can be applied to more complex elements, so feel free to have a play around with 3D Builder. It’s probably the least intimidating 3D software out there and is a great starting point (not to mention, free!). To give you an idea of what’s possible, here’s an animated zoetrope that was built in the same way as the cube:
Want to have a play with the cube we created? You can download it here .
If you make a 3D model in PowerPoint that you’re really proud of, let us know on Twitter or by email at [email protected] ! We love seeing what other people get up to in PowerPoint.

Ingrid Mengdehl
Managing design consultant; it lead, related articles, how to copy vector graphics from illustrator to powerpoint.
- PowerPoint design / Presentation technology
- Comments: 6
Although it has been possible for a long time, using vector files in PowerPoint has recently become significantly easier. Whether you want to copy something from Illustrator or add a swanky SVG element to your slide, it’s all possible and we’re here to share our secret tips with you...

Two time-saving tips for advanced PowerPoint animation
- PowerPoint animation / PowerPoint productivity
- Comments: 1
At BrightCarbon, we animate a lot in PowerPoint. Sometimes, it’s things as simple as a “Fade In” or “Zoom Out”. The rest of the time, it’s more complicated stuff that makes us look a bit like magicians. As we like to share the magic, here are a couple of tips that might make it easier for you when working with complicated animation sequences...

The annoying PowerPoint error: PowerPoint found an error that it can’t correct
- PowerPoint design / PowerPoint animation / Presentation technology
- Comments: 46
"PowerPoint found an error that it can't correct. You should save presentations, quit, and then restart PowerPoint." Except, well, you can’t save, because that’s when the error appears. And nobody likes to lose work...

This is amazing ! thanks for sharing.
However I’m looking for a tuto that will allow me to make turn an excel graphic like in this video
https://www.youtube.com/watch?v=XZHDhmM6KTc at 00:32
If you can help me it will be great
Thanks a lot in advance
This is beautiful
This was great…is there anyway to access the 3d ms models and save them directly to my hard drive to use the models in non microsoft programs? ty also can you make available the zoetrope model file?
Glad to hear you liked it! For saving models, the best way to do that would be to go through 3D builder (New Scene > Insert > Add). From there you can get any 3D model available through Microsoft, then, once it’s loaded in your scene, you can save it wherever you want as a .3mf file.
As for the zoetrope file, we’d rather not share it externally. However, you can use the tutorial above to create your very own (in 3D Builder, go to Insert > Custom > Cylinder, and then you can customise it really easily). Let us know if you have anymore questions!
Excellent. No puffery; just facts and encouragement. Thanks
Thank you ! It helped me a lot.
Many thanks for the simple and straight forward explanation on this topic. Really help me in my current project.
Nice, thank you!
Thank you, great way to explain the process, easily.
Really helpful
Leave a Reply Cancel reply
Save my name and email in this browser for the next time I comment.
Join the BrightCarbon mailing list for monthly invites and resources
No one was looking at their electronics; all eyes were on the podium. We raised the bar on what a great presentation is supposed to look like. Curtis Waycaster Smith & Nephew

How-To Geek
How to insert and animate 3d models in microsoft powerpoint.

Your changes have been saved
Email is sent
Email has already been sent
Please verify your email address.
You’ve reached your account maximum for followed topics.
Microsoft Office vs. Google Docs, Sheets, Slides: Which Is Best?
Is the galaxy s23 ultra worth buying in 2024, the 8 best third-party iphone apps i can't live without, quick links, insert a 3d model in powerpoint, customize a 3d model, animate a 3d model.
If you're looking for a unique way to spruce up your slideshow, check out the 3D model feature in Microsoft PowerPoint. You can insert a 3D image then resize it, rotate it, and even animate it with a nifty effect.
If you have your own 3D model , this is a great way to present it to your client or show it off. But you can also pick one from the online library with plenty of categories to match your slideshow's theme or mission.
Related: How to Use Microsoft Paint 3D
Open your presentation in PowerPoint and head to the slide where you want to add the model. Go to the Insert tab and click the drop-down arrow for 3D Models in the Illustrations section of the ribbon.
Related: How to Draw and Edit a Freeform Shape in Microsoft PowerPoint
Choose either "This Device" to upload your own model or "Stock 3D Models" to pick one from the library.

If you want to browse the Online 3D Models available, you'll see many categories. With everything from animals and avatars to vintage cartoons and vehicles, you're sure to find one to enhance your show. You can also use the Search 3D Models field to find a particular one.

Once you choose the model(s) you want to use from your device or the library, click "Insert" to pop it onto the slide.
After you insert the 3D model, you can move it anywhere on the slide by dragging it or resize it by dragging a corner inward or outward, just like an image. You can rotate it by dragging the icon in the center in any direction.

To customize it further, select the model and go to the 3D Model tab. You can choose a view for the model from a nice collection of options. Use the 3D Model Views section of the ribbon to pick the style you want.

Another useful customization option is the Pan & Zoom feature on the right side of the ribbon. With it, you can focus on a specific part of the 3D model.

To use Pan & Zoom, select the model and click the button in the ribbon. You'll see a magnifying glass appear on the right side of the image. Drag it up or down to zoom in or out. You can also move the image inside of its border, helping you get to the exact spot you want. Click the Pan & Zoom button when you finish to deselect the tool and turn it off.
You can then use the additional tools in the ribbon on the 3D Model tab to add alt text , bring the model forward, send it backward, or align it with other objects on the slide.

Maybe you'd like to add some motion to your model. PowerPoint offers a handful of animations specifically for 3D models that make them shine.
Related: How to Control When a Picture Appears in PowerPoint
Select the model and go to the Animations tab. Choose an effect in the Animations section of the ribbon. You can pick from an Entrance (green), a few Emphasis (orange), and an Exit (red) effect for the 3D model.

After you add the effect, you can customize it like other animations in PowerPoint. Select the effect number, go to the Animations tab, and choose the Timing or Advanced Animation options.

Once you finish inserting, customizing, and even animating your 3D model in PowerPoint, you'll have an entertaining addition to your slideshow.
For more on enhancing your PowerPoint slideshows, take a look at how to add rolling credits or how to insert a video .
- Microsoft Office
- Microsoft PowerPoint
- Slidesgo School
- PowerPoint Tutorials
How to insert a 3D model in PowerPoint

When we talk about 3D, we refer to three-dimensional objects, that is, objects that have three dimensions: length, width, and height. Humans see the world around us in 3D, as we can perceive the length, width, and height of all the objects around us.
Of course, 3D objects can also be found in graphic design. What's more, we can include 3D resources in our PowerPoint presentations to give them an original, but, above all, realistic touch.
So, in this post, we are going to tell you how to insert 3D resources in PowerPoint to make your presentations unique. Don't worry, you won't need the famous red and blue 3D glasses to read this information! Here we go!

Although we would love to have the ability to edit and insert 3D resources in Google Slides, at the moment it is only possible in PowerPoint. If you want to share your presentation or have it in the cloud, you can first edit it in PowerPoint and when you are done, upload it to Google Drive.
Here are some techniques for editing and using 3D resources in PowerPoint. Take note because let's get started!
How to insert stock 3D models in PowerPoint
How to create 3d elements.
PowerPoint offers quite a large amount of stock 3D models as you can find all kinds of elements, from simple geometric shapes to elements of any category and theme such as animals, furniture, avatars, dinosaurs, food and drinks, flowers and plants, sports, and many more. You can also find models with animations.
The procedure for inserting resources is very simple:
- Insert > 3D Models > Insert 3D model from... > Stock 3D models.
- Finally, choose the model you want. As we have mentioned, there is a wide variety of models, some of them animated, you just have to select the one that best suits the content of your presentation.
- Place the element wherever you want and with the size and orientation, you need.
- You can also modify the format of the 3D model, for example, add a reflection effect: Right-click on the model > Format 3D model > Effects > Reflection.
Another way to include 3D elements is to create them from scratch, and then insert them into your presentation. For this, we will use the Paint 3D application.
- Click on 3D Shapes. In this way, we will be able to insert, with the format we want, doodles, objects, or 3D models.
- As an example, let's insert a 3D doodle. In the options menu on the right, we can select the shape of the doodle, the color, or the thickness.
- Let's adapt the sheet to the size of the 3D element. To do this, click on crop and we adjust.
- After we have finished editing the 3D element, let's save it on our computer so that we can export it to PowerPoint. Click in the upper left corner on Menu > Save As > 3D Model. Select the folder where we are going to save it and give it a file name.
- Now we open PowerPoint to insert the 3D resource into the presentation. Click on Insert > 3D Models > Insert 3D Model From > This device > Choose the folder where the 3D model we created is and insert it.
And that's it for this post! You can insert and create 3D elements as we have explained, but if you need to, at Slidesgo we have a selection of templates that you can use in Google Slides and PowerPoint with 3D resources included. Either way, start seeing life in 3D!
Do you find this article useful?
Related tutorials.

New feature available: edit our templates with Canva
Whenever you need to create, Slidesgo is there. We’re continually enhancing your presentation design process with templates that are primed to impress for any occasion. And in order to let your ideas flow best, comfort is key. How could Slidesgo help you with this? By making you feel right at home with our resources, no matter your preferred platform.You spoke, and we listened. Now, your favorite slides can be accessed on a new platform: Canva! This new format adds to our existing options (PowerPoint and Google Slides), expanding your ways to utilize our first-rate presentation content. We’ve started with a selection of Canva-ready...

How to print PowerPoint notes
Crafting an impactful PowerPoint slideshow and delivering a captivating presentation are distinct skills. The first focuses on designing appealing visuals to convey a clear message, while the second involves employing effective presentation techniques to ensure the audience grasps the idea. The content of this article will help you with the latter part of this process, guiding future presenters on how to print PowerPoint with speaker notes to enhance your presentations success and effectiveness.

Discover Our Online Presentation Software for Free
We have great news for you today! If you’ve been a Slidesgo fan for years (or months, or weeks, or days, or mere hours, we welcome everyone!), you’ll probably know for now that our templates are available mostly in two formats: for use in Google Slides and PowerPoint.Google Slides is a free tool, since you only need a Google account in order to use it. PowerPoint, on the other hand, is part of the Microsoft Office suite, so it’s not a free program, but that didn’t stop it from being one of the most popular options in the world!What if we...

Webinar: Presentation Audit
With more than 15,000 templates released on Slidesgo and a user base composed of millions of people, we estimate that the total number of presentations created adds up to… um, a lot! Our team of professional designers work very hard to provide you with editable slides so that the only thing you need to do is, well, customize the elements to your liking. Starting from any given template, the results may vary a lot depending on the person who edited the contents.Have you ever wondered “Is my presentation good enough?” and wished that an expert on presentations looked at your template...
Home » General » PowerPoint 3D Models: Everything You Need to Know
PowerPoint 3D Models: Everything You Need to Know
PowerPoint 3D Models are a fantastic tool for adding a new level of visual interest and engagement to your presentations.
Whether you’re creating a slideshow for a business presentation, educational lecture, or personal project, these 3D models can help bring your ideas to life in a way that static images simply can’t.
With PowerPoint 3D Models, you can create dynamic animations , showcase complex designs , and captivate your audience with stunning visuals that are sure to make your presentation stand out.
However, before you start using 3D models in your presentations, there are a few things you should know.
Introduction
A 3D model is a three-dimensional object created using specialized software.
These models can be used to represent anything from a simple geometric shape to a complex structure. With the increasing popularity of 3D printing and virtual reality , 3D models are becoming more and more prevalent in various industries.
PowerPoint 3D models allow you to insert these 3D objects directly into your presentations.
This gives you the ability to add a whole new level of interactivity and engagement to your slides.
Whether you’re creating a product demo, educational presentation, or marketing pitch, 3D models can help you communicate your message more effectively.
How to Insert 3d Models in PowerPoint Slide
The 3D model feature is currently available in Microsoft 2019 up to the latest versions . This feature will help you to spice up your presentation and bring your design to the next level. So, let’s dive in!
Firstly, we have a new slide with a blue background for demonstration purposes. Inserting 3D models into your slides is as easy as inserting images or videos. Under the “ Insert ” tab, just select the 3D models.

You have two options here: the “ From Device ” option if you wish to import 3D models directly from your system files, and the “ Stock 3D models ” option so you can browse and insert 3D models from Microsoft’s online library.
For now, we will use the stock 3D models option.
PowerPoint stock 3d models
In the popup window that appears, you can browse or search for 3D models from the catalog .

We can see here different 3D models which are classified into different categories.
There are a variety of 3D models available for PowerPoint, from simple geometric shapes to complex objects .
Some popular models include furniture, clothing, toys, tools and buildings. There are even 3D models of people and animals, allowing you to add a more human touch to your presentation.
The animated 3D models have this animation symbol below them , and the simple and still 3D models without the animation symbol, which you can also animate later using the morph transition .
Now, let’s select a building 3D model.

In case if you want to insert multiple 3D models , simply select them all and click on the “Insert” button .
Once inserted, the thumbnails of your selected 3D models will be marked with an orange check-mark for easy identification.

After inserting a 3D model into your slide, a contextual tab named “ 3D Model ” will appear in the ribbon.
This tab provides various options to customize your model according to your needs. You can modify the model settings, adjust its dimensions, add text overlays, and arrange it within the slide.
Also, you will get a contextual tab on the side tools called “ Format 3d model “. On the format tab, there are some handy controls to help you customize how your 3D images are going to look.
Downloading and Using 3D Models in PowerPoint
There are several ways to obtain PowerPoint 3D models.
You can create your own 3D models using specialized software or hire a professional 3D modeler to create them for you.
However, creating 3D models can be time-consuming and requires a certain level of skill and expertise.
Fortunately, there are several resources available online where you can download 3D models for free or for a fee.
Many websites offer a variety of 3D models in different formats, including OBJ , STL , and 3DS . Some websites even offer an online 3D model viewer , allowing you to preview the model before downloading it.
One of the most popular formats for 3D models is the OBJ file format.
This format is widely used in the 3D modeling industry and is supported by most 3D modeling software. OBJ files can be imported into PowerPoint using a plugin or add-in.
Once you have your 3D model, inserting it into PowerPoint is easy.
Insert Your own 3d Model
Simply click on the “ Insert ” tab, select the downward arrow below “3D Models” to access the dropdown menu and choose “ This device “.

To insert your 3D model, simply select it and click on the “Insert” button.

PowerPoint allows you to insert 3D models in various file formats such as FBX, OBJ, 3MF, and STL.

Now, you can then resize and rotate the 3D model to fit your slide.
If you’re new to using PowerPoint 3D models, there are several online tutorials and resources available to help you get started.
Many websites offer free 3D model templates and tutorials on how to create your own 3D models.
Also read: Blender GPU Rendering: CUDA vs OptiX – The Good and The Bad
Frequently Asked Questions (FAQs)
Where to find 3d models for ppt.
If you don’t want to create your own 3D models, there are plenty of sites that offer 3D models for use in PowerPoint presentations.
Some of the most popular sites include TurboSquid , 3D Warehouse , and Sketchfab . These sites offer a wide variety of 3D models in different file formats, so you’re sure to find something that meets your needs.
Where Can I Get Free 3D Models?
If you’re looking for free 3D models, there are also several sites that offer them.
Some of the most popular free 3D model sites include Free3D , CGTrader , and GrabCAD. Keep in mind that while these sites offer free models, not all of them are royalty-free. Make sure to read the license agreements carefully before using any free 3D models in your PowerPoint presentations.
Which 3D Format is Supported by PowerPoint?
As mentioned earlier, PowerPoint supports several 3D file formats.
These include FBX, OBJ, 3MF, and STL. If you’re not sure which format to use, it’s best to check the documentation for your 3D model to see which format is recommended.
Are PowerPoint 3D Models Royalty Free?
The short answer is that it depends on the source of the 3D models.
If you create your own 3D models or purchase them from a site that offers royalty-free licenses, then you can use them in your PowerPoint presentations without any issues.
However, if you download 3D models from a site that doesn’t offer royalty-free licenses, you may be infringing on someone’s copyright.
How to Import a 3D Model into PowerPoint?
Importing a 3D model into PowerPoint is a straightforward process. (see above images)
First, you need to ensure that the 3D model is saved in a compatible format, such as .obj or .fbx. Then, go to the “Insert” tab and click on down arrow below “3D Models.”
From there, select “This device” and navigate to where the 3D model is saved.
Click on “Insert” to add the 3D model to your PowerPoint slide.
What is the OBJ Format for 3D Models?
The OBJ format is a widely used 3D model format that is compatible with many 3D modeling software programs.
It is an open file format that allows for the exchange of 3D models between different software programs. OBJ files contain information about the geometry, texture, and materials of a 3D model.
Also Read: Maya vs Blender vs Other 3D Software: Theory and Industry Tools
In conclusion, PowerPoint 3D models are a great way to add depth and dimension to your presentations.
Specifically, 3D models can add a new dimension to your PowerPoint presentations, making them more engaging and interactive. With the help of the right resources and tools, you can easily find, create, and import 3D models into your PowerPoint presentations.
So why not give it a try and see how 3D models can enhance your next PowerPoint presentation?
Leave a Comment Cancel reply
Notify me of follow-up comments by email.
Notify me of new posts by email.
Slidesgo.net is an independent website that offers free powerpoint templates and is not part of Freepik/any particular brand. Read the privacy policies
3d Powerpoint templates and Google Slides themes
Discover the best 3d PowerPoint templates and Google Slides themes that you can use in your presentations.
3D Cylindrical Staircase PowerPoint Diagram
3d gear with earth-industry powerpoint templates, 3d pie charts powerpoint diagram template, free 3d divided sphere ppt diagrams, free 3d divided graphic ppt diagrams, 3d pie chart powerpoint diagram template, 3d fedora graphic ppt diagrams, 3d ring bar chart powerpoint diagram, 3d cylinder bar chart powerpoint diagram, 3d pillar bar chart ppt diagram, slidesgo categories.
- Abstract 13 templates
- Agency 15 templates
- All Diagrams 1331 templates
- Brand Guidelines 3 templates
- Business 195 templates
- Computer 66 templates
- Education 97 templates
- Finance 54 templates
- Food 57 templates
- Formal 60 templates
- Fun 6 templates
- Industry 91 templates
- Lesson 67 templates
- Marketing 57 templates
- Marketing Plan 19 templates
- Medical 71 templates
- Military 21 templates
- Nature 119 templates
- Newsletter 5 templates
- Real Estate 46 templates
- Recreation 53 templates
- Religion 30 templates
- School 557 templates
- Simple 5 templates
- Social Media 8 templates
- Sports 46 templates
- Travel 26 templates
- Workshop 4 templates
Slidesgo templates have all the elements you need to effectively communicate your message and impress your audience.
Suitable for PowerPoint and Google Slides
Download your presentation as a PowerPoint template or use it online as a Google Slides theme. 100% free, no registration or download limits.
Want to know more?
- Frequently Asked Questions
- Google Slides Help
- PowerPoint help
- Who makes Slidesgo?
Home PowerPoint Templates 3D Graphics
3D Graphics for PowerPoint
Download 3D Graphics for PowerPoint . This collection of templates provide editable 3D designs for Microsoft PowerPoint.
You can download these 3D templates and edit them in PowerPoint to create eye-catching presentations with attention grabbing 3D layouts. The objects in these templates can be changed right down to the color, shape and size, which provides the flexibility to craft attractive custom 3D slides in a matter of minutes.

Graphic Design Proposal PowerPoint Template

Digital Designer PowerPoint Template

Animated 3D Stairs Diagram PowerPoint Template

Executives Meeting Room Isometric Scene Illustration

Creative 3D Box Diagram Template for PowerPoint

3D Four Steps List PowerPoint Template

3D Cube Concept for PowerPoint

Animated 3D Billboard PowerPoint Template

Animated 3D Bridge PowerPoint Template

Animated 3D Container Models for PowerPoint

Isometric Domino PowerPoint Design

3D 5 Step Segmented Funnel Diagram
Download unlimited content, our annual unlimited plan let you download unlimited content from slidemodel. save hours of manual work and use awesome slide designs in your next presentation..
Watch demo presentations.
ABOUT SLIDE3D
Slide3D, is a web viewer & editor apps, to create web 3D presentations
Key features of our technology:
Run on every web browser.
Goggle Chrome, Microsoft Edge, Apple Safari & more .
Run on every device
Desktops Windows/Mac/Linux, Android tablet/phone, Apple iPad/iPhone & more.
Upload & insert 3D models into your presentations.
Points Of Views
Set POVs to create unique views & focus on interesting point of the 3D models. You can set fly or jump to the POVs
Set text, images & video tags to give information on your models. usually attached to POVs.
Upload your models with animations, to make them become a live.
Popup info pages
Setup an html popup pages to give more detailed data on your 3D models, usually attached to POVs
User Interface
Add UI buttons, texts & images, for more info & control on your 3D models.
We know design.
Lorem ipsum dolor sit amet, consectetur adipiscing elit, sed do eiusmod tempor incididunt ut labore et dolore.
View Our Works

Collection of sample Web 3D presentations

EDITOR GUIDS

- Create by yourself
- Hire a professional 3D artist/designer
- Search the web
- Microsoft 3D Builder
- Microsoft 3D Viewer
- MODEL CONVERTER
Choose a pricing plan that fits your needs.
- 50MB Storage
- Unlimited presentations
- Unlimited traffic
- 250MB Storage
- 1GB Storage
The ones who runs this company

Founder & developer
Experienced Chief Thechnology Officer with a demonstrated history of working in the consumer goods industry. Strong entrepreneurship professional skilled in Software Design, Metal Fabrication, Manufacturing, Management, and Start-ups.
Web Designer
Phasellus eget enim eu lectus faucibus vestibulum. Suspendisse sodales pellentesque elementum.
Lets get in touch. Send us a message:
SEND MESSAGE
Get Creative with 3D PowerPoint Elements! 5 Great Ideas for Your Presentations
You already know that intelligent use of visual elements in PowerPoint presentations is essential. Visual stimuli can provoke emotions, support the content your presentation, and help you achieve your goals.
Microsoft PowerPoint 365 offers you the possibility to include 3D PowerPoint models in your slides. These are a new and fresh way of catching your audience’s eye, completely different to the usual images or animations. We set out below the various 3D options in PowerPoint, and how to incorporate three-dimensional elements into your presentations.
So what are the advantages of using 3D PowerPoint elements?
Three-dimensional elements on your slides:
- provide visual interest
- add variety
- help you avoid boring blocks of text
- add a fresh and modern touch
- can easily be adapted to your needs (highlighting the most important elements, etc.)
What you need to consider when using a 3D PowerPoint element
As visually interesting and varied as 3D models are, keep in mind that they don’t necessarily fit every theme . A poorly designed and thematically inappropriate 3D animation element can do more harm than good to your presentation.
Also, don’t overload your slides with 3D elements . This looks unprofessional. Less is more here.
Another important detail that you should consider, especially with animated 3D objects, is what size they are. These animations take up a lot of megabytes , affecting the overall size of your PowerPoint presentation.
How to insert 3D PowerPoint elements into your presentation
Please note that the following instructions apply only to subscribers to the Microsoft 365 package!
- In the Insert tab, select the 3D models option

2. PowerPoint now gives you the option to insert your own three-dimensional objects with the drop-down selection From file . Alternatively, you can access a wide range of 3D elements by clicking From online sources .
3. We will use the From online sources option here. This selection opens a window which shows 3D elements sorted by theme . You can also search for a keyword using the search bar. Some elements are animated in addition to being 3D. This is shown by an icon of a running man at the bottom left of the category box.

4. Now just click on the three-dimensional element you want, and it will be inserted on your slide. You can select and insert several elements at the same time.
How to use and edit animated 3D PowerPoint elements
If you have chosen an animated 3D object, the animation will run directly on the slide without you needing to do anything . You can stop it by clicking on the animation. A frame will appear around the element; just press the Start/Stop icon at the bottom left.

To edit the animation, click on the object and the 3D model tab will open. This gives you various editing options:
- Scenes : this allows your animated three-dimensional object to play out in up to eighteen different ways!

- Click on the scene that you prefer. You can choose to play several scenes if you want: just switch to the Animations tab and click Add animation .

- You can also edit your animation by clicking on the drop-down menu at Animations . For example, you can let it rotate ( Turntable ) or fade in ( Fade ). There are loads of brilliant options to choose from.

- Effect Options allows you to specify how often your animation should be played. Under Display Duration , you can specify the exact playback time .

- Clicking on Animation Area under Advanced Animation opens a window to the right of the screen. This gives an overview of all the animations used on your slide and the option to choose more detailed settings.

- Back in the 3D Model tab, you can choose the perspective from which you want to show the element under 3D Model Views .
- You can also change the size and orientation of your element here.
- If you don’t like your edited 3D PowerPoint model, just click on Reset 3D model .
Editing your 3D PowerPoint object further
To continue editing and personalizing your 3D element, right-click on it and select Format 3D model . An editing menu will now open on the right of the screen.
- To reposition or resize your 3D object, click on 3D element . The control panel will appears in the center. Select it by left-clicking and holding. Then tilt or rotate the model as you wish. To change size and position, use the image handles to zoom in/out, or the frame to move it.

- To rotate your 3D object, select the pentagon (the second element from the left) then click on 3D rotation . You can use the preset options, or rotate the object via the X, Y or Z axes.
- To colorize a 3D object, click on the color bucket (the leftmost icon). Under Fill , select Monochrome fill .The Color button opens a selection of colors for you to choose from.

- To colorize 3D object with gradated color: once you’ve selected the color bucket icon and Fill , select Gradient . Various options for setting the gradient you want are available to you here.
- To insert an image into a 3D object: use the color bucket icon and Fill to get to the Picture or texture fill option. Select File to locate the image you want to insert, and then just click Insert .
- To add shadow to a 3D object: select the pentagon icon (second from the left), then click Shadow . Using the sliders, you can add exactly the shadow you want.

- To adjust the lighting of your 3D object: Select the cube icon (on the far right). Now just select the lighting conditions you want under Preferences .

- Microsoft PowerPoint offers a great range of further editing options. Try it out and customize your 3D PowerPoint element exactly as you wish!
5 great ideas for using 3D PowerPoint elements in your presentation
If you want create your 3D slide content yourself, PowerPoint’s 3D option offers a wide range of possibilities. If not, PresentationLoad has put together professionally designed slide templates covering various business topics . Here are five fantastic ideas!
- Data-driven visualizations / charts:
Catch your audience’s eye by presenting your data in three-dimensional diagrams . Even dry facts and figures look more interesting in a 3D model.
Here are the slide templates we’ve designed for you to download:

- Geometric shapes:
Give the geometric shapes you use more impact by adding another dimension – show shapes like spheres, triangles, or pyramids in three dimensions for a change !
We have great 3D slide templates for you to download:

- Global maps:
Global maps are absolutely brilliant if, for example, you want to show company locations or customers in different parts of the world. Our three-dimensional visualizations will add even more oomph to your presentations! We have these templates for you to download:

- 3D images :
You probably already include images in your presentations, knowing that pictures can provoke emotions and let your audience better understand your subject matter . Pictures often say more than a thousand words, and this is boosted when you use animated images.
Here’s a handy template for you to download:

- Further ideas :
3D PowerPoint models allow you to use lots of great visualization options for your slides. Feel free to have a look around our store – we have many other 3D templates for you to download and use! ► To the Shop
To sum up: 3D PowerPoint models can provide great visual support for your presentatinons
To make your next presentation even more visually interesting and varied, think about incorporating 3D elements to support it. Whether you want just an individual 3D object or complete slide content, such as 3D diagrams, a 3D model is always an eye-catcher !
3D elements are strong stuff, though – use them sparingly, being careful not to overload your slides . Only use the size of three-dimensional element you need for impact. Then nothing will stand in the way of your next presentation!
Still have questions about 3D PowerPoint elements, or indeed PowerPoint in general? Feel free to email us at [email protected] . We’re always happy to help! Want to use professionally designed, ready-made 3D templates, rather than creating your own? You’re in the right place – have a look around our store , where we have a range of 3D templates suitable for a wide variety of business topics. Take a look today! ► To the Shop
You might also be interested in the following articles:
- PowerPoint SmartArt
- PowerPoint timeline
- PowerPoint Icons
- PowerPoint Arrows
- Flip PowerPoint Images
Share this post
- share
- save

Design Thinking: Problem Solving with a Difference

Why Corporate Mission Statements Are So Important

7 Tips & Learnings from the Apple Keynote

3D animation effects in PowerPoint
You can add animation effects to 3D graphics:
Arrive or Leave
Turntable and Swing
Jump & Turn

Duration: 58 seconds
For detailed instructions about using animation effects, see Animate text or objects .
|
| This is a subscriber-only, Microsoft 365 feature. See below for more details. |
Insert and position a 3D model as described in Get creative with 3D models .
On the Animations tab of the ribbon, select one of the 3D animation effects.
Select the animation effect you want.
On the ribbon, select Effect Options to open the menu. You can choose properties related to the Direction , Intensity , and Rotation Axis of movement.
To see the effect in action, select Preview on the ribbon.
Requirements for 3D animation effects
|
| This is a subscriber-only, feature. |
|
| PowerPoint for Microsoft 365: Version 1712 or later Version 1803 or later Version 1803 or later |
|
| This feature works on Windows tablets. See below for more details. |
On the Animations tab of the ribbon, select one of the categories of effects, such as Emphasis Effects .
The available 3D animations are at the top of the list.
On the ribbon, select Effect Options Property to open the menu. You can choose properties related to the Direction , Intensity , and Rotation Axis of movement.
To see the effect in action, switch to the Slide Show tab of the ribbon and select From Current Slide .
|
| This feature works on Windows tablets. |
|
| PowerPoint Mobile: Version 17.9226.20751 or later |
PowerPoint for the web supports several kinds of animation effects, including effects applied to SmartArt graphics. However, PowerPoint for the web doesn't support the insertion of 3D animation effects. It can play a 3D animation that has been created in another version of PowerPoint, but it can't be used to create the 3D animation itself.
Requirements for playback of 3D animation effects
|
| This is a subscriber-only feature for business users. |
|
| PowerPoint for the web files stored on OneDrive for work or school or SharePoint in Microsoft 365 |
|
| Microsoft Edge, Chrome, and Firefox are supported Internet Explorer isn't supported |
Get creative with 3D models

Need more help?
Want more options.
Explore subscription benefits, browse training courses, learn how to secure your device, and more.

Microsoft 365 subscription benefits

Microsoft 365 training

Microsoft security

Accessibility center
Communities help you ask and answer questions, give feedback, and hear from experts with rich knowledge.

Ask the Microsoft Community

Microsoft Tech Community

Windows Insiders
Microsoft 365 Insiders
Was this information helpful?
Thank you for your feedback.
We’re sorry, but Freepik doesn’t work properly without JavaScript enabled. FAQ Contact
AI-generated image
From your imagination to a tangible image in just a few words
From social media posts or prints to any other layouts, and everything in between
See your designs in action on apparel, packaging or prints
- Notifications
- Go back Remove
- No notifications to show yet You’ll see useful information here soon. Stay tuned!
- Downloads 0/60 What is this?
- My collections
- My subscription
Powerpoint 3d Images

- Add to collection
- Save to Pinterest
- 3d presentation
- 3d business
- graphic template
- design shape

- business chart

- 3d education

- 3d illustrations
- 3d character

- business presentation
- corporate presentation

- data infographic
- infographic

- art template
- creative design

- marketing presentation
- company presentation
- 3d marketing
- isometric landing page
- content page
- business landing page

- presentation

- business website

- marketing technology

- Technology banner
- cover report
- cover layout
- report template
- business data

- cover youtube
- gradient template
- creative template

- business graphic

- landing page template

- landing page

- 3d computer
- data management
- seo services

- arrow target

- creative graphics
- business graph

- information technology
- computer technology
- informative

- education website

- infographic presentation
- 3 infographic

- animated banner
- banner sale

IMAGES
VIDEO
COMMENTS
Download the 3D Shapes Cut-outs presentation for PowerPoint or Google Slides and easily edit it to fit your own lesson plan! Designed specifically for elementary school education, this eye-catching design features engaging graphics, and age-appropriate fonts; elements that capture the students' attention and make the learning experience more ...
Take your presentations to the next level with these 3D PowerPoint templates. Whether you're a business professional, a student, or a teacher, these templates will help you create an eye-catching presentation. With a range of customizable slides, you can easily manage your meetings and workshops, and make learning dynamic and attractive.
Step #2. Add a Border to Your Picture. Select the original picture in the center of your slide and from the Picture Tools Format tab select the Simple White Frame on the far left of the picture styles to make the image look more like a photo. Step #3. Crop Your Picture into the Shape of a Trapezoid.
The latest versions of PowerPoint (PowerPoint 2019 or the Office / Microsoft 365) give some neat 3D model images for you to use. They're visually appealing ...
On the Insert tab of the ribbon select 3D Models and then From a File. Once it's inserted you can use the controls to manipulate the image: Use the 3D control to rotate or tilt your 3D model in any direction. Just click, hold and drag with your mouse. Drag the image handles in or out to make your image larger or smaller.
Whether you're creating a presentation in Microsoft PowerPoint or building a catalog in Excel, 3D makes your work stand out. It's built-in to the Office apps...
Inserting a saved 3D model into your Slide. 3. Open your PowerPoint presentation and click the Insert tab from the ribbon. Select the down arrow and choose This Device…. Selecting a 3D file from our Device. 4. Select the .OBJ version of the 3D file and click Insert. Importing an .obj file to insert. 5.
In this video I show you how to use 3D Models in PowerPoint to make a creative presentation!We'll use the Morph Transition to create a show-stopping animatio...
Step 2: Create your 3D cube. Here comes the exciting bit. Once you've installed the 3D Builder, open it. On the welcome screen, click on New Scene. Once the scene is created, go to the top-left and click on Insert > Cube. Congratulations! You now have a 3D model of a cube.
Insert a 3D Model in PowerPoint. Open your presentation in PowerPoint and head to the slide where you want to add the model. Go to the Insert tab and click the drop-down arrow for 3D Models in the Illustrations section of the ribbon. Related: How to Draw and Edit a Freeform Shape in Microsoft PowerPoint. Choose either "This Device" to upload ...
Find & Download Free Graphic Resources for 3d Presentation. 1,750,000+ Vectors, Stock Photos & PSD files. Free for commercial use High Quality Images
Click in the upper left corner on Menu > Save As > 3D Model. Select the folder where we are going to save it and give it a file name. Now we open PowerPoint to insert the 3D resource into the presentation. Click on Insert > 3D Models > Insert 3D Model From > This device > Choose the folder where the 3D model we created is and insert it.
To create a 3D effect in PowerPoint, follow these general steps: Launch Microsoft PowerPoint and open your Presentation or create a new one. To add 3D Models - Go to the slide where you want to add a 3D effect. Click on the "Insert" tab in the PowerPoint ribbon. Select "3D Models" and insert a 3D model from your local files or the ...
PowerPoint 3D Models are a fantastic tool for adding a new level of visual interest and engagement to your presentations.. Whether you're creating a slideshow for a business presentation, educational lecture, or personal project, these 3D models can help bring your ideas to life in a way that static images simply can't.. With PowerPoint 3D Models, you can create dynamic animations ...
46 templates. Travel. 26 templates. Workshop. 4 templates. 3d Powerpoint templates and Google Slides themes -Slidego.
Download 3D Graphics for PowerPoint. This collection of templates provide editable 3D designs for Microsoft PowerPoint. This collection of templates provide editable 3D designs for Microsoft PowerPoint.
Today, you will learn how to add 3D models in your presentation and use the morph transition to animate these unique 3D stock models from Microsoft PowerPoin...
Upload 3D models, add tags, images, movies & info pages to creates 3D slides. presentations & lectures then publish it to your audience or embed it in your web site. ... is a web viewer & editor apps, to create web 3D presentations. Key features of our technology: Run on every web browser. Goggle Chrome, Microsoft Edge, Apple Safari & more ...
Select File to locate the image you want to insert, and then just click Insert. To add shadow to a 3D object: select the pentagon icon (second from the left), then click Shadow. Using the sliders, you can add exactly the shadow you want. To adjust the lighting of your 3D object: Select the cube icon (on the far right).
Read more about becoming an Office Insider here. To insert a 3D model, choose Insert, 3D Models, From a File and navigate to the 3D model you created. Select it and click Open. Here are the formats that PowerPoint accepts: 3D Manufacturing Format: 3MF. Filmbox Format: FBX.
3D Monthly Saving Plan Slides Modern Animated Data Science Slides ... Millions of professionally designed images and photos; ... Download your presentation as a PowerPoint template or use it online as a Google Slides theme. 100% free, no registration or download limits.
On the Animations tab of the ribbon, select one of the 3D animation effects. Select the animation effect you want. On the ribbon, select Effect Options to open the menu. You can choose properties related to the Direction, Intensity, and Rotation Axis of movement. To see the effect in action, select Preview on the ribbon.
Powerpoint 3d Images. Images 21.33k Collections 2. ADS. ADS. ADS. Page 1 of 100. Find & Download Free Graphic Resources for Powerpoint 3d. 21,000+ Vectors, Stock Photos & PSD files. Free for commercial use High Quality Images.
Create 3D Image in PowerpointWant to learn how to create a 3D image in Microsoft office powerpoint. its easy to do and gives a great 3D effect to your photos...
Premium Canva presentation template. Take your business strategy to the next level with our sleek, purple-themed Framework Business Plan template. Perfect for business professionals looking to impress stakeholders, this 3D, abstract slideshow template is designed to clearly convey your business ideas and goals.