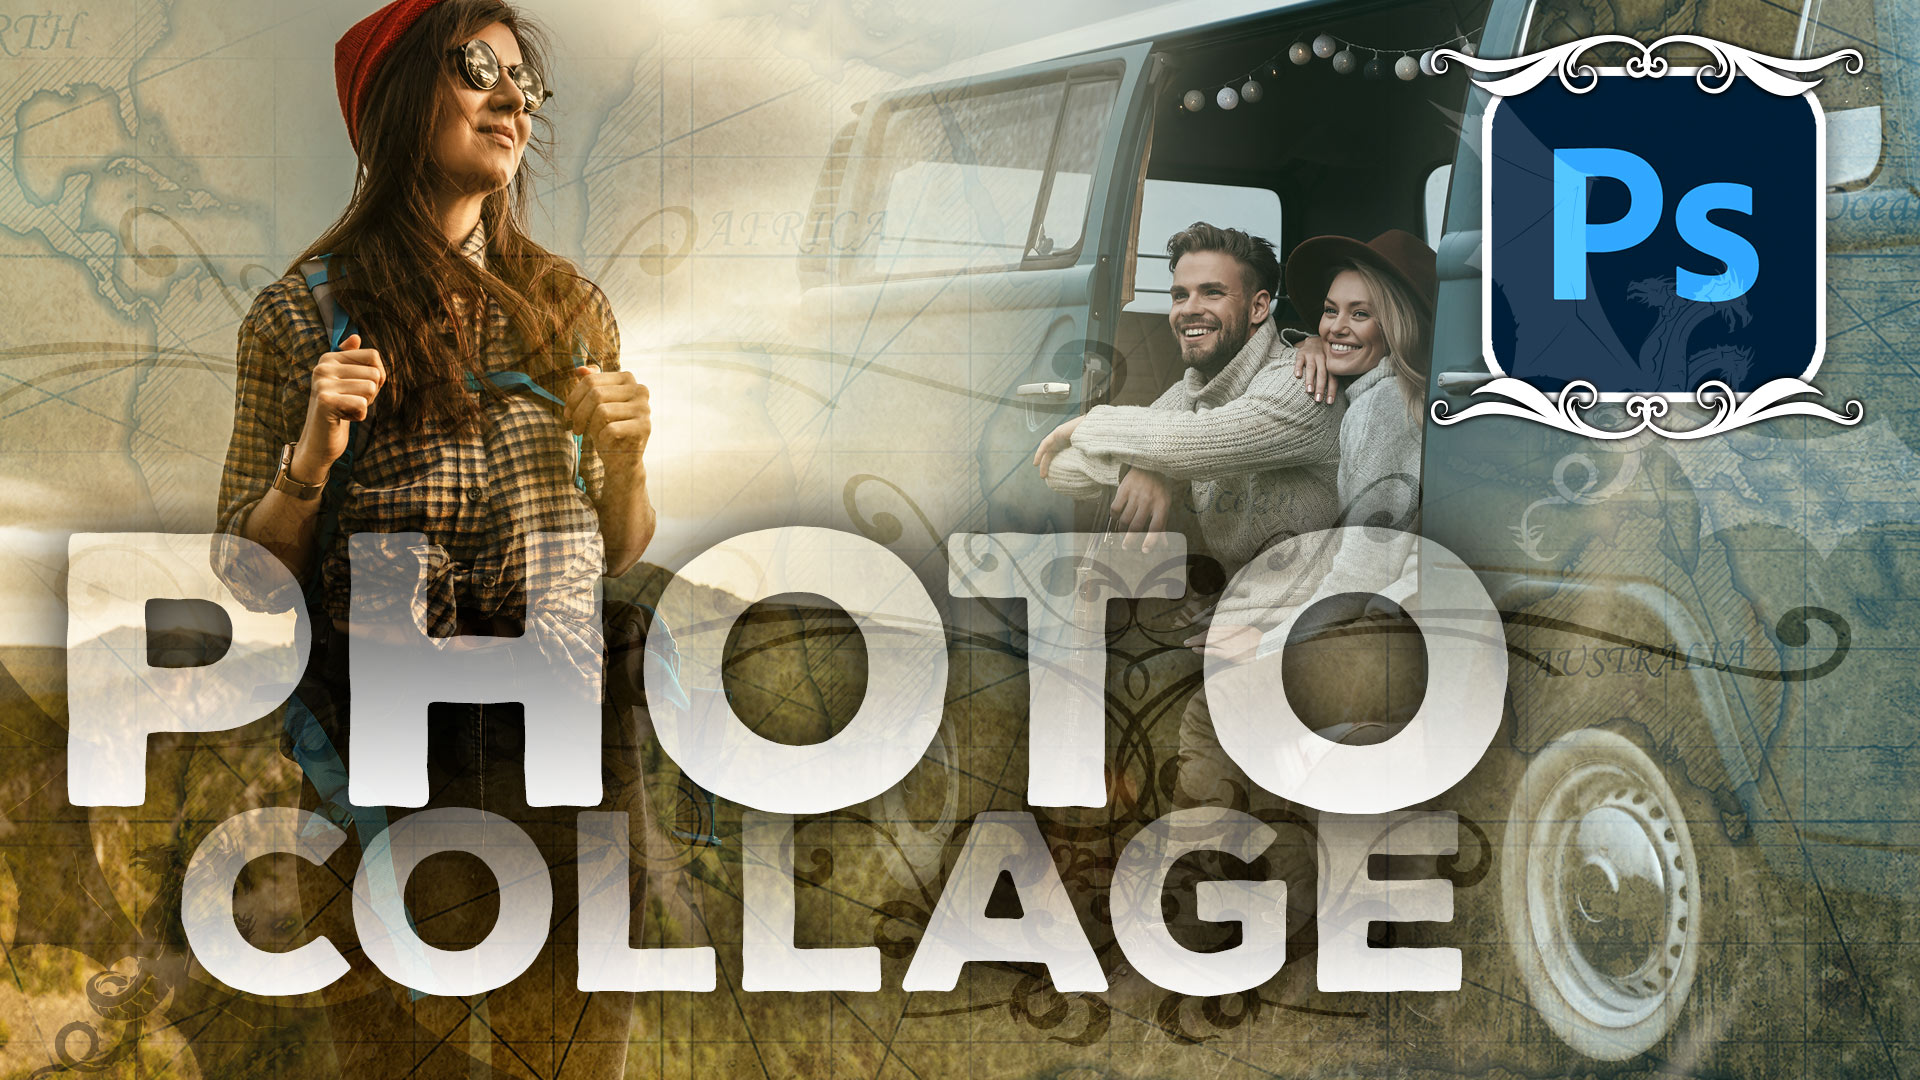
How to Make a Collage in Photoshop (9 Easy Steps!)
A Post By: Natalia Robert

Looking to make a collage in Photoshop ? I’m so glad you’re here – collage is a wonderful realm that offers unlimited creative freedom, and you’re about to discover how simple and rewarding it can be to combine your favorite photographs into one stunning piece of art.
In fact, I remember when I first got started with Photoshop collages. It was a revelation! Here was a way to bring together my favorite images in a single frame. (So trust me: once you start, you won’t be able to stop!)
Below, I share the exact method I use to create my own Photoshop collages. You’ll find it’s incredibly straightforward. And the best part? You don’t need to be a Photoshop expert to get started. Simply follow my instructions carefully, and you’ll end up with a result that looks like this:


Why are Photoshop collages so great?
Before we delve into the step-by-step collage-making process, I’d like to explain why you’d want to create a collage in the first place.
For one, collages are incredibly versatile. You can use them to make just about any visual display look better Want to make your social media profile pop? A colorful collage could be your new Facebook header. I frequently use collages to give my own Facebook profile a personal touch.
But collages aren’t just about looks. They can also tell a story in a way that a single photo can’t. Think of a collage as a visual narrative that conveys a theme or captures a special moment. The best ones convey a message or create a real emotional impact.
Relatedly, think about special occasions – and how collages can do a great job of telling the story of an event. How perfect would a collage be for a wedding album? Imagine compiling the best moments from the big day into a single, awe-inspiring frame. Collages also make fantastic holiday gifts and cards. Picture your favorite memories from the year, printed and framed, gracing the walls of your family and friends.
Plus, as I emphasized above, making a collage in Photoshop is fast and easy. There’s no need to spend hours fussing with complicated settings. You can craft something beautiful in a short amount of time.
How to make a Photoshop collage: the step-by-step process
In this section, I take you through each step I use to create my collages – and I share clear examples along the way. It’s an easy process, I promise!
Step 1: Choose your collage photos
Before you actually create the collage, you’ll need to pick your collage photos – and you’ll need to do this carefully.
I recommend selecting images connected by a theme (such as a location, an event, or even a concept). Include a mix of subjects at different scales; for instance, pick some wide shots that show the entire scene, as well as some detail photos that show lots of texture and personality. Without one or the other, the story won’t be complete. And it won’t carry the level of emotion that you’re after.
Speaking of storytelling : It often does help to focus on the story you’re trying to tell. Do you want to offer a narrative surrounding an event? Do you want to clearly convey a meaningful concept? Make sure to take this into account when picking photos!
One more tip: If possible, include at least three photos and no more than eight. Too few photos, and you won’t be able to tell the full story. Too many photos, and you’ll confuse the viewer with clutter (plus, it’ll be tough to show off individual details).
Step 2: Open the selected images in Photoshop
Once you’ve picked your photos, open them all in Photoshop.
To do this, you can drag and drop files directly onto the document window, or you can select File>Open and click on the relevant images.

You should see the photos as separate tabs in the document window, like this:

Step 3: Create a new file for your Photoshop collage
Every Photoshop collage needs a background file where all the images will eventually be assembled.
While you can use an old collage template, if you’re making your first-ever collage, you’ll need to create a new document.
So select File>New in the Menu bar (or tap Ctrl/Cmd+N ):

A New Document window should pop up, and you’ll need to dial in your file preferences.

The specifics will depend on what you plan to do with the collage as well as the sizes of your chosen photos. If you’re working with big JPEGs and you aim to print, you should probably pick a 5000+ pixel width and height. If you want to display your collage on a standard web page, however, a 1500 pixel width and height will do just fine (though you can always start big and resize later, as discussed in Step 8 below).
(I do recommend you make the file size a bit larger than the size you want in the end; that way, you can do a final crop to deal with any arrangement issues.)
Step 3: Add your images one at a time
Head to your first open photo, then select it.
To do this, you can drag with the Marquee tool :

Or you can hit Ctrl/Cmd+A . You should see the marching ants appear around the border of your image:

Then choose Edit>Copy (or tap Ctrl/Cmd+C ):

Finally, head over to the new document, then choose Edit>Paste (or tap Ctrl/Cmd+V ):

This will add the photo to the blank document but on its own layer .
Depending on the size and resolution of the new image, you may need to make some adjustments with Edit>Free Transform (or Ctrl/Cmd+T ). For instance, my first photo was way too large:

So I used the Free Transform option to scale it down:

(Once you’ve activated Free Transform, simply drag the edge nodes until you get the result you’re after. You want an image that’s small enough to be comfortably moved around the canvas.)
Then repeat the above instructions for all the remaining collage photos.
Step 4: Arrange your photos
After you’ve added all the collage photos to your document, it’s time to do some arranging. This is where you shift the photos around until they tell your story.
After doing several collages, you’ll start to discover your preferred style; personally, I like to create symmetrical layouts as well as interlocking puzzles. But each story does have slightly different needs, so don’t be afraid to experiment!
To adjust the photo positions, you can select the Move tool (or tap V ):

Then drag around all the images until you get a good result. If you want to resize any photos, use the Free Transform option discussed above.
With my pet collage example, I first tried a more symmetrical arrangement:

But I settled on a puzzle-type composition:

Step 5: Add image spacing
Once you’ve determined the layout and you’ve sized all the images, I recommend giving the design some space in the form of a nice border. It’s a personal preference, I know, but the effect is generally nice.
In other words, instead of a collage like this:

I recommend creating one like this:

It’s pretty easy to do; you simply add a thin, white border between the images. You can select each photo, then use the mouse or arrow keys to drag until you see white space. Or you can double-click on each image in the Layers panel:

This will open the Layer Style menu, where you can select the Stroke option:

Make sure the Position is set to Inside , the Blend Mode is set to Normal , and the color is set to White :

Then increase the Size until you see a nice border appearing around your images.

Unfortunately, this will crop the images somewhat – but depending on the look you like, it might be worth it. (Also note that you’ll need to independently add a border to each image, not just one.)
Step 6: Merge all layers
At this point, you should have your collage laid out with perfect photo spacing, which means you’re ready to merge all the layers.
Simply select Layer>Merge Visible (or tap Ctrl/Cmd+Shift+E ):

And the layers will merge into a single beautiful Photoshop collage!
Step 7: Crop the final image
Before you resize and export your collage, I recommend cropping any extra white space around the edges (you want the design to look even).
Just hit C or select the Crop tool :

Then drag at the edges of the photo to get rid of any unwanted areas:

Step 8: Resize
This step depends on your goals for the collage. If you want to print, you’ll need to resize based on printing requirements (which will generally involve leaving the image pretty large). If you want to post your collage on Facebook, Instagram, or Pinterest, however, consider sizing down to a maximum of 1500 pixels on the long end.
So select Image>Image Size (or tap Alt/Opt+Ctrl/Cmd+I ):

Then dial in your preferred width and height.
Step 9: Save and export your collage
Last but not least:
Save and export!
You’ll want to select File>Save a Copy . Then choose a location and file name, make sure that Save as type is set to JPEG , and hit Save .
And select your preferred image quality (I usually go for around 8 ):

And you’re done! Photoshop will save your collage in the specified location.
Ideas for fun Photoshop collages
If you’re excited about making a collage but need a bit of inspiration, don’t worry. Here’s a list of collage ideas to get your creative juices flowing.
Let’s start with your pets. From dogs and cats to birds and fish, a pet collage can capture all the adorable moments you’ve shared. Not only will it make you smile, but it’s also a wonderful way to showcase your furry or feathery friends.
Next up, how about a collage featuring your children? Whether it’s their first steps, birthdays, or just everyday moments, combining these memories makes for an emotionally impactful piece. You can even make it an annual tradition, showcasing a snapshot – literally! – of how your kids grow and change.
What about a collage of you and your friends? This could be a beautiful holiday gift or a keepsake to remember good times. Think of concerts you’ve attended, trips you’ve taken, or the times you’ve simply hung out. Compile these into a collage, and I guarantee that you’ll love the result.
And let’s not forget romantic collages. Capture your relationship’s highlights with your partner or spouse. From first dates to vacations and cozy moments at home, a love-filled collage can make a sentimental gift for anniversaries or just because.
Lastly, let’s talk about thematic collages. How about one of your favorite landscapes, wildlife, or travel images? These collages can transport you to different times and places while serving as a visual diary of your passions and adventures.
How to make a Photoshop collage: final words

From the many reasons to create a collage to some inspiring ideas to get you started, you now have the tools to make your own visually captivating piece. So what are you waiting for? Collages offer a fun, effective, and surprisingly easy way to display multiple photos in a single, eye-catching format.
Don’t be daunted by the possibilities or the technical elements. Once you dive in, you’ll have tons of fun – and creating collages may become a big part of your photography toolkit!
So go ahead and give it a try. And when you do, don’t forget to share your creations. You never know who you might inspire.
Now over to you:
Have you made any collages previously? Have any additional tips? Please share your advice (and collage photos!) in the comments below.

Read more from our Post Production category

, founder and lead photographer of Full Circle Images , brings her background as an architectural designer forward to produce luxurious images that create a sense of warmth and culture. Natalia is based in San Diego, California, USA. She has had the honor of shooting with AirBnB for 3 years and counting, as well as with various publications, TEDxSanDiego, and countless small businesses to convey stories through strong imagery. Today, her furry co-pilot, Daisy, inspires a daily sense of wanderlust while serving as a reminder of how valuable it is to maintain a sense of HOME.
- Guaranteed for 2 full months
- Pay by PayPal or Credit Card
- Instant Digital Download

- All our best articles for the week
- Fun photographic challenges
- Special offers and discounts

Photoshop » Design » How To Make A Collage In Photoshop (Step By Step)
How to make a collage in photoshop (step by step).

There are endless ways to display photographs, whether you share them online or print them for your walls at home. A great way to portray multiple photos is in a collage, where you place similar photos together on one image. The best thing about this is that you can make a collage in Photoshop using simple techniques.
There are multiple ways to organize and customize your collage by adding text, a pop of color, or background shapes and patterns. In this tutorial, I will give you the basic techniques to set up a simple collage. Then, you can take these steps, along with other Photoshop techniques , to further customize your own eye-catching collage.
Table of Contents
How To Make A Collage In Photoshop
Follow these steps to create a stunning collage in Photoshop in minutes. I recommend you use this tutorial as a guide and for inspiration, but always add your own flair and creativity to take your designs to the next level.
Now to make this process even faster, I created five free collage templates for Photoshop here as an alternate option to these steps.
Step 1: Select A Set Of Images
Before designing your collage, select the right set of images to use. Collages work best when all the images have similar colors or shapes. The photos need to make sense together, rather than choosing your favorite pictures and throwing them together.
You should also select more images than you need, so you can change a few around if they don’t end up working together on the page. However, you shouldn’t select too many images that confuse you and make you struggle to choose which ones to use while designing.
I recommend choosing about two to four extra photos as backups.
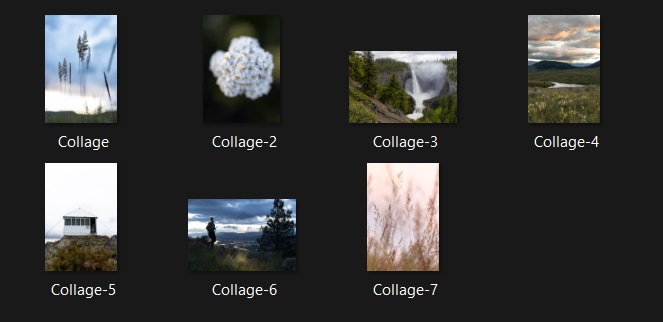
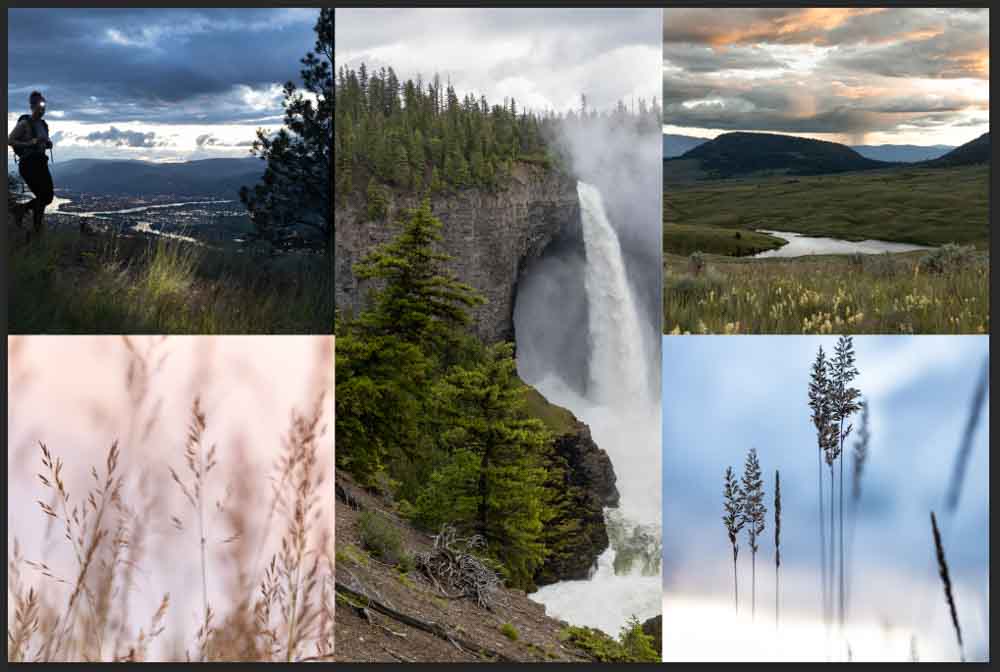
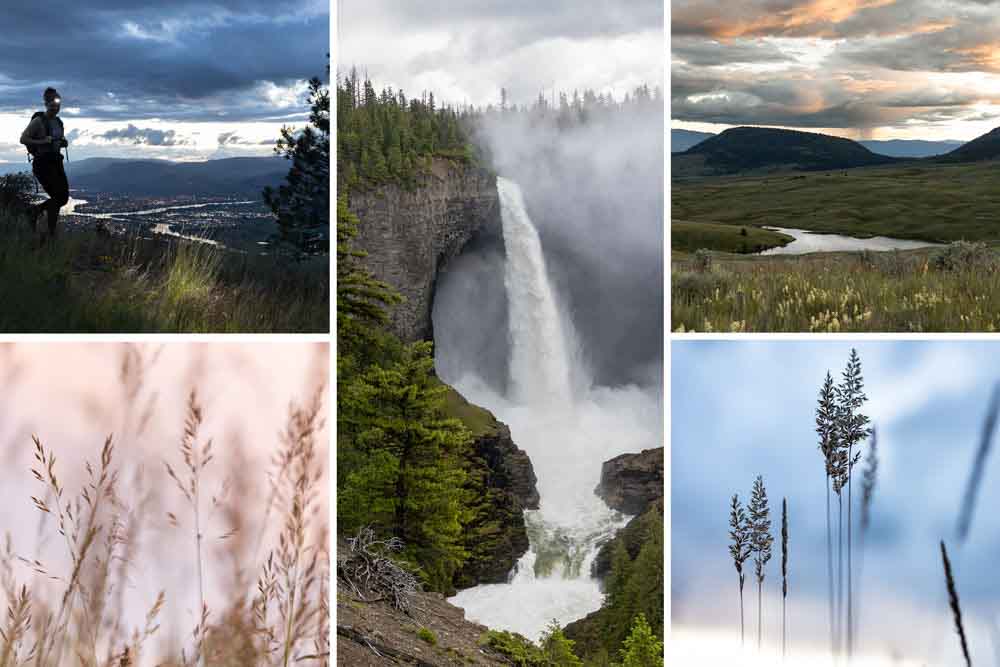
Here are the seven photos I’ve selected for my collage. You can see they all follow the same nature theme and have similar colors, lines, and shapes.
Step 2: Set Up A New Document In Photoshop
To start your collage, you need to create a document of the correct size. The size of your document depends on where you plan to use the collage. You can create a collage to use on a website, social media , or to print and frame in your home.
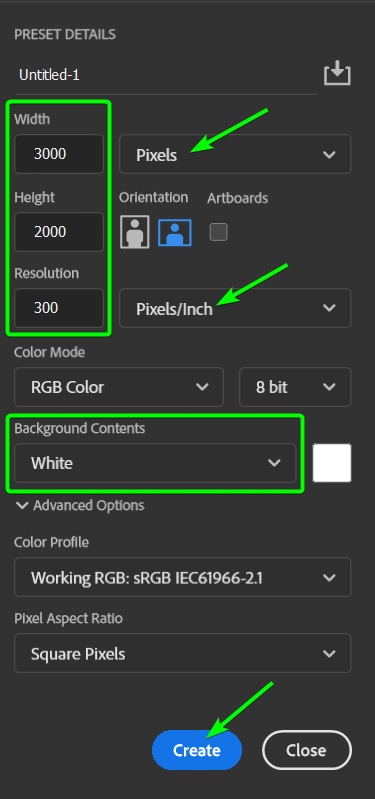
If you aren’t sure which size to use, I recommend starting with a canvas of 3000 x 2000 pixels and a PPI of 300 .
This large size allows you to rescale the collage to smaller sizes as needed. It’s challenging to upsize a collage while keeping the same quality you started with, but much easier to reduce the size.
However, if you know the size you are printing at, you can follow the standard photo sizes guide to determine how many pixels or inches to set the document.
Start by creating a new file in Photoshop by clicking the New File button or using the shortcut Control + N (Win) or Command + N (Mac) .
In the panel on the right, add in your width and height amount, changing the unit of measurement if needed. Then add the resolution amount, ensuring the unit is set to pixels/inch.
I have set mine to 3000 x 2000 pixels at 300 PPI . You can set the background to white and click Create .
Step 3: Add Frames To The Canvas With The Frame Tool
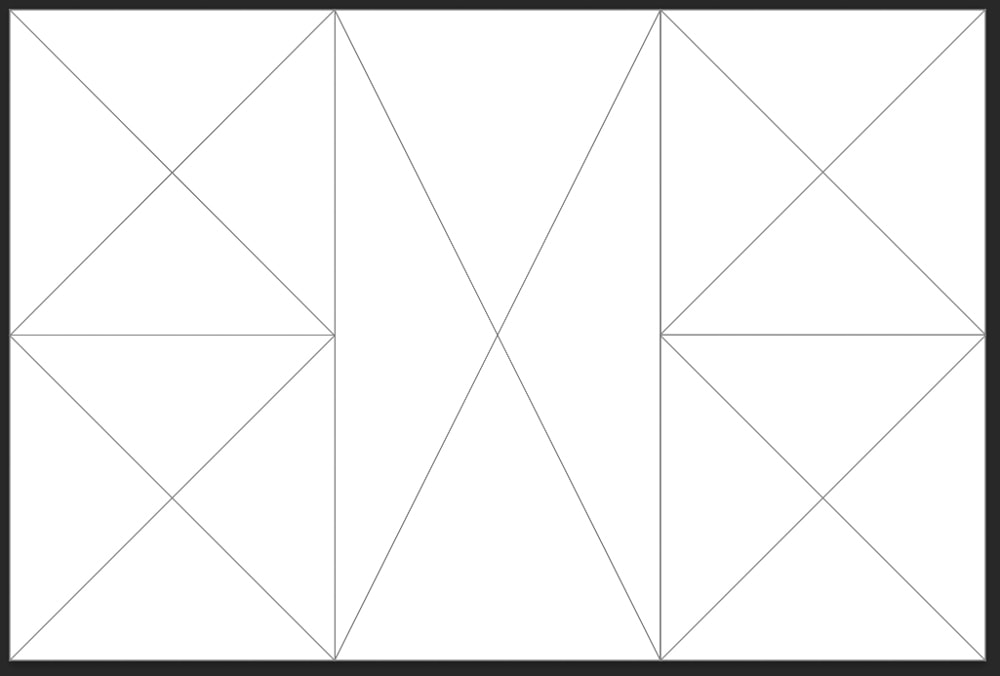
Now, you can start designing the collage by adding frames to the canvas. These frames will determine where the images will be placed, so you can try out a few different arrangements before adding the photos.
Select the Frame Tool from the Toolbar or press K .

Then, in the Options bar , you can choose to add a rectangle/square or oval/circle-shaped frame to the canvas.
Once you have selected the frame shape, click and drag to add a frame to the canvas. Hold in Shift while creating the frame if you want to add a perfect Circle or Square frame to the canvas. You can use the pink smart guides to line up your collage if you need.

Continue adding more frames to the canvas until you have as many as you need, using the guides to help you line everything up. When you are finished, you should have multiple frames with diagonal lines inside them, indicating that you can place an image inside each one.
If you want to change the size or positioning of any frame, you can click on it while the frame tool is still active.
The selected frame will have blue lines around it with anchor points. Click inside the frame and drag to reposition the frame.
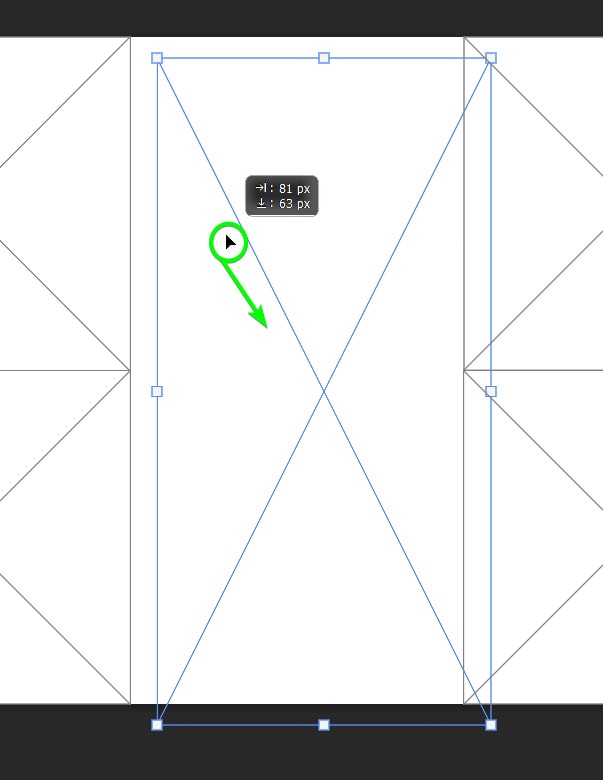
You can also click on an anchor point when the cursor turns to a double arrow and drag to resize the frame.
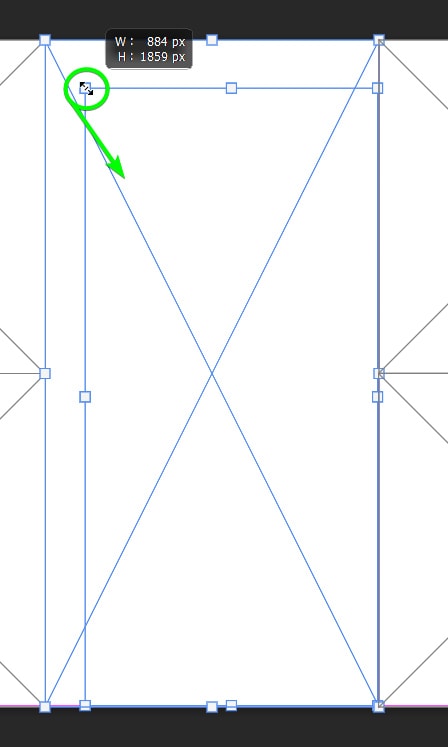
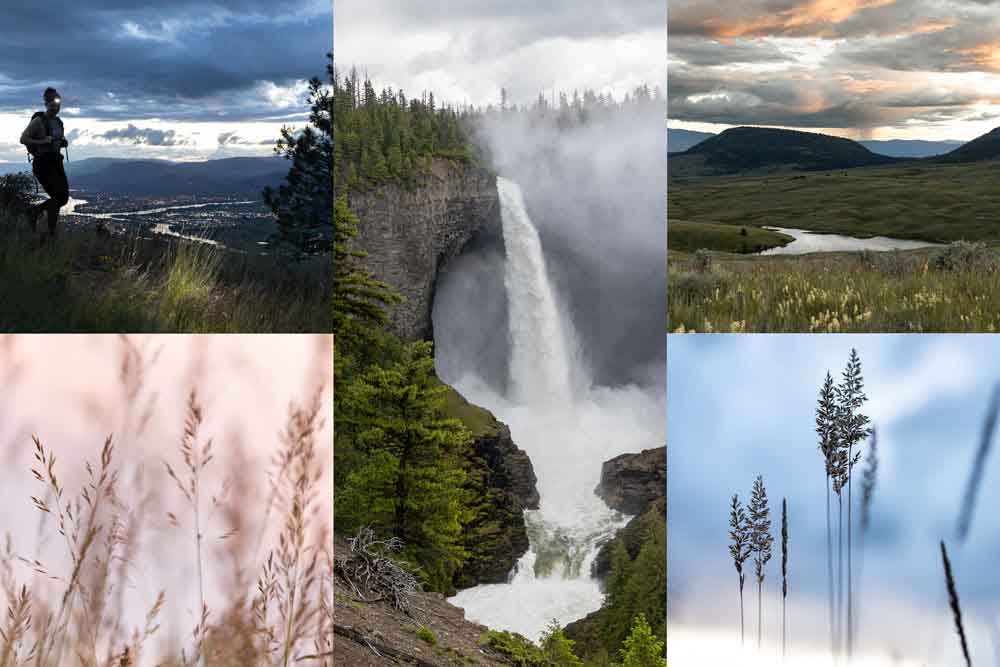
I have kept my layout to five frames, with four square frames on the side and one rectangle frame in the center for my hero shot.

Step 4: Drag And Drop The Photos Into The Frames
Adding your images to the frames is simple. You can simply drag and drop the photos into the frames, or if you prefer not to, you can use the menu path.
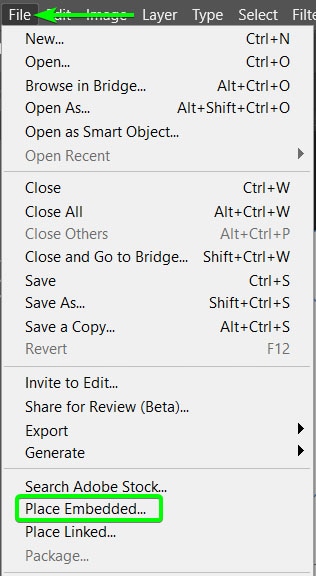
To use the menu path, select a frame by clicking on it, then go to File > Place Embedded .
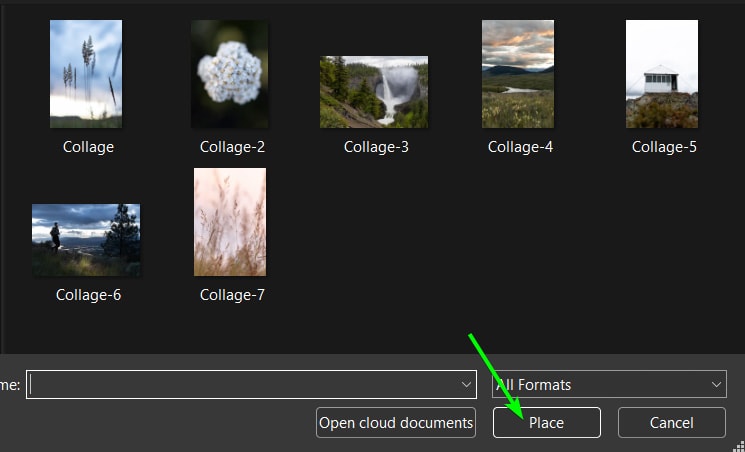
Then search for the photo on your computer and click Place .
However, a much easier way to add the photos is to open your file Finder or Explorer and locate the images. Then keeping the photo window open over Photoshop, drag and drop each picture onto the frame to which you want to add it.
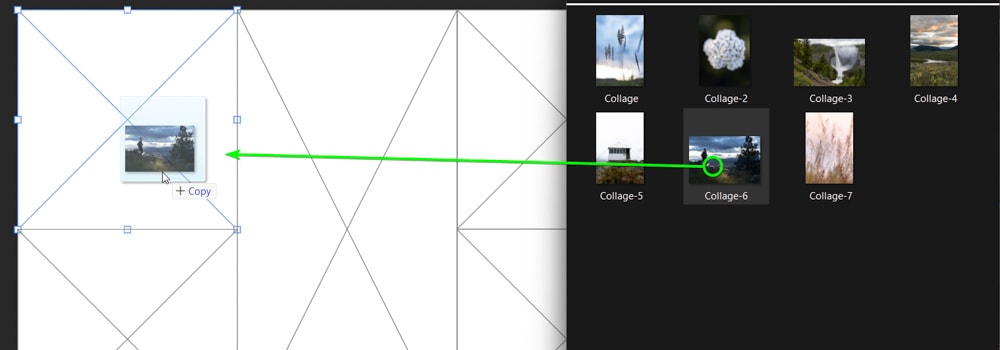
Continue dragging and dropping the pictures until you have filled all the frames. Don’t worry if a photo isn’t placed correctly in the frame; we will fix this in the next step.
Step 5: Resize Or Move The Images
Once the images are added to the frames, you can move or resize any photos to change the composition.
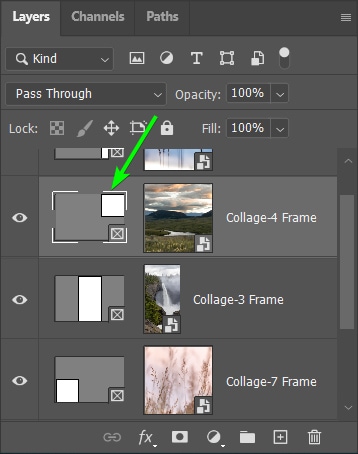
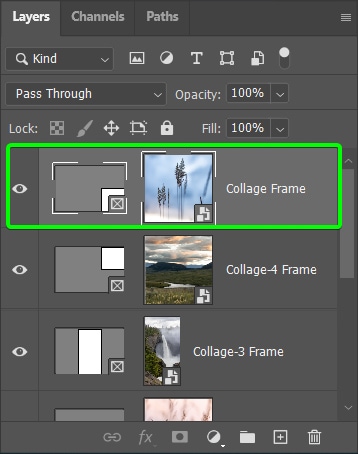
In the Layers panel , you will notice that each frame you’ve added has a frame thumbnail and an image thumbnail. Select the thumbnail containing the picture to move the photo within the frame. When a thumbnail is selected, it’s indicated by a white border around the thumbnail.
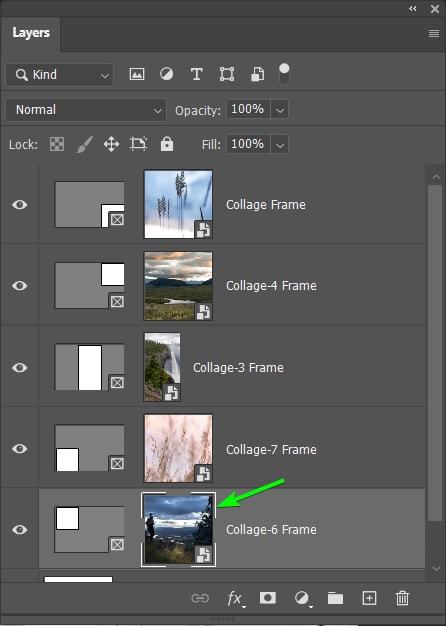
When you have selected the image, you will notice a blue frame around the actual photo on the canvas, which extends beyond the frame borders. This frame shows that you have selected the picture.
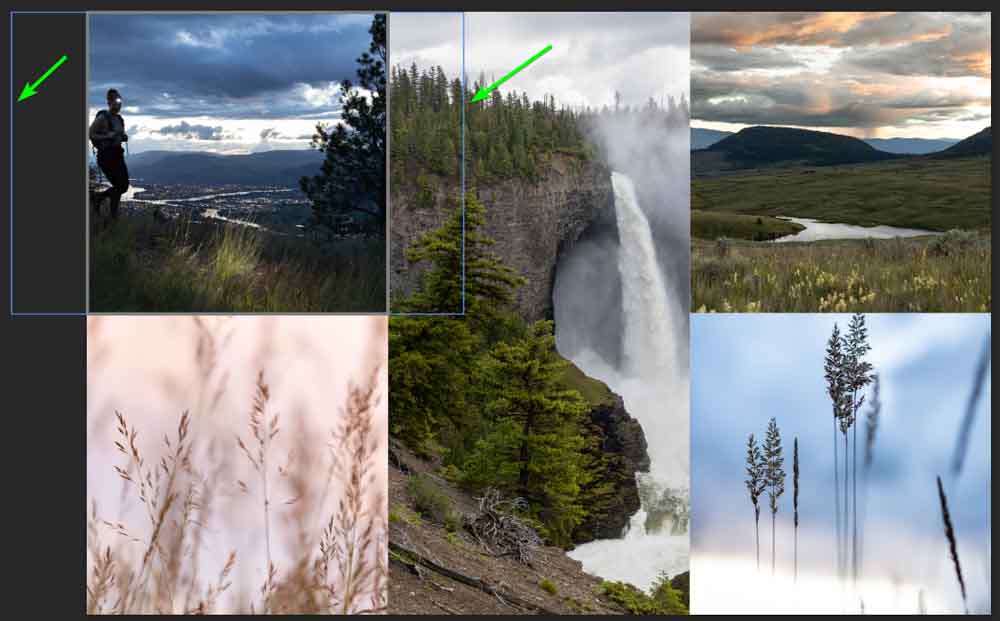
Now, click on the image and drag it to reposition it inside the frame.

Suppose you want to resize the image. Press Control + T (Win) or Command + T (Mac) to activate Free Transform. The photo will now have anchor points around it, which you click and drag to resize the image.

Repeat these steps to resize or reposition the photos as needed.
Step 6: Resize Or Move The Frames
If you want to resize a frame without affecting the picture inside it, at this stage, you can follow the same process as moving an image, but make sure that the frame thumbnail is selected in the Layers panel .
As soon as you select the frame thumbnail, anchor points appear, so you don’t need to activate Free Transform. At this stage, you can’t move the frame on its own because if you move the frame, the image will move along with it.
Once you resize and move the images and frames, you have a complete collage with the photos placed correctly.
How To Add A Border To A Collage In Photoshop
Once you have completed your collage, you can add borders around the frames to break the images up. There are multiple ways to add borders, such as adding a stroke to the frame or moving the photos to leave white spaces in between the frames.
However, the easiest way to add a border is by adding lines to the canvas and positioning them. This way, you can control the border width, color, and positioning. This also means you can choose where the borders are instead of having a border around the entire frame, as this won’t work well for photos when printed.
Make sure you have the top layer selected in the Layers panel before adding the lines, so the borders appear on top of the images and not behind them.
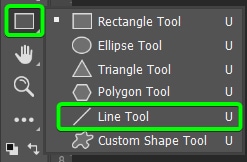
Select the Line Tool (U) from the Toolbar to add a line. It may be hidden under the Rectangle Shape Tool, so hold the icon until the fly-out menu appears.
With the Line Tool selected, you can change the settings in the Options bar , depending on how you want the borders to appear. First, set the Type to Shape in the first drop-down menu to ensure the line creates the edge you want.
Next, the Fill option is the most important. You must set the Fill to the color you want your border to be. You can also set the border to a gradient or pattern if you’d like. Click on the color block next to Fill to open the options.
The first icon next to no fill allows you to select a color. Next to that is the gradient option, and lastly, the pattern option.
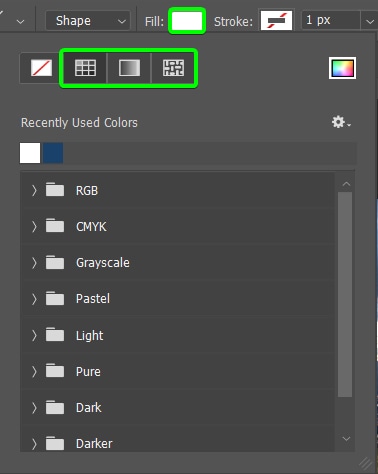
When choosing a color, you can use any preset colors from the list or click on the colored swatch to open the Color Picker.

In the Color Picker , you can select any color you wish and click OK to select it.
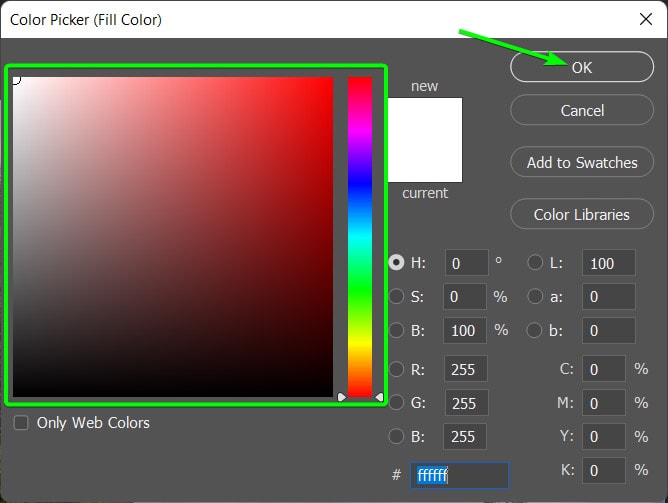
I want to keep the color white for my borders. Then the next two settings to change is the Stroke color , which you must set to No Stroke . Then, set the Weight to how thick you want your border to be. I set the weight to 20px .
You can now add the lines to your collage where you want the borders to be. Click on the edge and drag across the area you wish to add the border. Hold in Shift to draw a straight line with the tool.
Once you add the shape, you can re-position it by selecting the Move Tool (V) and dragging it around if you need to correct the positioning.
Now, with the Line Tool selected again, you can draw more lines around the rest of the images to create more borders. You now have a collage complete with borders. You can change the color and size of the borders at any time using the Properties panel .

How To Resize An Existing Collage In Photoshop
After completing your collage, you may want to resize the image for different digital platforms. As long as you create a collage larger than the new size you need, you can easily change the size while keeping the original quality.
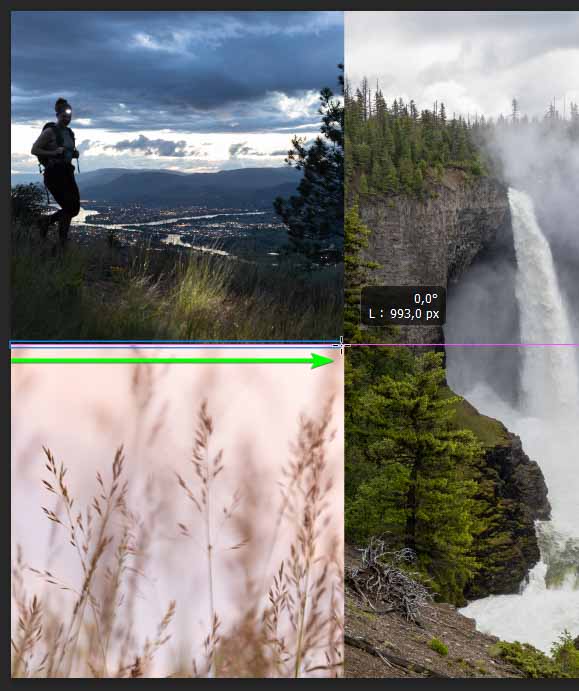
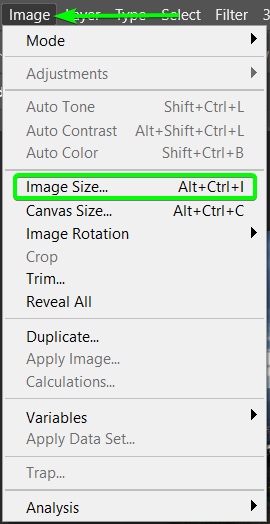
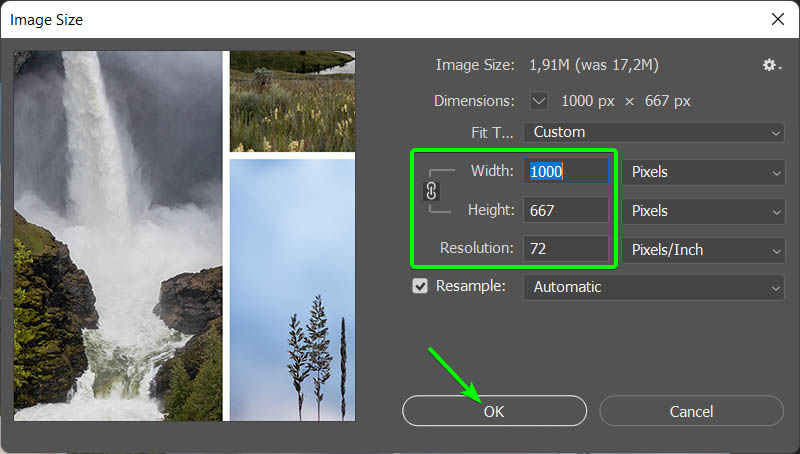
To resize the collage, go to Image > Image Size or press Alt + Control + I (Win) or Option + Command + I (Mac) .
In the Image Size panel , ensure that the unit is set to the correct one you need, such as Pixels or Inches. Then activate the Link Icon next to the width and height boxes to ensure you don’t distort your image.
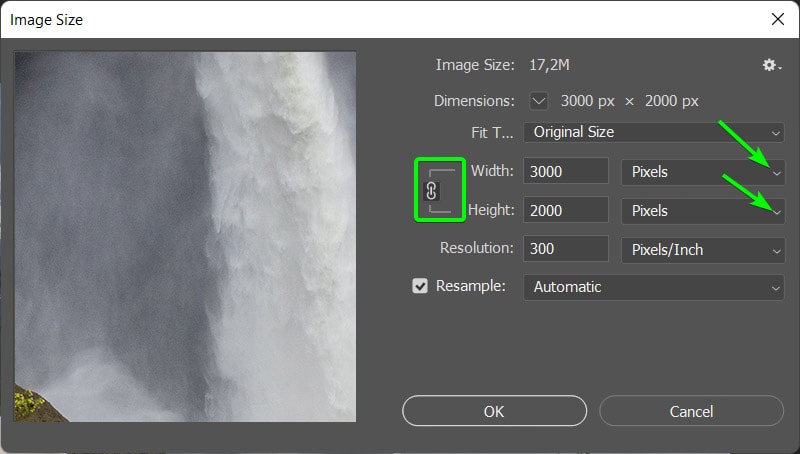
Now, you can simply change the width to the new amount, and the height will automatically adjust since the link is active.
You can also just input the height and let the width re-adjust. Lower the resolution to 72 PPI if you are using the collage digitally.
Remember not to increase the resolution, or you may decrease the collage’s quality. Click OK when you are done.
You now have a resized image, which you can see is smaller in the workspace.
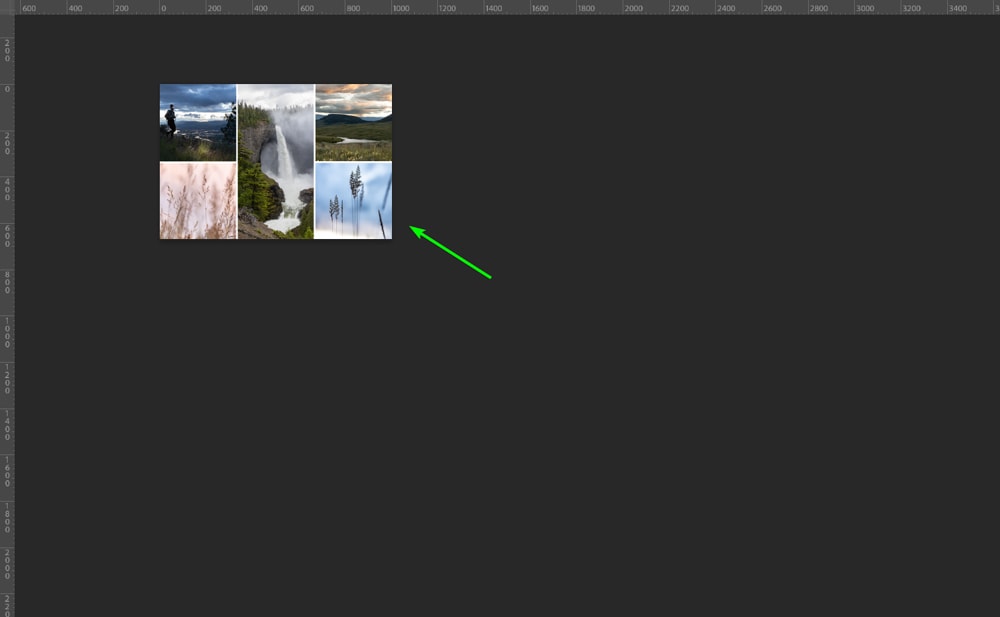
Zoom in by pressing Control + + (Win) or Command + + (Mac), and you can export and use your newly resized collage as needed.
Did you enjoy learning how to create a basic collage in Photoshop? Don’t forget to get creative and customize your collage. You can add 3D text to the collage or develop patterns to add as borders around your photos. There are so many possibilities to make your collage stand out.

Continue Reading:
How To Create Adjustment Presets In Photoshop

How To Use The Marquee Tool In Photoshop

How To Crop A Layer In Photoshop (3 Simple Methods)
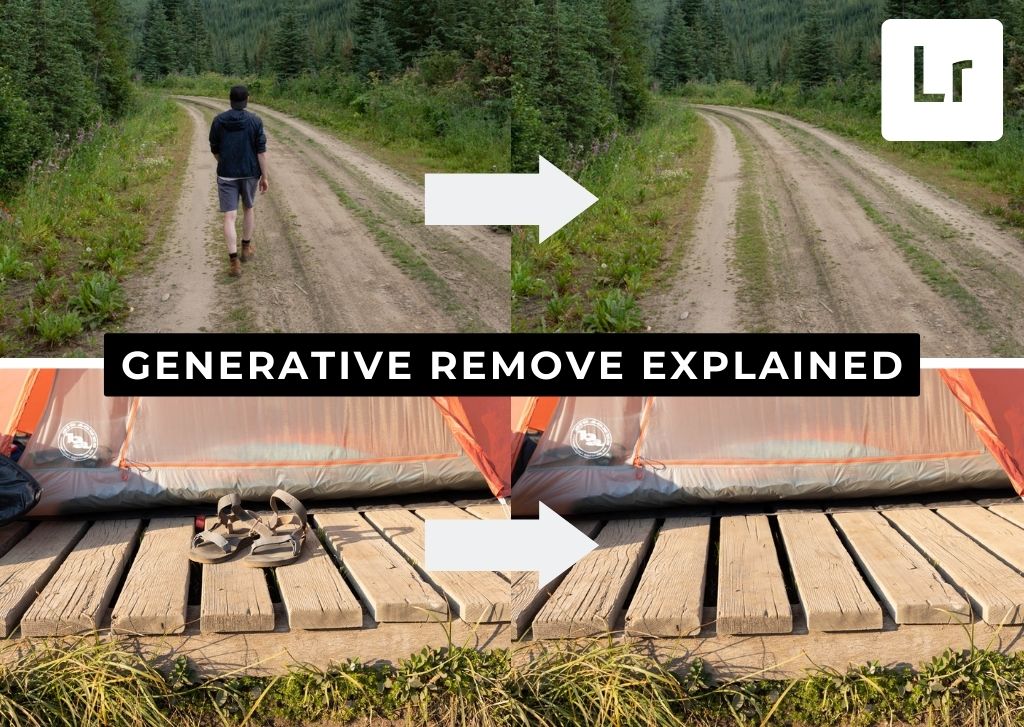
How To Use Generative Remove In Lightroom – Complete Guide

What Are Embedded Previews In Lightroom + How To Use Them

Adobe Lightroom System Requirements For Mac & PC

How To Outline An Image In Canva

How To Add A Border In Canva (To Images, Shapes & Text!)
How To Make A Background Transparent In Canva

As an Amazon Affiliate, I earn from qualifying purchases. Brendan Williams Creative also participates in affiliate programs with Impact, Clickbank, CJ, ShareASale, and other sites.
Student Login
329 Howe Street #1413 Vancouver, BC V6C 3N2 Canada
[email protected]
Mon to Friday 9:00 am to 5:00 pm
Privacy Policy
Terms & Conditions
Refund Policy
Cookie Policy
How to Make a Photo Collage in Photoshop
Collages are a fun way to show off a collection of photos. They are perfect for showcasing vacation snaps, images from a themed or professional photoshoot, or photos advertising an event.
Hi! I’m Cara and as a professional photographer, I love collages because they give me an opportunity to depict the story of a session in a way that a single image never can.
Photoshop also makes it quite easy to put a collage together. Let me show you how!
Note that the tutorials and screenshots below are based on Photoshop CC Windows, they might look slightly different if you are using the Mac or other versions.
Table of Contents
Step 1: Create a New Document
Step 2: bring in the images, step 3: turn them all to smart objects, step 4: add images to your document, step 5: resize and reposition, change the background color, add a border around the images.
With Photoshop open, press Ctrl + N or Command + N to create a new document. Alternatively, you can go to File in the menu bar and choose New.
Think carefully about the size document you need. If you want to post your collage on Instagram, you’ll want a square document. If you’re planning to print your collage, you may want a fairly large document with high resolution.
If you’re unsure about the size, it’s better to err on the side of too big. You can always cut or scale it down later.
For this demonstration, I’m going to choose the preset for an 11 X 17-inch document for print. You can find it under the Print tab or you can choose your own values on the right.

You can also choose the background color at this point. We’ll go with white for now. Click Create when you’re happy with your selections.
The number of images will have a huge impact on how the final product turns out. I recommend using no less than three images. Two images are kind of boring and one isn’t a collage, haha!
However, you don’t want to bring in too many either. If your collage is large, you can get away with using more, but for this size collage I recommend maxing out at eight images.
To bring in the images, you can load them individually or you can use this handy trick to load them all at once. Go to File in the menu bar and hover over Scripts. Choose Load Files into Stack .

Click Browse , and navigate to the images you want to use. Select them and they will appear in the box on the left. Once you’ve got them, press OK.

The images will then load as new layers one on top of the other in a new document.

One of the benefits of using smart objects is that you can scale images without losing quality. Since we’ll need to resize these images to place them, let’s go ahead and turn them all into smart objects first.
Right-click on each layer and choose Convert to Smart Object for each image.

You may have noticed that the images did not load onto your document. That’s okay. Once you’ve turned them all into smart objects, simply select all the layers and move them to your document.
Do this by clicking the first layer, holding Shift , and clicking the last layer. This will highlight all the layers.
Click and drag and you’ll see a ghost version of the layers track with your mouse. Drop them on the tab where your document is waiting.

Now it’s time to arrange the images. Click directly on the image in the document or pick the layer in the layers panel.
A blue box will appear around the selected image. Grab the corners and drag to resize. Click on the image and drag to move the whole image.
Keep an eye out for the purple alignment lines. These will help you line up the images with the sides, top, and centerline of the canvas as well as the other images.

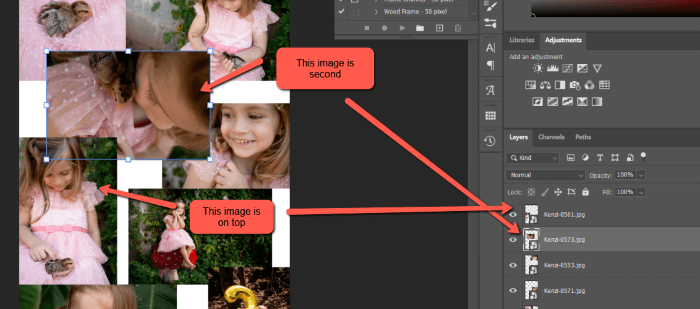
If you want to overlap some of the images, remember that layers at the top of the layers panel will appear on top of the image.
For example, the selected image (which has the blue box around it) is second in line. It is above all the other images in the stack and overlaps on three images.
The image overlapping the bottom left corner of the highlighted image is the one on top of the stack. Click and drag up the layers to bring images forward or down to send them back.
Hit Enter or Return when you’re happy with the placement of each image to accept the changes.
Step 6: Dress It Up
You can be done with a simple collage at this point. If you want to dress it up there are a few things you can do. For example, I don’t like the stark white background for this collage.
To change it, select the background layer and press Shift + Backspace or ( Shift + Delete on Mac) to open the Fill box. You can also go to Edit and select Fill.
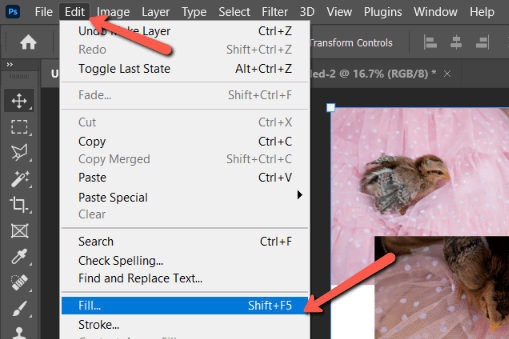
Choose Color in the Contents box to get the color picker to open up.

You can choose a color or use the eyedropper to pick a color from one of the images.
If you use the Eyedropper , make sure that All Layers are selected in the Sample box in the Options bar. Otherwise, the color picker will only be sampling the background layer and it will look like nothing is happening.
Then click on a color in one of your photos that you’d like to match. Click OK .
You can also add a border around the images if you like with a layer effect. Select a layer then click the fx icon at the bottom of the Layers panel.
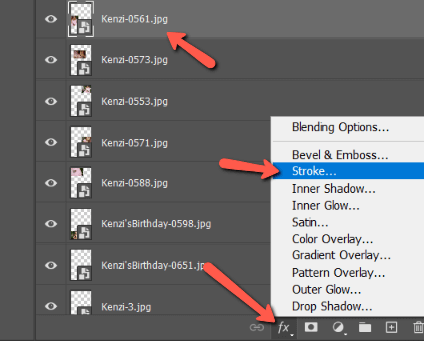
Choose Stroke from the menu. In the Layer Style panel, you can adjust the size and set the position of the border on the Outside , Inside , or Center (equally inside and outside).

Double-click in the color swatch to pick the border color. Click OK when finished.
Back in the layers panel, right-click on the bordered layer and choose Copy Layer Style.

Select all the other layers, right-click, and choose Paste Layer Style to apply the same border to all the other images.
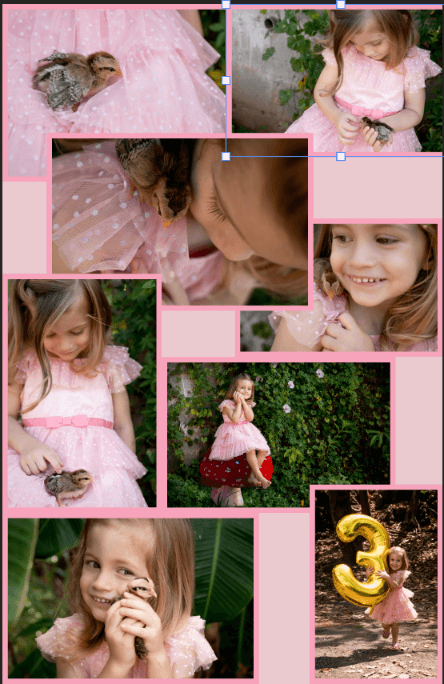
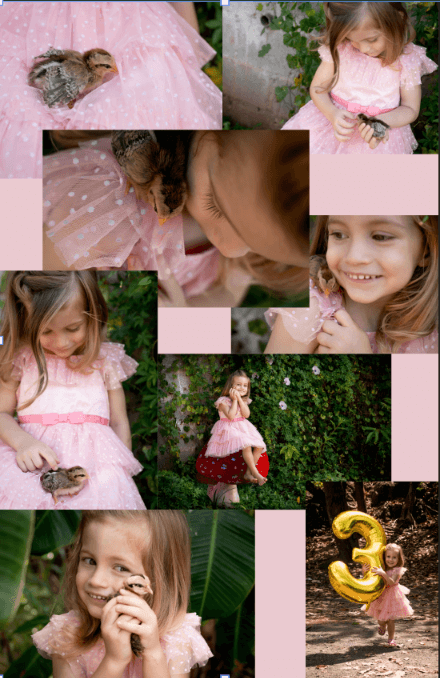
There it is! What a fantastic way to showcase this little sweetie’s birthday pictures. Have fun setting up your own collages!
If you’re looking for more Photoshop techniques, don’t hesitate to check out our tutorial on how to overlay images here !

Leave a Reply Cancel Reply
Your email address will not be published. Required fields are marked *
Sign up to our newsletter!
Photoshop is a design software made by Adobe Inc. This site is not supported or associated with Adobe in any way.
- Photoshop Tutorials
- Photoshop Freebies
- Privacy Policy
- Student Successes
- My Learning
How to Make a Collage in Photoshop (Step by Step)

You can also select your interests for free access to our premium training:
By now, most of us are familiar with the variety of collage apps online and on our smartphones. But do you ever wonder how to make a collage in Photoshop ? It’s easier than you think and we’ll show you how to do it.
Creating a Photo Collage in Photoshop: Step 1 – Select Your Photos

Step 2 – Resize Your Photos

Step 3 – Create a New File in Photoshop

Step 4 – Add Your Photos to Your New File

Step 5 – Position Your Photos on Your Collage Canvas

Step 6 – Add Borders to Your Photos

Step 7 – Adjust the Background Layer Color

Using Photoshop to create a photo collage may seem daunting at first. But once you learn the details of the process, you’ll see that the steps are quite simple and easy to understand. What makes Photoshop different from any other collage maker app is that it’s endlessly customizable. You can create all sorts of variations of collages and not worry about seeing another version of it anywhere else. So go ahead and give it a try! If you’re feeling more adventurous, you can try experimenting with digital collages , as well, by following this easy Photoshop tutorial ! Eager to learn more about different post-processing techniques? Why not check out our course Effortless Editing with Lightroom next!
Popular Content

How to make a photo collage in Photoshop CC
Want to learn how to make a photo collage in Photoshop CC? Here's a step-to-step guide for importing and arranging images in the app.
Learning how to make a photo collage in Photoshop will come in handy in lots of different situations. Individual photos capture single moments in time, but invoke a collage and you'll be able to illustrate a whole story, archiving a treasured family holiday or creating a megamix of memories for a partner's birthday. Collating a collage is also a great test of your composition skills.
There are collage maker apps in abundance out there, but Photoshop CC will give you even more control. It allows you to complete the whole process using just one app, and that includes any image adjustments needed. (For some of the best apps, see our roundup of the best collage maker tools out there.)
Photoshop is one of the most commonly used apps for this type of work. If you’re not already signed up, get Adobe Creative Cloud to access an impressive range of creative software.
In this Photoshop tutorial you will learn how to import images into Photoshop, lay them out onto a single page and border them with coloured frames. If you want to up your Photoshop skills in other areas, check out our post that sums up the best Photoshop tutorials , or for a beginner tut, check out how to Photoshop someone into a picture .
01. Choose your images

First up, pick your images. It’s impossible to condense a whole photo collection down onto one single page, so you need to be selective, sticking to a maximum of 5-8 pictures. Image choice is important if you want to retain the interest of the viewer – collages aren’t just spreads of random images, but represent a flowing narrative, displaying a diverse range of angles, shapes and styles.
Try to use images that suit different frames sizes, picking only your best and most appropriate images. Theming the collage along the lines of one consistent colour or common element can bring the whole thing together, while contrasting images create tension and tend to draw the eye. Every image should be well-exposed and in focus.
If you aren’t sure what looks good, check out some magazine layouts for inspiration. Using a library organiser, like Lightroom or Bridge, streamlines the process, making it easier to sort through multiple photos at once, although Finder works just as well. Use this stage to make any necessary adjustments to your images before bringing them together.
Get the Creative Bloq Newsletter
Daily design news, reviews, how-tos and more, as picked by the editors.
My collage will feature a photoshoot of a Porsche 964 Carrera, so I have included wide, action shots as well as close-up details of the interior, showing the car off from every angle.
02. Create the document

When you create your document, the size of the canvas will depend on the intended output of your collage, namely whether it’s for digital or print (most collages look better in landscape format). Photoshop’s New Document window presents a range of ‘document presets’ to make this choice easier, whether it’s page sizes for print or standard digital sizes for web and mobile. If you want a custom size, there are also options to change the width, height, resolution and colour mode. You can edit this later in Image > Canvas Size. I have used a document size of 1920px x 1080px, RGB, a standard HD screen.
03. Import images

There are various methods for gathering images into one file. Perhaps the simplest is dragging and dropping images from Finder, directly onto the canvas, which imports them as smart objects. The benefit of doing this is that you can reposition and resize them without any loss of quality.
Alternatively you can embed the images as linked layers, which means they will appear on the canvas as low-res versions, while linking back to the original files on your computer, avoiding slow rendering times. Do this by holding the Alt key down when dragging and dropping your images into the file.
Another technique is to open all the images in separate Photoshop windows, selecting each with Cmd + A , copying with Cmd + C , then pasting into the master document with Cmd + V . You can also change your window arrangement to show two files at once, then literally drag and drop layers from one to the other.
04. Roughly position images

Before spending too much time refining the collage, you need to have the right images in the right positions. Move the images around the canvas, using the Selection tool, until they all seem to roughly fit the page. You can turn layers on and off using the eye icon to the left of each layer, in the Layers panel. Scale and rotate layers using the Free Transform tool ( Cmd + T ), grabbing the handles of the transform frame. Holding the Shift key will maintain the proportions, while holding the Alt key will scale out from the centre. You can find further options for transforming under Edit > Transform.
05. Draw borders

Add a single border using either the Pen tool (with Stroke applied) or the Rectangle tool, to break up the images. I drew a long white rectangle across the canvas, duplicated it with Cmd + J , moved and rotated it with Free Transform, then repeated the process until I had all my borders laid down, including one around the outer edge as a frame.
If you’re struggling to line up your images, you can drag guides out from the rulers (turn these on with Cmd + R or under View > Rulers). You can also select multiple layers and use Layer > Align to straighten them up.
06. Mask the spare image

With the borders now placed, it will be obvious that some of your photos are overlapping. Use the Marquee Tool to select unwanted areas on each layer, inverse this selection by right-clicking and selecting ‘select inverse’, then press the mask button at the bottom of the Layers panel (this looks like a circle in a box). You can edit your masks later, if you change your mind, by painting black and white into the mask area. Repeat this step for each layer until they’re all sitting flush against the border lines.
If you imported your images as Smart Objects, you can simply delete the unwanted areas instead of masking them, since you won't be losing any of the original image. If you then want to move the image inside the frame, double click on the layer to open the smart object window and move it there.
07. Add text and export

When you are happy with the layout of your collage, you may wish to add a title or a message. Select the Type tool from the toolbar and draw a text box onto your canvas, preferably over an area that is either very dark or light. Select a typeface and colour from the Character tab, then insert your text. If the text is unreadable, you might need to draw a solid box behind, then soften it by reducing the opacity or changing its blending mode. I also added an underline stroke, using eyedropper to pick the yellow from the image.
Save your image as a .psd file, so you can edit it later on, then export in whatever format you need. (See our guide to image file formats if you're not sure.)
- The 13 best alternatives to Photoshop
- How to Photoshop someone into a picture
- The 6 best laptops for Photoshop
Thank you for reading 5 articles this month* Join now for unlimited access
Enjoy your first month for just £1 / $1 / €1
*Read 5 free articles per month without a subscription
Join now for unlimited access
Try first month for just £1 / $1 / €1
Matt has worked for various publishing houses and design agencies, covering studio photography, video production, editorial design, branding, illustration and motion graphics. He currently works for Future PLC with brands such as T3, Woman&Home, Marie Claire, Music Week, TechRadar, Golden Joysticks, Cycling Weekly, Brand Impact Awards, Horse&Hound and Tech&Learning. In the past he has designed titles including Mac|Life, IQ, Bow International, Drummer, iDrum, Acoustic, Clay Shooting, Sea Fishing and GunTradeNews. He has experience across the full Adobe Suite and is currently spending a lot of time creating projects in Blender and After Effects.
Related articles

- 2 The new Barbie Flip Phone looks like a total dream
- 3 The Atari 7800+ is a remake of the only retro console I never owned, so of course I want it
- 4 Viral videos debunk bogus claims of 'no CGI' in these movies
- 5 Beyoncé’s elegant whisky packaging is a smooth sip of luxury
The leading authority in photography and camera gear.
Become a better photographer.
12.9 Million
Annual Readers
Newsletter Subscribers
Featured Photographers
Photography Guides & Gear Reviews

How To Make a Collage in Photoshop
Learn how to make your own collage in Photoshop. This guide steps you through how to make beautiful photo collages you can share online!
Photoshop | Software | By Ana Mireles
Shotkit may earn a commission on affiliate links. Learn more.
Do you want to make your own photo collage but you don’t know how? Sure, there are apps to make collages, but they can be limiting.
Maybe you want to add more images, use a different size or be more creative with the form and distribution. Perhaps you’re the type of person who likes to do things by themselves to learn how it’s done.
Regardless of the reason, this tutorial will help. Read on, and you’ll learn how to make a collage in Photoshop using Layers.

Download the latest version of Adobe Photoshop to follow along with this simple tutorial.
Start a free 7-day trial today
(Alternatively, learn how to make a collage in Lightroom or use a photo collage app .)
Table of Contents
How to Make a Collage with Photoshop
Step 1: finding the right images.

A photo-collage is a great way to showcase different pictures in a single image. This can be useful for many reasons – and depending on the reason, you can choose the right pictures.
For example, if you’re a photographer, you can put a collage on your website’s landing page to showcase your different projects.
Another idea is to make a collage in Photoshop that then becomes part of a photo album showcasing your latest trip.
You can also use a collage to tell a story in a single social media post – such as on Facebook or Instagram. Once you know how to make a collage in Photoshop, your creativity is the only limit.
Collages are also great when you’re printing them out to be used in picture frames .
So, based on what your Photoshop collage will be used for, select the files that you’re going to need. Make sure your images have something in common to make the collage look harmonious and coherent. It can be the topic, colour scheme, or anything else.
To make this selection, you can use photo management software such as Lightroom. In here you can view, rank and tag your files.
Try to choose a few extra images, this way you’ll have more flexibility to swap elements if something isn’t looking the way you want.
- Everything You Need to Know to Create a Digital Collage
Step 2: Resize your images (optional)
Working with multiple images can create very heavy files that can slow down the workflow. So, if you already know the final collage’s size or destination, you can adjust the images before you start.
For example, if you don’t need to do any more editing on the individual pictures, you can save them as .jpeg. Also, if your Photoshop collage will be for web only, you can work with a resolution of 72 dpi.
Lightroom allows you to do this when you export the selected pictures. In the Export dialog box, you’ll find the sections File Settings and Image Sizing. Here you can make the adjustments you need.
You can also do this in Photoshop, but then you’d have to do each image separately. If you choose to do this, go to File, Open and choose the image you want to adjust.
Then, go to the menu File, Image, Image Size to change your picture’s size and resolution . Use the Save As command if you need to change the file format; if you don’t need to change it use Save.
You can also learn more about resizing images with Photoshop here and how to change DPI here.
Step 3: Create a new document
To create a new document, go to the top menu and choose File, New. A dialog window will open with different preset choices. Otherwise, you can input your own settings on the right-hand side.
I recommend you to make a document that’s bigger than the final size of the collage. This way you’ll have a bigger workspace to move the images around.
This new document will be your background layer.
Step 4: Open your images as layers

Now, to make your collage in Photoshop you’ll need all the images inside the same document. Each one of them needs to be on a separate layer. You can manually do this by using the command Place.
However, I find much easier to select all your files on your computer and then drag them into Photoshop’s workspace.
Photoshop will automate the process and paste each photo as a separate Smart Object when you do this. Depending on the size and number of images, this can take some time – be patient.
When it’s done, you’ll be able to see in the Layers panel all the documents.
Alternatively, you can use Photoshop’s script Load Files Into Stack. However, this will open the files as normal layers instead of Smart Objects.
Fortunately, you can convert the layers later by right-clicking the layer in the Layers panel. From the menu, choose Convert to Smart Object. Do this if you plan to resize any of them.
Step 5: Arrange your images.

Now it’s time to make your photo-collage. Select the Move tool from the top of the tools panel. Then click and drag to reposition your images and start organizing the collage.
You can organize all the elements by placing them inside a group. This way, they will be easier to manage. For example, separating them by orientation (portrait and landscape), position (top row and bottom row), etc.
You can click on the eye icon next to each layer (or each group) to toggle the visibility. This way, you can ‘turn off’ the ones that you’re not using.
To create a group, go to the Layers panel and select the layers that you want to group together. Then, use the keyboard shortcut Cmd+G or click on the folder icon at the bottom. You can also rename it for easier management.
The Move tool will move the active layer. If you want to move another one, use the layer panel to activate it and then use the move tool.
You can also enable Auto-Select on the top bar. This will change to a different layer when you click on any part of it. Keep in mind that this option doesn’t work very well with overlapping layers.
The Free Transform tool is also useful when you’re arranging your photo-collage. With it, you can rotate, flip or distort any image.
You can activate it using the keyboard shortcut Cmd+T. This will select the activated layer by adding a frame with handlers around it. You can drag the corners and handlers to transform it free-hand, or you can right-click on it and open the Free Transform menu.
- How do you flip an image in Photoshop?
Step 6: Fine-tune your collage

To make sure things are aligned, you can use the guides. When the rulers are active, click and drag on them to pull out a guide.
Then, zoom into the canvas and make the necessary adjustments with the move and free transform tool.
If you want some of the images from your collage to be overlapping, you need to consider the order of the layers.
The top layer in the Layers panel will be blocking the ones below. So, to achieve the look that you want, you need to have the layers organized correctly. If you need to change the order, click the layer and drag it up or down to where you want it.
However, if you need to hide a part of a layer, and you can’t do it by overlapping, you can use a Layer Mask. You can do this by clicking on the Layer Mask icon at the bottom (it’s a rectangle with a hollow circle in the middle).
You won’t notice any difference in the image, but you’ll see a white thumbnail appear next to the selected layer – this is the layer mask.
Here, anything that you paint black will be hidden, and anything you want showing is in the white area.
Step 7: Save your collage

Once you’re happy with your photo-collage, you can crop the extra space and make sure it’s the size that you need. Then, if you’re not going to change it anymore, you can go to the menu Layer, Flatten Image.
This will unite all the layers into one locked background layer. This way the file will be lighter. After that, you can save it in any file format – the most common being JPG.
However, if you want to keep an editable version of the photo-collage, you shouldn’t flatten it. Keep your layers to make all the changes that you want in the future. For this, you should save in PSD, the native file format from Adobe Photoshop .
Tips to Customize your Collage
Now you know the basic steps of how to make a collage in Photoshop.
If you want to get more creative, you can continue to customize your photo collage in Photoshop to make it more visually appealing. Here are a couple of ideas.
You can do any of these once you’re done with step 6.

If you want to give your Photoshop photo-collage a vintage look, you can add borders to each of the images. To do this, open the Layers panel and double-click on any of the layers.
This will open the Layer Style dialog box. Here, choose Stroke on the left menu and customize its color and width on the options from the right side.
Of course, you can also play with any of the other choices and find a style that you like. Once you’re happy, click OK.
You’ll notice that the effects are listed on the layer in the Layers panel. Click on them while holding the Alt key and drag them to the next layer to copy them. Repeat the process with every image on your collage.
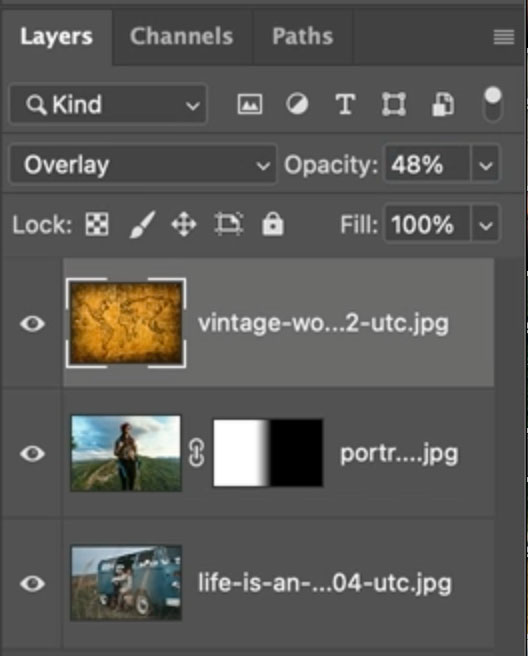
Add an overlay

Another creative way to customize your photo-collage is to add an overlay. To do this, you need to add a new layer on top of the others.
This can be a texture, a gradient, a colour, etc. For this example, I used a solid colour by adding an adjustment layer.
After adding your overlay, toggle the blending modes to change how it affects the layers below. You can also use the Opacity slider if you want to make the effect more subtle.
Using a Grid in Photoshop is a simple way to arrange your images to ensure everything is aligned correctly. The easist way to do this is to turn on Photoshop’s grid overlay.
In the View menu, navigate to Show and then click on Grid. Then adjust the settings by navigating to Preferences > Guides, Grid & Slices.
How To Make a Collage in Photoshop: Final Words
That’s it: you don’t need to limit yourself to simplistic templates or buy premium subscriptions to widen your choices.
As you can see, once you know how to make a collage in Photoshop it’s actually very easy and you can get as creative as you want.
Have you tried making a collage in Photoshop? How did you go? If you have any questions, don’t hesitate to post them in the comments section.

Ana Mireles is a Mexican researcher that specializes in photography and communications for the arts and culture sector.
Leave a Comment Cancel Reply
👋 WELCOME TO SHOTKIT!

🔥 Popular NOW:

Unlock the EXACT blueprint to capture breathtaking iPhone photos!
- PRO Courses Guides New Tech Help Pro Expert Videos About wikiHow Pro Upgrade Sign In
- EDIT Edit this Article
- EXPLORE Tech Help Pro About Us Random Article Quizzes Request a New Article Community Dashboard This Or That Game Happiness Hub Popular Categories Arts and Entertainment Artwork Books Movies Computers and Electronics Computers Phone Skills Technology Hacks Health Men's Health Mental Health Women's Health Relationships Dating Love Relationship Issues Hobbies and Crafts Crafts Drawing Games Education & Communication Communication Skills Personal Development Studying Personal Care and Style Fashion Hair Care Personal Hygiene Youth Personal Care School Stuff Dating All Categories Arts and Entertainment Finance and Business Home and Garden Relationship Quizzes Cars & Other Vehicles Food and Entertaining Personal Care and Style Sports and Fitness Computers and Electronics Health Pets and Animals Travel Education & Communication Hobbies and Crafts Philosophy and Religion Work World Family Life Holidays and Traditions Relationships Youth
- Browse Articles
- Learn Something New
- Quizzes Hot
- Happiness Hub
- This Or That Game
- Train Your Brain
- Explore More
- Support wikiHow
- About wikiHow
- Log in / Sign up
- Hobbies and Crafts
- Paper Craft
How to Make a Collage in Photoshop
Last Updated: April 8, 2024
This article was co-authored by Crystal Bear . Crystal Bear is a Professional Photographer and the Owner of Summer Bear Photography. Crystal specializes in weddings and portraits for women. She holds a BS in Interior Design and Consumer Science from San Francisco State University. Coming from a design background, Crystal brings a sense of style and artistry to her work that brings out her client’s inner confidence, showcases their beauty both inside and out, and puts them at ease. She also specializes in using the correct lighting and branding for women entrepreneurs. This article has been viewed 97,863 times.
Even if you've never used Photoshop, it will only take a few minutes to learn the basics and get started on your collage. Once you've arranged it to your satisfaction, print it right away, or play around with Photoshop's many tools to add your own artistic effects.
Note: If using a Mac, use command instead of Ctrl for all steps.
Setting Up the Document

- Width and height: Choose A4 for a typical sheet of paper, or 3000 pixels wide x 2000 pixels high for a landscape collage — or set any size you like.
- Resolution: Enter 300, or 200 if using a slow computer. Switch to a smaller value if the collage is very slow to edit or open, or use a larger one if the pictures look pixelated.
- Color Mode: RGB color
- Background contents: Choose Transparent if you plan to add your own background image. Otherwise, choose White or Black.

- Click the background image and press Ctrl + A to select it.
- Press Ctrl + C to copy the image.
- Click the collage window (called “untitled 1” unless you saved it).
- Press Ctrl + ⇧ Shift + N to open a new layer.
- Find the Layers panel and click “Layer 1.” Type in a new name: “background.”
- Press Ctrl + V to paste the image into the background layer.
- Adjust the background image as desired. The slider above the name in the Layers panel makes it more or less transparent. Ctrl + T lets you resize or rotate the image .

- Click on “stroke” and check the box next to it.
- Change the position to “inside.”
- Alter the size and color however you like.
- Check “inner shadow” if you’d like a shadow inside the frame.
- Click OK when finished.

Making the Collage

- Drag the file directly into the collage document, without opening it, or open it and drag the image into the collage. Name the new Layer something descriptive. (To select more than one file at a time, hold down Ctrl .)
- Or open the file with File → Place Embedded (or just Place in older versions.)
- Or open the image and use copy paste functions to transfer it to the collage. See the information on adding a background above for more information.
- If you only want part of the picture, select the rectangular marquee tool at the top of the Tools panel. Drag it over part of the image, then copy and paste it as described above.

- Use Ctrl + Alt + Z to undo a mistake.
- Press the magnifying glass to zoom in before selecting small or detailed areas.

- To resize the image, drag any corner. Hold down Shift while doing this to make sure the image doesn't distort.
- To rotate the image, move your cursor farther out from a corner until you see two arrows. Click and hold, then drag the image.
- To move the image, click and hold anywhere inside the image and drag.
- When you're done, press Enter or click the check mark near the top right corner.

- Make sure your “background” layer is always at the bottom. Anything below it will not be visible.

- Use File → Save As instead to change file formats. Choose PDF if you want your collage professionally printed or framed. Choose JPEG to make an image that other photo viewing software can open.
Adding Extra Effects

- Don't click the layer name itself, or you'll just be typing in a new name. Click the space next to it.

- By default, any layer adjustment you add will apply to every layer (every image in the collage). You can change this by right clicking on the adjustment in the Layers panel and selecting "Create Clipping Mask." This applies the adjustment to only the layer beneath it.

- To make the image stylistically blurry, use the Noise, Pixelate, Render, Sharpen or Blur filters.

- There is no spell check. To check spelling, you'll need to copy-paste to a text editing program or online spell check.
- Once you're done, click the black cursor tool to return to the default move tool.
Community Q&A
- Turn colored pictures to black and white using Ctrl + Shift + U . Thanks Helpful 1 Not Helpful 0
- If you make a mistake, press Ctrl + Alt + Z to undo it, or use Edit → Undo in the top menu. Thanks Helpful 0 Not Helpful 1
- Photoshop can only open certain types of files. If an image fails to open, find the file on your computer and double-click to open it with a different program. Use File → Save As to change the format to JPEG, PNG, or BMP, then open the new file in Photoshop. If this doesn't work, search online for a file format converter. Thanks Helpful 0 Not Helpful 0

You Might Also Like

Expert Interview

Thanks for reading our article! If you’d like to learn more about photoshop, check out our in-depth interview with Crystal Bear .
About This Article

1. Create a blank document. 2. Make it the desired size. 3. Click File . 4. Click Open . 5. Double-click an image to open it. 6. Copy part or all of the image. 7. Paste it into the blank document. 8. Repeat with other images. Did this summary help you? Yes No
- Send fan mail to authors
Is this article up to date?

Featured Articles

Trending Articles

Watch Articles

- Terms of Use
- Privacy Policy
- Do Not Sell or Share My Info
- Not Selling Info
Keep up with tech in just 5 minutes a week!
- Customer Support
How to make a photo collage in Photoshop
Colin smith.
How to composite a collage in Photoshop
In this Photoshop tutorial, I’ll show you how to merge photos together to make a creative collage. This is the kind of style used in posters, record covers and such. I hope you enjoy it.
Check out the video, because it covers each step and additional techniques and tips not covered in these written steps, as I like to keep the brief and easy to follow.
Bring the photos into Photoshop
Start with your photos, I’m using 2 photos and a third as a texture. I put them all into a folder.
I got the photos from Envato Elements here: https://1.envato.market/c/1981284/298927/4662

To load the images into Photoshop and put them on layers in the same document choose File>Scripts>Load Files into stack
Click on Browse and find your folder.

The images are opened into a layered document. See this tutorial on combining images if you are stuck
2. Position the images
Position the first layer and scale it, this is the photo that will go on the right side of the collage (The VW Bus).
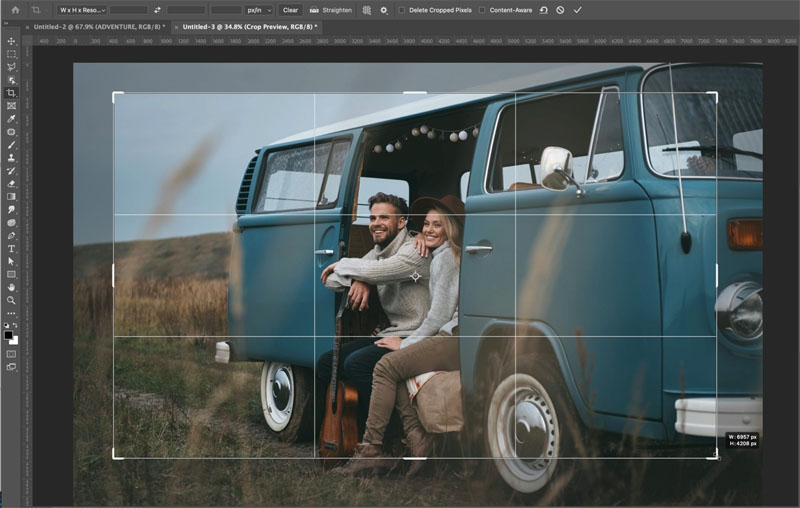
Choose the crop tool (make sure delete cropped pixels is OFF) and drag to set the shape for the collage.
Press enter to apply
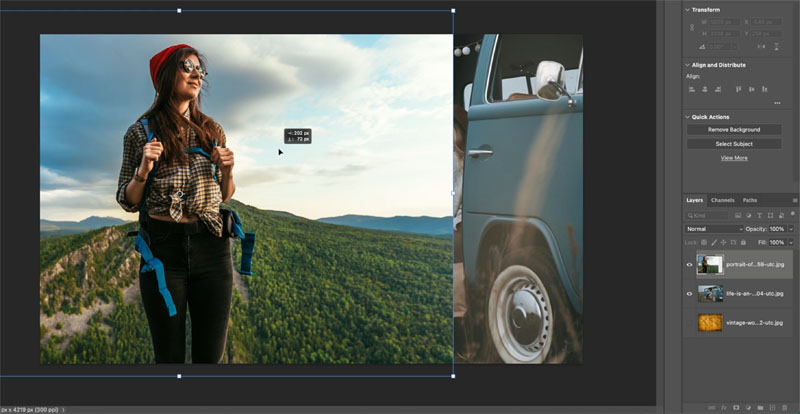
Choose the layer that contains the 2nd image with the move tool (V key).
Press Ctrl/Cmd+T for free transform.
Drag to size and position the image on the left side.
Press enter to apply the transformation
3. Blend the photos together
Choose the gradient tool for the toolbar
Choose the black to white gradient.
Make sure it’s set to linear, Normal blending mode and 100 opacity.

Click the new Layer Mask icon in the bottom of the layers panel (Rectangle with circle in it).
You will see a white Layer Mask next to our layer we are going to blend.
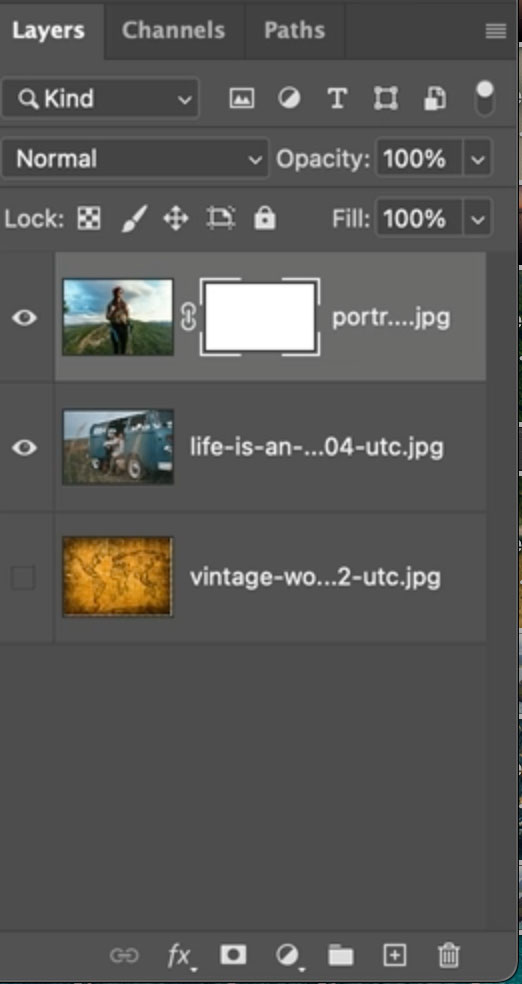
With the gradient tool, drag from the right to the left to apply a gradient over the seam. (remember to make sure you are working on the mask).

You will now see a nice seamless blend. If you don’t like the result, try drawing on the image with the gradient tool again until you see a blend you like.

Create an overlay texture in Photoshop
Drag the map image to the top of the layers panel and turn on the visibility eye.
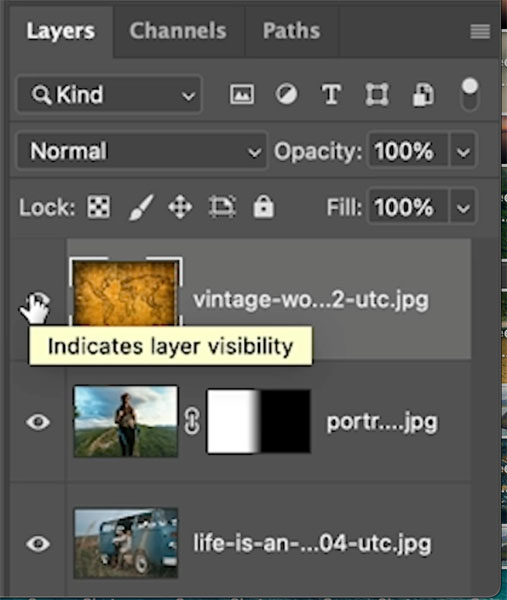
Drag the corner point to enlarge the map image until it covers the entire document window.
Press enter to apply.

This time we will use a different way to blend the top layer.
Change the Layer blending mode from Normal to Overlay.
Adjust the opacity to somewhere round 50% to find a nice mix of texture and phots underneath.
Now you can see how it blends nicely.
If you want to paint away the map texture from the faces, choose a soft round black brush, and with the layer mask still selected, paint over the areas you want to hide the texture. (This is shown on the video).

Add a Color Overlay
Now we want to tie everything together, as well as flavor it with a gradient color grade.
Chose a warm color for the foreground and a cooler color for the background.
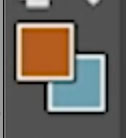
Choose The layer Styles in the Layers panel and select Gradient.

Set the gradient to the Foreground to background option.
Change the angle so that the gradient goes horizontal.

Change the layer blending mode to color.
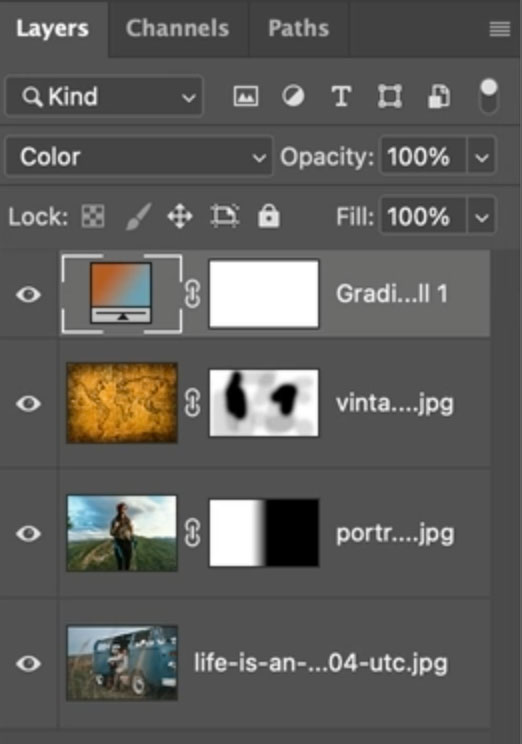
Now you see the color of the gradient shows with the image.

Lower the opacity of the gradient layer to mix the original colors with the gradient colors.

To finish it off add some type or other elements. If you want to see how I created this fading type effect, its on the video at the top.
A variation
I hope you enjoyed this this tutorial, let me know in the comments if you want more like this. Also follow me on socials (or my mailing list) for other Photoshop tutorials and tips.
See you at the CAFE
Consider Consider joining our mailing list so you don’t miss any of my tutorials.
For more, follow us on Social Media

6 responses to “How to make a photo collage in Photoshop”
A great demonstration of the power of blending modes in the creative process. I would appreciate if this was explored more. Many Thanks
Excellent and so easy to follow. Than you
Love this, Colin! One thing I do differently is to use the radial gradient (foreground to transparent) in lieu of a brush to mask away the portions of the texture overlay where I don’t want it. The gradient allows me to create a softer edge (better blend) than even the 0% hardness brush.
Your tutorials are amazing, they are easy to follow and understand. I appreciate that you write the instructions out, not having to take notes and watch the video at the same time is awesome. Thank you so much!!!! Bev
Great tutorial Colin, so easy to follow, thanks for sharing this
Thank you for the tutorial and written content, makes learning easy.
Leave a Reply Cancel reply
Your email address will not be published. Required fields are marked *
This site uses Akismet to reduce spam. Learn how your comment data is processed .
more related tutorials

How to Place text behind an object in Photoshop
In this Photoshop tutorial, I show you how to run text behind a portion of a photo. This is what...

Black and white noir photograph effect in Photoshop
in this Photoshop tutorial, learn how to add a nostalgic Black and White Film Noir look to a portrait....

HDR in Lightroom CC tutorial how Lightroom CC does High Dynamic Range
in this free Lightroom tutorial learn how to make an HDR image in Lightroom 6 / Lightroom CC. Shoot bracketed...
Popular tutorials

Newest tutorials
featured products

Access The Photoshop Vault
Unlock dozens of valuable photoshop resources for free.

The Ultimate
Photoshop resource.

How to Create a Photo Collage in Photoshop – Day 18

- Add to favorites
Download the Sample Images
Description.
Learn how to use a non-destructive workflow with Smart Objects to make a photo collage in Photoshop. Crop and resize images without losing resolution so that you can dial in the look that you want!
This is Day 18 of our 30 Days of Photoshop series. Follow along with all 30 episodes as we explore the magic of Photoshop together!
- How to Edit RAW Photos in Photoshop – Day 19
- How to Color Grade a Photo in Photoshop – Day 20
- How to Change the Color of Anything in Photoshop – Day 21
- How to Correct Exposure in Photoshop – Day 22
30 Days of Photoshop

Sign up to receive email updates to keep you going, sample images to follow along, and a printable calendar to keep track of your progress!

Create Your Own Photo Collage
Making a photo collage.
It may sound like a simple project, but making a photo collage is great way to display your work or commemorate an occasion, all while getting valuable practice using Smart Objects in Photoshop.
Smart Objects are one of the keys tools for working non-destructively. But what does it mean to work non-destructively? Well, it all comes down to protecting your work and saving time. A non-destructive workflow allows you to make edits in Photoshop without ever damaging your original photos. It also allows you to, at any time, change or remove edits you’ve made. So if you go back to a project later and decide you don’t like a particular look, or, in our case, decide you want to resize and change the layout of a photo collage, you can do so without having to start over from scratch.
Resize & Scale
Smart Objects are particularly useful when working on a photo collage, since we’ll be scaling our images a lot until we get a layout that we like. Without using Smart Objects, scaling an image down to a smaller size and then back up to a larger size will result in a loss of information. Photoshop has to remove pixels as the image gets smaller and then has to try to recreate that information after you make it larger. Smart Objects are the best way to get around this, allowing you to resize and Transform at will without ever losing detail in a photo.
When you load an image as a Smart Object, Photoshop creates a reference of that photo. Basically, that means that Photoshop will always ‘remember’ every pixel in the original image. So if you scale it down to a small size, and then back up to a larger size later, Photoshop is able to pull all of that original information from its memory so you don’t lose precious colors or resolution.

How to Edit RAW Photos in Photoshop – Day 19

How to Color Grade a Photo in Photoshop – Day 20

How to Change the Color of Anything in Photoshop – Day 21
New & popular tutorials, new free tutorials view all ».
How to Select Subjects and Refine Edges in Photoshop
How to Correct White Balance in Photoshop
Testing The New Selection Brush Tool in Photoshop
How to Match Fonts From Images in Photoshop

How to Create a Lens Flare Effect in Photoshop
New pro tutorials view all », compositing 101: master the essentials, the beginner’s guide to wedding photo editing in lightroom, lightroom mobile: the beginner’s guide to powerful editing, master fashion photo editing in photoshop & lightroom 2024, master adobe camera raw 2024.
One Subscription. All of PHLEARN
Get Instant Access to Every Tutorial
A Creative Collage Lesson for All Students

There are so many reasons to love the art of collage, from the freedom it allows to the powerful stories that can be told through it. In the classroom, I love the fact that students can mix personal items and traditional materials to create something new and uniquely meaningful. And the fact that students don’t feel intimidated when they are encouraged to collage? It’s priceless!
I use collage techniques in many of my lessons. But over the years, one lesson stands out as the most successful: Collage to Canvas.

This lesson not only has students experimenting with the art of collage, but it also has them thinking deeply about composition. It’s a great primer to get them experimenting with visual storytelling. Although I use this lesson with my secondary students, it could certainly be scaled down for elementary kiddos.
I begin the lesson by discussing the art of collage. We discuss how collage means assembling different colors, textures, shapes, and materials to create a new concept.
Then, I share the various types of materials that can be used.
Here are just some of the items I like to provide and have students gather:
- Transparencies
- Tape Transfers
- Manipulated Paper
- Handmade Paper
- Drawings/Sketches
- Photographs
- Personal Items
- Odds and Ends
It’s also a good idea to provide some examples by sharing master collage artists. Artists I’ve used in the past include Georges Braque, Picasso, Kurt Schwitters, Romare Bearden, Radcliffe Bailey, Richard Hamilton, and Robert Rauschenberg. These artists and their works lay the foundation for a wonderful class discussion. When students see this work, they become inspired to begin creating their own collages.
Here are the 7 remaining project steps.
Step 1: set a theme.
There are many themes teachers can use when collaging with their students, but for this specific lesson, I stick with the theme of “self.” I tell students they will be creating a type of “self-portrait” collage. Instead of a traditional portrait, however, they will use colors, textures, magazine images, text, fabrics, photos, and maybe even a few special items from home. The only other parameter I give is that the final collage must be smaller than 6″ x 8.”
Step 2: Brainstorm
After the theme has been set, I give students a “think sheet” to help them dive deep into what makes them unique and help them brainstorm useful imagery to locate. This acts as a type of mental map for their art piece. You can grab a copy to use with your students below!

Download Now!
Step 3: Collect Imagery
I usually allow students a few days to search for imagery. They have so much fun with this step! Be sure you don’t limit your students to magazine imagery only. My students search for imagery and other items on the Internet, in old photo albums, at their homes, on nature walks, and in other unexpected places. They hold their items in an envelope until they have at least twenty-five things with which to experiment.
Step 4: Create Collage
After students have a variety of items to work with, it’s time to create their “self” collages! Many students choose to collage onto a flat surface, like posterboard or cardboard. However, I don’t limit them to these materials because often they find objects to collage on top of which adds to their visual stories. For example, one year a student collaged on her flip-flops, and another year a student collaged on a paper fan that belonged to her grandmother.
Step 5: Sketch
Once these awesome collages are complete, students take a 3” x 3” sticky note, fold it in half and cut a small viewfinder out of it. This viewfinder is then placed on top of the collage so students can find new compositions within their collage. Students move their viewfinders around, and I often have them sketch out a minimum of six new compositions.

Step 6: Paint
Students are so excited to see these new compositions and find the gems of imagery that appear when they look closely. From this point, they can either choose one or several combined areas and recreate them on a large, 16” x 20” canvas board using acrylic paint.
Students have about a week to paint this new composition onto their canvas board, creating an exciting piece based on their collage work!
Step 7: Combine Work
As a final step, I have my students combine their collages and paintings into one display. My students mount their paintings onto poster board and consider how they want to add their collage. Some students decide to put the collage to the side while others will glue the collage onto the canvas, it’s completely up to them.

This is one of my students’ favorite projects because they have so much freedom to create an artwork with such personal meaning. From the simple task of collaging, many of these pieces end up being award-winning artworks!
How do you incorporate the art of collage into your curriculum?
Do you have your students create “self” art beyond the traditional self-portrait?
Magazine articles and podcasts are opinions of professional education contributors and do not necessarily represent the position of the Art of Education University (AOEU) or its academic offerings. Contributors use terms in the way they are most often talked about in the scope of their educational experiences.

Debi West is one of AOEU’s adjunct instructors and a former AOEU Writer and NBCT art educator. She loves sharing with others and enthusiastically stands behind her motto, “Together we ART better!”

Tempera Cakes 101: How to Make and Use the Most Versatile Paint

Discover How to Teach Responsible Artificial Intelligence (AI) Use in the Art Room

Back to Basics: How to Teach the 4 Processes of Printmaking for Newbies

5 Remarkable Gel Plate Printing Techniques for You To Master This Summer

If you’ve wanted to create your own photo grid collages, Photoshop is a great tool to use. Using guides, you can quickly set up perfectly-even grid shapes by setting up the number of rows and columns you wish to use. Then, you will use shapes and clipping masks to finish your collage.
Want to learn how to create a custom photo collage in Lightroom? Go here to watch a video tutorial .
How to create a collage in Photoshop
Below is a step-by-step tutorial on creating a custom Photoshop collage.
Step 1: Create a new document
Open Photoshop and go to File > New . Then, choose a document size you’d like to work with. This tutorial will work with all image sizes, so go ahead and pick a size that works for you. Here I created a document with a white background of 6000×4000 pixels in size and 300 PPI.

Step 02: Create a grid using guides
After you create your new document, go to View > New Guide Layout . Then, use the Columns and Rows sections to create your grid, and make sure the Preview box is checked so you can see how it looks. This sets up evenly-spaced guides that make it easy to create the shapes you will use to place your images for your photo grid collage.

Step 03: Set up the Rectangle tool before creating your grid shapes
In the toolbar, go to the Rectangle tool . If you don’t see it, you might need to right-click over the existing shape and set it to the rectangle.

Then, at the top, make sure that the default shape has no stroke , and choose a color for your shape. You can choose any color you like, as a photo will replace it once you’ve created your photo grid collage.

Step 04: TitleAdd the first shape template
First, make sure that you have the Snap option checked in the menu. You can check this by going to View > Snap , as well as View > Snap to > Guides . This will ensure that your shape is set up against the guides you created in the second step.
Then, using the Rectangle tool, draw a shape, make it fit inside one of the guide boxes, and snap it to the guides in the document.

Step 05: Duplicate the shape and fill the other photo grid boxes
Now that you have your first shape created, it’s time to add rectangles to the other boxes. Instead of drawing the shapes over and over, you can duplicate the layer and drag it to the grid box.
The quickest way to do this is to select the Move tool (keyboard shortcut: V ), then press the Opt (Mac) or Alt (Win) key and drag the rectangle shape. This will duplicate and move the shape at the same time. Continue duplicating and moving the shapes until the entire grid is filled.

Step 06: Add a border to the shape
If you want to add a border to the outside of your grid photos, you can do that easily with Layer Styles. Select the top layer in the Layers panel, and use the Layer Styles button to add a stroke.

Then, set the Stroke size and color to whatever works for your setup. Here I chose a 30 px white stroke set inside the shape.

Step 07: Copy the Layer Style to the other layers
With the top layer still active, go to Layer > Layer Style > Copy Layer Style . Then, in the Layers panel, press and hold the Shift key. and click the bottom shape layer (this selects all shape layers). Next, go to Layer > Layer Style > Paste Layer Style, and the stroke/border will be applied to all the shape layers.

Step 08: Fill the shapes with photos to finish your Photoshop collage
Now it’s time to fill your shapes with your image to create the photo grid! First, you might want to clean up the preview and hide the grid view by going to View > Clear Guides (don’t worry, you can leave it on if you like, and it won’t affect your printed or exported file).
Now, open a folder on your computer with the photos you want to use in your photo grid. Then, select one of the shape layers and drag/drop your photo to the preview window. Press and hold the Opt (Mac) or Alt (Win) key and hover in-between the shape layer and the image (just below the image you just added), and click when you see the icon change. This will create a clipping mask, so the image you added is only visible within the confines of the shape layer. Now you can resize the image layer (select the layer and go to Edit > Free Transform ) to fit better within the shape.

Continue adding your images above the shape layers and clip/transform them until your entire photo grid is filled.

Stay in touch
Stay in touch and get the latest updates by subscribing to my newsletter below:

Nicole is a photographer, published author, and educator specializing in Lightroom, Photoshop, and photography. She is best known for her books on food photography but is widely versed in various photographic genres, including landscape, nature, stock, travel, and experimental imagery.
Leave A Comment Cancel reply
Save my name, email, and website in this browser for the next time I comment.
Subscribe for new releases and tips from Nicole
Shop the Nicolesy Store

$ 50.00

$ 30.00

$ 25.00
Recent Posts

How to add a watermark in Adobe Photoshop
Adding a watermark to your photos can serve many purposes. It can help protect your [...]

50 Art Style Prompts for Photoshop Generative AI Fill
Adobe Photoshop has always been the go-to software for photo editing and graphic design. But [...]

Ten Tips for Fireworks Photography
Independence Day is approaching in the United States, and many people will be out celebrating. [...]
Nicoles S. Young is a photographer and entrepreneur who teaches photography and post-processing full-time here on her website and also throughout the photography industry.
Go here to read more.
Recent blog posts
© 2005 – 2024 Nicolesy, Inc | Terms of Service | Refund Policy | Privacy Policy
Privacy Preference Center
Consent management.
Privacy Policy
Privacy & Cookies: This site uses cookies. By continuing to use this website, you agree to their use.
Please enable JavaScript in your browser to enjoy a better experience.
29 Collage Photoshop Tutorials for Beginners
If you loved making collages with scissors, glue, mom’s magazines and dad’s subscriptions when you were growing up, there is no reason to stop now. The only difference is that these days, you can make an awesome Collage by using Photoshop !
Here are some of the most interesting collage Photoshop tutorials that will teach you to combine photography with hand-drawn elements and turn an otherwise ordinary image into awesome photo manipulation. You’ll get to know how to incorporate lots of objects into one stunning image.
Recommended Reading: How to Create A Painting Effect – Photoshop Tutorial
Who knows, later on you might be able to create gift cards, postcards or even a beautiful cover for your own book. Let’s get inspired!
"Food for Thought" Photoshop Collage Assignment

- Google Docs™
Description
Students develop and practice their photoshop skills with this creative and interactive project.
Questions & Answers
- We're hiring
- Help & FAQ
- Privacy policy
- Student privacy
- Terms of service
- Tell us what you think
Unsupported browser
This site was designed for modern browsers and tested with Internet Explorer version 10 and later.
It may not look or work correctly on your browser.
- Design & Illustration
100+ Great Photoshop Tutorials for Clever Beginners
- Bahasa Indonesia
Before you can start your Photoshop projects and ideas, you need to learn the basics. Even the most complex digital artworks are built on a foundation of simple actions. These 100+ free Adobe Photoshop tutorials are aimed at the clever beginner who wants to master Photoshop from the roots.
Jump to content in this section:
Unlimited Design Resources for Your Photoshop Projects at Envato Elements
Text effects for cool photoshop tutorials, photo manipulation photoshop tutorials, photoshop techniques for print design, digital drawing in adobe photoshop, other interesting and cool adobe photoshop tutorials, clever photoshop ideas: video tutorials, 9 creative photoshop effects from envato elements.
There are a number of ways to make a living with your Photoshop skills. We have a series of articles that explore careers in design and illustration , which is a great starting point to explore after you work more in Photoshop.
Also, as your design skills improve, you can sell graphic components yourself and earn a solid income. We have plenty of professional resources available on Envato Elements , with unlimited downloads for a low monthly price.
Take a look at our awesome range of Photoshop actions and Photoshop brushes , for example. You can use these to bring the "wow" factor to your projects and start building a freelance clientele.

Illustration Sketch Painting Action

Digital Sketch Photoshop Action

Desert Photoshop Action

Geometrical Collage Generator

Transparent Photoshop Action

Toy Camera Photography Actions
Or watch a free course on how to use Photoshop from the ground up. Certified Adobe instructor Daniel Scott teaches tips and tricks for Photoshop beginners with a tutorial that you'll love. Go through all the essential features in more than three hours of easy-to-watch video.

Now let's get into these free lessons for your Photoshop projects!
These cool Adobe Photoshop tutorials are free and a great entry point into Layer Styles in Photoshop.

Dramatic Text on Fire Effect: Photoshop Lessons
Flames are particularly hard to render in Photoshop, but in this tutorial Collis Ta'eed will show you how to use a photograph of fire to set text to the match. You'll render the look on a nice dark background with a gorgeous text effect to complete the image.

How to Create a 3D Text Effect Action: Free Adobe Photoshop Tutorial
One of the Photoshop basics you should learn first is how to create 3D text. In this tutorial, Melody Nieves will teach you how to make a 3D effect Photoshop action to create a simple 3D text effect.

How to Create a Disney Frozen Inspired Text Effect in Photoshop
Create a text effect inspired by the Frozen Disney movies with Enrique Eliçabe . The main concept is to show you how to create an ice texture effect with a variety of textures and text style attributes with Adobe Photoshop.

How to Create a Realistic Chrome Text Effect: Photoshop Tutorials FREE
This super easy and quick tutorial by Rose will show you how to use a couple of textures and layer styles to create a shiny, reflective chrome text effect.

How to Create a 'Stranger Things' Inspired Text Effect in Adobe Photoshop
Rose shows you an easy way to create a text effect inspired by the 'Stranger Things' series, using only layer styles and some simple adjustments.

How to Create an Underwater Text Effect: Photoshop Lessons
Water can make for such beautiful, inspiring visuals! In this tutorial, Daisy Ein will take some text and visually "place it" underwater—creating a wavy text effect, looking down and into the water, with the text beneath.

How to Create a Cloud Effect in Photoshop
Want to know how to make cloud shapes, cloud text, and cloud brushes, really quickly and easily? With John Negoita , you can make realistic cloud shapes using your own images.

How to Create a Realistic Embroidery Text Effect: Free Photoshop Tutorials
In this tutorial, John Negoita will show you how to create a realistic embroidery text effect in Photoshop using stitch brushes and layer styles. The end result will be a font that looks like embroidery!

How to Create a Japanese Brush Font Text Effect in Photoshop
Create a completely custom font effect from scratch easily and quickly. In Abbey Esparza's tutorial, you'll find step-by-step video instruction.

How to Make a Graffiti Text Effect With Photoshop Layer Styles
In this tutorial, Jan Stverak will show you how to create a graffiti text effect in Photoshop. You will use layer styles and the "Blend If" function from the blending options.

How to Create a Realistic Neon Light Text Effect in Adobe Photoshop
Layering glow and gloss effects can help create nice, shiny objects. Learn with Rose how to modify a brick texture for the background, and then use layer styles with the Pen Tool to add some bright, glowing neon text and a simple cable over it.

How to Create a Clean, Glossy Plastic Text Effect in Adobe Photoshop
Using multiple layer styles can help achieve a more detailed and 3D-looking effect. Rose will show you how to use layer styles, filters, textures, brushes, and adjustment layers to create a shiny, clean plastic text effect in Adobe Photoshop.

How to Create a Cartoon Rainbow Text Effect in Photoshop
Text effects and Photoshop text styles can be a lot of fun—they can be expressive, dynamic, and communicative! In this tutorial by Daisy Ein , you'll create a rainbow text effect in Adobe Photoshop using text effects, layer styles, and some other tricks too.

How to Create a Quick Broken Glass Text Effect in Adobe Photoshop
Rose will show you how to use a couple of layer styles to create a glass text effect. Then, you'll learn how to use the Selection Tool and masks to turn it into broken glass.

How to Create a Medieval Metallic Text Effect in Adobe Photoshop
Wondering how to make stylish medieval lettering? Jan Stverak will show you how to create a metallic medieval text effect, using a pattern and layer styles.

How to Create a Cool 3D Comic Text Effect in Photoshop
In this tutorial, you will learn with Jan Stverak how to make a 3D text effect in Adobe Photoshop easily and quickly. You will use layer styles and a filter to add a comic book look to it.

How to Create a Leaf-Covered Text Effect Action in Adobe Photoshop
Create your very own natural-looking text effect using layer styles with the power of patterns. Follow Anderson Luiz and you'll learn the ins and outs in no time.

How to Create a 3D Jewel Text Effect Action in Photoshop
Anderson Luiz will show you how to create fake 3D Photoshop actions. This text effect looks as if it's made of a faceted ruby.

How to Create a Cartoon Text Effect in Adobe Photoshop
Create an easy cartoon text effect using a pattern and a layer style with Jan Stverak . In this easy tutorial, you'll learn how to use different layer styles to make a bold, colorful effect.

How to Create a Fun Felt Photoshop Text Effect
Learn how to create a stitched felt Photoshop text effect in just a few easy steps. This effect by John Negoita is great for the winter holidays.

How to Create a Layered Floral Typography Text Effect in Adobe Photoshop
Floral typography is a design trend that combines nice floral elements with bold typography to create some elegant designs. Learn how to create flower text art in Photoshop with Rose . This tutorial will show you how to use a flower stock image, with simple text and a couple of layer styles, filters, textures, and adjustments, to create your own floral typography design.

Create a Candy Flavored Text Effect in Photoshop
Want to know how to create a sweet and tasty text design? In this quick tip tutorial, Enrique Eliçabe will explain how to create a "Caramelo" glossy candy cane style text effect in Adobe Photoshop.
Want to improve your Photoshop techniques? These Photoshop tutorials will help you to achieve your goals.

Mirror an Image in Photoshop
Flip the script on your images by learning how to mirror an image in Photoshop. The simple skill will be useful to know as you continue working on Photoshop projects.

Mix Cool Retro Curves Into Your Photographs: Free Photoshop Tutorials
Inspired by James White's designs, Fabio Sasso decided to figure out his own way of creating that type of effect in Photoshop. In this tutorial, he shows you how to mix cool retro geometric shapes into your photo.

Create a Basic Vexel Image
Alvaro Guzman will show you how to make a stylish comic-look image from a regular photo portrait. You'll learn a basic way to create a vexel image predominantly using Photoshop's vector-based tools.

How to Create VHS Glitch Art in Adobe Photoshop
Do you like that grunge, glitched look on old VHS tapes? There are different ways to add such effects to your images and even create an animation from a static photo. Ivan Gromov shows how to convert your image to a VHS frame in simple steps, using only standard Photoshop tools.

How to Create a Dripping Paint Photoshop Effect Action
In this tutorial, you will learn how to create an amazing, artistic paint-drip effect Photoshop action. Marko Kožokar will explain everything in so much detail that everyone can create it, even those who have just opened Photoshop for the first time.

How to Create an Awesome Dispersion Action in Adobe Photoshop
In this tutorial, Marko Kožokar will show you how to create an amazing dispersion effect.

How to Add Realistic Falling Snow to a Photo in Photoshop
Falling snowflakes are a great way to make your winter photography much more interesting. Sometimes the weather doesn't cooperate, however, and you have to turn to Photoshop to get the job done. Tony Aube will explain how to create a realistic falling snow effect in Photoshop and show you how to apply it to your images.

How to Create a Colorful Collage in Adobe Photoshop & Lightroom
In this tutorial, you will learn how to use Adobe Photoshop to create a colorful, futuristic collage featuring a beautiful woman. Kaylan Michael will also teach you how to retouch the artwork in Adobe Lightroom.

How to Make a Cool Photo Effect Album Cover Design in Photoshop
This tutorial by Abbey Esparza includes how to create a surrealistic body paint Photoshop portrait effect that you can use in your everyday art, not just on an album cover!
How to Turn a Landscape Photograph Into an Isometric Icon in Adobe Photoshop
Wondering how to create an isometric icon? Mohammad Jeprie will teach you how to create an isometric perspective grid in Adobe Photoshop. To make a nice isometric view illustration, you also will add some photo textures.

How to Make a Photo Collage in Photoshop
Create a cool and original photo portrait together with Marko Kožokar . In this very detailed and easy tutorial, you will learn how to make a photo collage in Adobe Photoshop.

How to Create a Living Galaxy Photo Effect in Adobe Photoshop
Do you like space and the planets? Make your own ethereal portrait with Abbey Esparza .

How to Create a Dramatic Angel Photo Manipulation in Photoshop
Abbey Esparza will show you how to make dramatic and cinematic angel photo effects using only a handful of images. This photo effect looks really breathtaking!

How to Create a Fun Giant Dog Photo Manipulation in Photoshop
What if dogs were as big as houses? You don't need to wonder any longer, because we can bring this vision to life with the magic of Photoshop! Let's take our Godzilla-dog for a walk in the city and see what happens with Monika Zagrobelna .

How to Create a Glowing Winter Night Photo Manipulation in Adobe Photoshop
Warm lights in a winter forest. Make your night photos look cozy and intimate. This tutorial by Jenny Le will help you with it.

Make a Trendy Double Exposure Effect in Adobe Photoshop
You’ve probably seen this interesting effect of two or more overlapping photos on the covers of music albums, in modern magazines, and in advertisements. In this tutorial by Yulia Sokolova , you’ll create a trendy double exposure effect in Adobe Photoshop.

How to Create a Wintry Deer Portrait Photo Manipulation in Photoshop
Add some winter magic to your portraits! Melody Nieves will show you how to make a magical creature in Adobe Photoshop using simple tools, Adjustment Layers, and high-quality stocks.

How to Create a Neon Rainbow Photoshop Portrait Effect
Make a cool punk-rock portrait with Abbey Esparza . You will learn a little-known trick for getting the perfect neon glow, as well as how to bring an all-over vibrancy and brightness to a portrait.

How to Remove a Person From a Photo in Adobe Photoshop
One of the most important and helpful tricks in Photoshop. Melody Nieves will teach you how to make it quickly and easily. Also, this tutorial contains a short video explanation.

How to Create a Human Cyborg Photo Manipulation in Adobe Photoshop
Let's add some cyberpunk to your portrait! Melody Nieves shows how to make a stylish cyborg portrait using color adjustments and regular brushes.

How to Create an Abstract Portrait With Rocks and Lava in Adobe Photoshop
In this detailed tutorial by Jenny Le , you'll learn how to build the base background using several texture images, retouch the model, and import an abstract texture and rock effect.

How to Create a Futuristic Fashion Portrait in Adobe Photoshop
Design an impressive modern portrait with Abbey Esparza . You'll explore the concept of hand-painting smaller details as opposed to using filters, pre-mades, or presets.

How to Create a Wonderland Photo Manipulation With Adobe Photoshop
Do you like Alice in Wonderland? Jenny Le will explain how to make a photo manipulation scene based on this story.

How to Create a Surreal Giraffe Photo Manipulation With Adobe Photoshop
Create a surreal giraffe using a variety of photo manipulation techniques. Jenny Le explains all the steps in this tutorial.

How to Create a Vintage Portrait Photo Manipulation in Adobe Photoshop
Some of our greatest inspiration can come from learning about the past. Melody Nieves explains how to turn a modern photo into an old-looking vintage one.

How to Create a Black History Month Collage in Adobe Photoshop & Lightroom
In this tutorial, Kaylan Michael will show you how to use Adobe Photoshop to create an intense, powerful collage for Black History Month featuring a beautiful woman, and how to retouch the artwork in Adobe Lightroom.

How to Create a Colorful, Wavy, Tribal Photo Manipulation in Adobe Photoshop & Lightroom
Kaylan Michael has always been a fan of Japanese art, so she decided to merge two styles together: Afrofuturistic and Japanese. In this tutorial, you'll learn how to use Adobe Photoshop to create a colorful, wavy, tribal collage featuring a beautiful woman.

How to Create a Black Panther Movie-Inspired Photo Manipulation in Photoshop
Do you like superheroes? With this brilliant tutorial by Melody Nieves , you could turn yourself into one of them!
Are you looking for new ideas for Photoshop projects? These step-by-step tutorials will help you to make top-quality designs. You'll learn the basics of composition, digital collages, and typography.

Make a Turn of the Century Vaudeville Poster
In this tutorial, you'll learn how to create a turn-of-the-century Vaudeville poster. This uniquely appealing style of advertisement was popular in the late 1800s and early 1900s. You sir! You madam! Step right up and prepare to be amazed as we transport an image of two friends back in time to create a poster advertisement without compare!

Wicked Worn Vintage Poster
Follow Alvaro Guzman and expand your poster design skills as he teaches you how to create a vintage poster using the power of Photoshop's blending modes.

How to Make a Movie Poster in Photoshop
Want to be a movie star? Abbey Esparza shows you how to create a stylish movie poster with stock pictures, the same technique you can apply to your own photos. You will be focusing on creating a gritty post-apocalyptic color grade using adjustment layers and will learn pro Photoshop tips.

How to Make a Star Wars Inspired Movie Poster in Photoshop
Become a hero of your own saga! In this tutorial, Monika Zagrobelna will show you how to create a movie poster in Adobe Photoshop, inspired by Star Wars: The Last Jedi.

How to Use Grids in Photoshop to Create a Typographic Poster
Grids are the base of every composition. With Laura Keung , you will create a powerful typographic poster by using grids. Also, you'll learn how to use layer masks and adjustment layers to edit images. Are you ready to get started?

How to Create a Light Streak Effect for a Contemporary Ballet Poster in Adobe Photoshop
Do you like ballet? In this tutorial, Laura Keung will explain how to combine three different Photoshop filters to create a contemporary poster. You will be mixing two styles, a modern light effect and a classical dancer.

How to Create a Music Poster Using Bitmap Mode in Photoshop
There are a lot of interesting effects you can achieve with Bitmap mode in Photoshop, and Laura Keung will show you how to use it. Together you will look at a couple of different patterns you can use on a photo to create a screen-printed effect.

How to Create a 90s Abstract Rave Poster in Adobe Photoshop
Do you like the rave aesthetic? Laura Keung explains how to create an abstract but impactful poster in Adobe Photoshop by using compelling imagery and typography.

How to Make a Halftone Roy Lichtenstein Style Poster in Adobe Photoshop
The pop art style of Roy Lichtenstein still looks modern and fresh. Laura Keung shows how to design a typographic poster using the Color Halftone filter to achieve a Roy Lichtenstein art style look.

How to Create a Poster Using Layer Masks in Adobe Photoshop
Want to make a stylish and elegant poster? Join Laura Keung as she shows you how to make an empowering poster using typography interwoven into flowers using the Layer Mask tool in Adobe Photoshop.

How to Create a Poster Using the Liquify Tool in Photoshop
In this tutorial, together with Laura Keung , you will design a poster using the Liquify Tool on a traditional object in Adobe Photoshop to give it a digital feel.

How to Make a Business Flyer Template in Photoshop
Need a new flyer for your business? Melody Nieves can show you how to make your very own professional flyers using Adobe Photoshop.
Do you want to learn cool things to do in Photoshop? Try digital drawing. Create your own universe by following these awesome tutorials. Warning, some of them may need a graphics tablet.

3D Transform a Colorful Cube Design
Constantin Potorac carefully examined the work of a great artist named Guilherme Marconi. In this tutorial, you'll learn one way to create a design using repeating elements in a style inspired by him.
Design a Glossy Download Icon
Ever wondered what it takes to create your very own glossy icon? Well if that's the case, follow Arik in this in-depth tutorial, where he gradually shows you how to build a download icon using basic geometric shapes combined with the power of Lauer styles.

Craft a Vintage Fifties Letters
In this tutorial, Rafik Massoud goes over how to create a fifties love letter with stamps, a bent corner, and a retro border using the brush engine, rectangle tool, layer styles, blend modes, and several intermediate techniques that are sure to propel your skills to the next level.

Draw a Pirate Character in Photoshop
Character design might be one of the most fun things that you can do in Photoshop. Here, Eric Galand will demonstrate how to draw a pirate character in Photoshop.

Quick Tip: Turn a Side View Into a 3D View in Photoshop
Drawing a side view of something seems to be the most intuitive—without "perspective" it's simple and fun. However, because of this simplicity, side-view drawings are also boring, and they make it very hard to present all the features of a character. In this short tutorial, Monika Zagrobelna will show you how to turn them into an interesting, 3D view with a simple Photoshop trick.

Learn to Paint Beautiful Realistic Lips in Adobe Photoshop
Lips in humans are instruments of emotion. Not because we speak with them, but also because of the infinite amount of feelings they can convey. Together with Alice Catrinel Ciobotaru , you'll go over a technique (among many others—everyone has their own way of painting) for painting realistic lips.

How to Paint a Dapper Victorian Cat in Adobe Photoshop
Digital artists have the unique ability to travel back in time by tapping into the styles and techniques of other periods. In this tutorial, Melody Nieves will show you how to create a fun, dapper cat, inspired by the beautiful portrait paintings of the Victorian era.

How to Create a Textured, Hand-Lettered Card in Adobe Photoshop
In this tutorial by Elizaveta Akimova , you will draw a Valentine's card with a Mexican flavor, including text reading "Te Quiero Mucho" ("I love you so much") and a lot of ornaments and decoration.

How to Create a Sign Language Digital Painting in Adobe Photoshop
Love is... universal. Learn how to create a digital painting inspired by the American Sign Language (ASL) alphabet in this Photoshop tutorial. Melody Nieves will cover how to draw each hand from scratch before tackling the digital painting with Layer Blend Modes and more.

How to Create a Hand-Lettered Housewarming Poster in Adobe Photoshop
Yulia Sokolova shows how to create a hand-drawn lettering poster that will make your home cozy and add a warmer atmosphere to any interior.
How to Create a Set of Zodiac Icons in Adobe Photoshop
In this tutorial, Yulia Sokolova explains the inspiring process of creating a set of funny cartoon zodiac icons. You’ll be using basic shapes as well as simple freehand drawing.

How to Create a Furry, Purple Spirit Day Mascot in Adobe Photoshop
Draw a cute purple mascot for Spirit Day with Monika Zagrobelna ! Also, she will show you how to shade colorful fur without having to switch colors all the time.

How to Paint Fluffy, Stormy, and Wispy Clouds in Photoshop
Love to stare up at the sky? Recreate beautiful, realistic clouds with this Photoshop tutorial by Melody Nieves .
Learn more Photoshop basics with our instructors in these Photoshop tutorials for beginners.

How to Make Gradients in Photoshop (and More!)
Do you want to become a pro with Photoshop Gradients? Jonathan Lam shows how to create a gradient in Photoshop, as well as how to load and save preset gradients in Photoshop.

How to Create a Light Particles Photoshop Brush
In this tutorial, Jonathan Lam shows the step-by-step process of how to create a particle effect using Photoshop brushes.

How to Create a Layer Mask in Photoshop
In this quick tip tutorial by Abbey Esparza , you will learn what a layer mask is, what it does, and how to create a mask for your Photoshop ideas!

How to Create a Rubber Stamp Effect in Adobe Photoshop
Turn any photo into a rubber stamp in just a few quick steps. John Negoita will show you how to create a realistic rubber stamp effect in Photoshop.

How to Insert a Photo Into a Product Mock-Up in Adobe Photoshop
In this quick Photoshop tutorial, Kirk Nelson explains how to use Adobe Photoshop to add your own custom imagery to a product mock-up purchased from Envato Market.

Photoshop in 60 Seconds: How to Apply a 3D Anaglyph Effect
A 3D anaglyph image is one that contains two different colored images, one for each eye, using filters of typically red and cyan. Melody Nieves explains how to make it in Photoshop.

Use a Tattoo Font to Add a Realistic Tattoo to a Photo in Photoshop
A tattoo font is the easiest way to create a stylish tattoo in no time. In this tutorial, Monika Zagrobelna will show you how to add a realistic tattoo in Photoshop using a tattoo font.

How to Create a Photoshop Painting Effect
With Ivan Gromov , you will create a vintage painting Photoshop action using smart filters, mask layers, vintage textures, and dynamic brushes for your Photoshop projects.

How to Create an Instagram Post Template in Photoshop
In this tutorial, Abbey Esparza will take a quick look at how to create an Instagram post template in Adobe Photoshop!

Design a Vista Styled Wallpaper
Join Vaclav Krejci as he shares his process of creating a gradient background in Adobe Photoshop. Learn how to draw curved shapes and make them glow using the Layer Style panel.

Create a Wavy Blackberry Style Wallpaper Design
Fabio Sasso will show you how to create an abstract background image using Photoshop only. The design has a cool wavy pattern with interesting lighting effects, like the Blackberry 9000 wallpaper. This is a tutorial you can sit down and complete in less than an hour.
I've shown you an awesome selection of free Photoshop tutorials from Tuts+, which I'm sure you've found useful. But, if you prefer to watch Photoshop tutorials for beginners on video, I'm here to help you.
The next videos are from our playlist Learn Adobe Photoshop , where you can watch more than 150 Photoshop tutorials and learn cool things to do in Photoshop. And don't forget to check out our Envato Tuts+ YouTube channel, where you'll find more fun Photoshop projects.
1. Create a Magical Mermaid Illustration in Photoshop
Have you ever wondered how to draw a mermaid from scratch? For sure, this could make a very fun Photoshop project! Well, this free Photoshop tutorial will teach you how to draw a mermaid tail using the Pen Tool and some photo manipulation. Turn your Photoshop ideas into amazing digital drawings!

2. How to Make a 3D Text Effect in Photoshop
Text effects are really cool things to do in Photoshop. Why don't you take a look at these Photoshop tutorials for beginners and learn how to make a 3D text effect.

3. Create a Living Galaxy Photo Manipulation Effect in Photoshop
Looking for awesome Photoshop projects? What about creating a live galaxy? That's a cool Photoshop idea. Learn how to create stars, galaxies, and nebulas in this free Photoshop tutorial.

4. Create an Instagram Story Template with Adobe Photoshop
Instagram stories can be great Photoshop projects, believe it or not. In these Photoshop tutorials for beginners, you'll learn to quickly create Instagram story templates for your accounts.

5. How to Create a Cool Glitch Photo Effect in Adobe Photoshop
Speaking about cool things to do in Photoshop, a glitch effect is a pretty nice thing to Photoshop. Check this free Photoshop tutorial and recreate a glitch like the ones you see on television or in video games.

6. How to Make a Halftone Pattern in Photoshop
Halftone patterns can become fun Photoshop projects if you follow our Photoshop tutorials for beginners. Learn how to create a halftone effect in Adobe Photoshop in different ways to achieve the exact look you want.

7. How to Use Layer Masks in Photoshop
If you've got plenty of things to Photoshop, then you need to master the use of masks. Photoshop masks add tons of advantages to your workflow that will help you achieve some of the best photo effects.

8. How to Make a Stop Motion Video in Adobe Photoshop
Looking for Photoshop ideas for your pictures? Learn a simple and useful animation tip with our Photoshop tutorials for beginners.

9. How to Create an Instagram Filter Adobe Photoshop Action
If you'd like to start Instagram filters Photoshop projects, then this free Photoshop tutorial is for you. With a few simple adjustments, you can achieve a cool photo effect like your favorite app in Adobe Photoshop.

10. How to Remove a Person from a Photo
Who hasn't taken a cool picture, only to realize a person is ruining the view? Well, cropping out objects and removing unwanted tourists from pics are some really cool things to do in Photoshop. Just follow our free tutorial and start this fun Photoshop project!

11. How to Make a Glowing Photo Effect to a Portrait in Photoshop
Tribal makeup styles are nice Photoshop ideas to recreate, don't you think? Learn to create this glowing photo effect inspired by African tribal makeup following this free Photoshop tutorial.

12. Create an Abstract Diamond Lens Effect in Adobe Photoshop
There are plenty of cool things to do in Photoshop. What about creating a trippy diamond lens effect? Follow this tutorial and get yourself some cool Photoshop projects!

13. How to Create a Vintage Photo Filter With Adobe Photoshop
You'll find these Photoshop tutorials for beginners pretty easy to follow! In 60 seconds, learn to create your own Photoshop Action for a cool vintage photo effect.

14. How to Decorate Photos with Drawings in Adobe Photoshop
Looking for more things to Photoshop? Then check this fun Photoshop project and learn to decorate pictures with drawings in less than 60 seconds!

15. Blur a Photo's Background with a Custom Photoshop Action
We've got this handy tutorial from our selection of cool things to do in Photoshop. A blurred background is a great way to bring attention to the objects in the foreground.

16. Create a Haunted Portrait Effect in Photoshop
I've got some pretty unique Photoshop ideas for you. Have you ever wished to create a haunted image? Then this free Photoshop tutorial will give you tons of cool Photoshop projects.

17. How to Create a Kaleidoscope Effect in Adobe Photoshop
We haven't run out of Photoshop ideas for you. This Photoshop tutorial for beginners will teach you how to create a kaleidoscope effect to use in your Photoshop projects.

18. Use a Tattoo Font to Add a Realistic Tattoo to a Photo in Photoshop
Tattoos are interesting things to Photoshop. If you're wondering how a tattoo would look on you or a friend, then follow this useful free tutorial.

19. How to Make a Movie Poster in Photoshop
For cinematography lovers, movie posters are awesome things to Photoshop. This free Photoshop tutorial focuses on creating a gritty post-apocalyptic color grade using adjustment layers.

20. How to Create an Orton Effect Photoshop Action
If you're short on Photoshop ideas, why don't you take a look at this?
The Orton effect is a dreamy glow often added to landscape images to make them look magical. This free Photoshop tutorial will show you how to create an action to recreate the popular Orton effect.

21. BEST Cartoon Effect in Photoshop
Learn how to make an amazing cartoon effect in this step-by-step Photoshop tutorial with Cristi Kerekes.

We've covered a great range of free Photoshop tutorials and effects you can learn with some practice.
However, if you're short on time, you can always use our premium Photoshop actions and brushes from Envato Elements to give your pictures some cool effects in a few clicks. Let's see them!
1. Double Exposure Photoshop Action (ATN)

Double exposure pictures are cool things to Photoshop. Use this Photoshop action to create a double exposure effect in a few clicks. You can add any tone or gradient to your composition to make it stunning!
2. Photoshop Ink Brushes (ABR)

Looking for Photoshop ideas? Check this complete set of Photoshop brushes, which includes a total of 36 brushes, divided into 3 different categories: regular brushes (for ink sketches and illustrations), ink washes, and ink stain stamps.
3. Sand Dust / Powder Explosion Photoshop Action (ATN, ABR)

Get this creative Photoshop action and give your pictures a dramatic sand effect! This best-selling action also includes a video tutorial link, so you'll learn in detail how to complete this fun Photoshop project.
4. Watercolor Brushes for Photoshop (ABR, PNG)

This is one of our favorite sets of Photoshop brushes because it's very complete and easy to use. This Photoshop project includes:
- 15 watercolor hand-drawn brushes
- 15 flora and fauna elements on transparent background
- 2 backgrounds with floral elements
5. Retro Photo Kit (ATN, PNG)

Give your pictures a retro look! This kit gives you 15 cool film Photoshop actions, 10 beautiful light leaks, an easy date stamp generator, and a retro font.
6. Plastic Photoshop Stamp Brushes (ABR)

Use these Photoshop brushes to give your image a realistic look. This set comes with 30 Brushes inside, 2500 pixels size, and works with any Photoshop version! These brushes will give a cool look to all your Photoshop projects and ideas.
7. Dissolve Photoshop Action (ATN)

We've got more Photoshop ideas! What about this cool dispersion effect? Dissolve and disperse parts of your photo! Simply brush over the areas that you want to dissolve, choose the direction of liquid dispersion, and just play the action.
8. Vintage Painter Photoshop Action (ABR, ATN, PAT)

Use this Photoshop action to create a professional painting effect of watercolor and vintage looks. The final result will include fully editable layers, colors, and elements.
9. Splatter Stamp Photoshop Brushes (ABR)

This set of 15 splatter stamp brushes will come in very handy when you're looking for cool things to do in Photoshop. Don't hesitate to add it to your collection.
We hope you enjoyed these Photoshop basics and tutorials.
Still craving more inspiration and Photoshop ideas? Then check our incredible collection of Photoshop effects to transform your photos through Envato Elements.

Latest Photoshop tutorials
Welcome to Photoshop Essentials, where everyone can learn Photoshop! We offer fun, exclusive, step-by-step tutorials for all skill levels, and all written with beginners in mind. From Photoshop Basics to Photo Editing and Retouching, Photo Effects, Text Effects and more!
Visit our YouTube channel for our latest Photoshop video tutorials!
Check out our latest Photoshop tutorials below. Or download our tutorials as PDFs and get exclusive bonus content!
Subscribe to our newsletter! Keep up with our latest tutorials!
The Smart Way to Use Photoshop’s Camera Raw Filter
Photoshop’s Camera Raw filter is the best way to edit images, but there’s a trick you need to know to keep your edits non-destructive.
Using the new Generate Background AI in Photoshop
Quickly remove backgrounds from photos and replace them with new AI generated backgrounds using the new Generate Background feature in Photoshop.
Adobe Firefly vs Midjourney – Which is the better AI image generator?
Adobe Firefly and Midjourney are both popular AI image generators. But which one produces better results? Let’s find out.
How to Turn Photos to Paintings with Generative Fill in Photoshop
Learn the simple trick that lets you turn any photo into a painting in Photoshop using Generative Fill and Adobe Firefly.
How to Brighten Eyes in Photoshop and Make Them Sparkle
Learn how to use Photoshop to brighten the eyes of your subject and help your portraits look more engaging. A step-by-step tutorial.
How to Generate AI Images in Photoshop using Adobe Firefly
Learn how to use the new Generate Image feature in the Photoshop beta to generate entire AI images from scratch with the power of Adobe Firefly and its new Firefly Image 3 model.
Using Visual Intensity in Adobe Firefly for More Detailed Images
Learn how to use Adobe Firefly’s Visual Intensity setting to adjust the amount of detail and complexity in Firefly’s AI images.
Using Structure Reference and Style Reference in Adobe Firefly
Learn how to control the composition and visual style of Adobe Firefly’s AI-generated images by using existing images as a reference.
The Easy Way to Open or Add Images in Photoshop
Learn how to open an image as a new document, or import images as layers in your document, just by dragging and dropping them into Photoshop.
How to Hide the Home Screen in Photoshop
Learn how (and why) to stop Photoshop’s Home Screen from displaying automatically, and how to show the Home Screen when you need it.
Hide Photoshop with Screen Modes and Interface Tricks
Learn how to use Photoshop’s screen modes and other tricks to hide the Photoshop interface and see more of your image as you work.
Save Your Own Adjustment Layer Presets in Photoshop
Learn how to save your adjustment layers as presets so you can instantly apply them to other images. New in Photoshop 2024.
Using the new Adjustment Brush Tool in Photoshop
Photoshop’s new Adjustment Brush Tool makes local non-destructive image adjustments simple and intuitive, especially for Photoshop beginners!
How to Round Corners in Photoshop
Learn the best way to give your photo rounded corners in Photoshop with this easy step-by-step tutorial.
Two Ways to Open JPEG Files in Adobe Camera Raw
Camera Raw is Photoshop’s best way to edit images, and this tutorial shows you two easy ways to open JPEG files in Camera Raw, first from Adobe Bridge and then from Photoshop.
Using Adjustment Layer Presets in Photoshop
Photoshop’s Adjustments Presets use adjustment layers to easily enhance or add effects to your image non-destructively, and are a great way to learn how adjustment layers work!
Create a Gold Text Effect in Photoshop 2024
Learn how to create a shiny gold text effect in Photoshop with this step-by-step tutorial, and even how to save the gold text with a transparent background.
Fade an Image to Color in Photoshop Faster with Live Gradients
Learn how to fade an image to color with Photoshop the new and easy way using live gradients!
How to Add Falling Snow to Photos with Photoshop
Learn how to add realistic falling snow to your winter photos with Photoshop.
Using the Improved Remove Tool in Photoshop 2024
Learn all about the Remove Tool’s great new features in Photoshop 2024 that make removing people or objects from photos easier than ever!
Get Better Color Halftone Effects in Photoshop
Learn how to create more realistic color halftone patterns using Photoshop’s Color Halftone filter and this simple trick.
How to Create a Halftone Dot Pattern in Photoshop
Learn how to turn your photo into a halftone dot pattern in Photoshop, including how to create a black and white halftone pattern and how to add color!
How to Add a Vignette in Photoshop with Gradients
Add a vignette to your photo the fastest and easiest way using Photoshop and its new Live Gradients feature in Photoshop 2023.
Extend Images in Photoshop Faster with Generative Expand
Learn how to extend images in Photoshop with fewer steps using Generative Expand, a new streamlined version of Generative Fill.
How to Use Live Gradients in Photoshop 2023
Live Gradients in Photoshop 2023 make drawing and editing gradients easier than ever. This step-by-step tutorial shows you how to use them!
Generative Fill in Photoshop: Remove People and Objects from Photos
Learn how to use Generative Fill in Photoshop to remove people and objects from photos and watch them disappear like they were never there.
Generative Fill in Photoshop: How to Add Water Reflections
Learn how to add realistic water reflections to an image in seconds using Photoshop’s Generative Fill, powered by generative AI.
Generative Fill in Photoshop: How to Extend an Image
The future of image editing is here! Magically transform portrait shots into amazing landscape photos using Generative Fill in Photoshop!
Upscale Images with Super Resolution in Adobe Camera Raw
Use the AI-powered Super Resolution in Adobe Camera Raw to instantly double the width and height of your photo without losing sharpness or detail.
How to Remove Noise from Photos with Denoise in Adobe Camera Raw
Learn how Camera Raw’s new Denoise feature removes noise from your photos using the power of AI.
Remove People or Objects from Photos Using Photoshop’s Remove Tool
Photoshop’s new AI-powered Remove Tool removes people and objects from photos faster than ever. Here’s how to use it!
Add A Spotlight Behind Your Subject With Adobe Camera Raw
Add a spotlight behind the subject in your photo with just a few simple steps using the amazing masking features in Adobe Camera Raw.
How to Crop Images in a Circle Shape with Photoshop
Tired of cropping your images as rectangles and squares? Learn how to easily crop an image into a circle with Photoshop!
Use the Oil Paint Filter in Photoshop to Turn Photos to Paintings
Transform your photos into beautiful and stunning paintings with the Oil Paint filter in Photoshop. Follow along with this step-by-step tutorial.
A Better Way to Add Multiple Strokes to Text in Photoshop
Frustrated with layer effects? Learn the trick to adding multiple strokes around text that keeps the strokes as smooth and rounded as the letters!
Using Layer Effects with Layer Masks in Photoshop
Using layer effects and a layer mask on the same layer can give you unexpected results. Learn the tricks to getting your effects and masks working perfectly together!
How to Paste an Image into a Layer Mask in Photoshop
Learn the simple trick that lets you paste an image or a texture directly into a layer mask!
A Better Way to Convert Type to a Smart Object in Photoshop
Learn a better and more flexible way to convert type to a smart object that makes editing your text inside the smart object a whole lot easier.
How to Create a Retro 3D Movie Effect in Photoshop
Learn how to recreate the look of classic 3D movies with this easy red and blue retro 3D effect in Photoshop.
Photoshop’s Brush Tool Fixed in Latest Update
Photoshop’s Brush Tool is finally fixed in the latest Photoshop update and no longer gets lost in the background as you paint!
Photoshop Image Adjustments vs Adjustment Layers
Still using Photoshop’s image adjustments? Here’s why adjustment layers are a better way to edit your photos.
How to Crop a Single Layer in Photoshop
Here are two ways to crop a single layer in Photoshop so you can crop an image on one layer without cropping every layer at once.
How to Flip and Rotate Letters in Photoshop
Here’s the simple trick that lets you flip or rotate individual letters in a word with Photoshop.
Use Smart Portrait in Photoshop to Change Your Subject’s Look
Change your subject’s appearance using Photoshop’s Smart Portrait filter. Add facial expressions, make them look young or old, adjust hair thickness and more!
How to Download the Photoshop Beta and Preview Upcoming Features
Try out upcoming Photoshop features before their official release by downloading the Photoshop beta. This tutorial shows you how.
Remove Distractions with Neutral Color Mode in Photoshop
Remove distracting colors from Photoshop’s interface with the new Neutral Color Mode option in Photoshop 2022.
Select Subject’s New Cloud Option in Photoshop 2022
Get better 1-click selections in Photoshop 2022 with Select Subject’s new Cloud option that processes your image on Adobe’s servers.
How to Change the Color of an Object in Photoshop
Learn how easy it is to change the color of an object in Photoshop, including the fastest way to select an object and two simple ways to change colors!
How to Posterize A Photo in Photoshop
Add an easy posterize effect to your image in Photoshop to recreate the classic look of posters printed with limited colors of ink.
How to Keep An Image Centered After Cropping in Photoshop
Is Photoshop not centering your image on the screen after you crop it? Here’s why it happens and how to fix it!
Unsupported browser
This site was designed for modern browsers and tested with Internet Explorer version 10 and later.
It may not look or work correctly on your browser.
- Presentations
How to Make a Photo Collage in PowerPoint Presentations (+Video)
Are you searching for a wow factor to showcase your creative work? I'll take you through how to make a collage in PowerPoint that'll immediately capture your audience's attention!

When it comes to your presentation, text matters. But text is just one part of your presentation. Visuals like photos are another essential part of your PowerPoint slide deck.
If you want to spice up your presentation, using a PowerPoint photo collage template is a good idea. In this tutorial, I’ll explain how to make a collage in PowerPoint and its benefits. We’ll also share some quick tips on how to make a photo slideshow in PowerPoint .
How to Quickly Make Great Photo Collage Presentations With PowerPoint Templates (Video)
Do you want to create a PowerPoint photo collage for your next presentation? I've got a quick video that'll help you find out what you need to know about how to make a collage in PowerPoint:

Keep reading for even more tips and ideas about PowerPoint picture collages. I'll cover much more in the rest of the tutorial.
Jump to content in this section:
Why Use Collage Layouts in Your Presentation?
How to create collage layouts in powerpoint, 5 powerpoint image trends, 5 quick tips for making collage photo layouts, find powerpoint templates with collage layouts on envato elements, 5 amazing photo collage powerpoint templates, learn more about making great powerpoint presentations in 2024, add a photo collage to your powerpoint presentation.
In my experience, collage layouts are a creative way to add many images to your slides. But how do you make a photo slideshow in PowerPoint?
Add several photos to the slide to create a slideshow or collage PowerPoint layout. Then, organize them like you would with a paper collage or a scrapbook. I prefer to save time using a premium pre-made PowerPoint photo collage template.

Using PowerPoint collage layouts can make presentations more visually appealing. This effortlessly creates a dynamic feel, keeping your audience interested and engaged.
Plus, a PowerPoint collage template makes your presentation stand out. Most of your peers will stick to a more traditional slide layout of an image next to a text block.
I've seen photo collage PowerPoint layouts often come in handy for creative professionals. Here are a few examples:
- when presenting past projects such as design or illustrative work
- when showcasing photos from an event
- when sharing photos of different products or services
As I mentioned, a PowerPoint picture collage is a great way to add many images with minimal slides. Let's examine how to create a collage layout in PowerPoint quickly.
For this tutorial, I’ll be using the Mouve PowerPoint template from Envato Elements.

This is a clean modern PowerPoint template that's suitable for all kinds of presentations. Let's get started:
1. Create a New Blank Slide
%20Inserting%20a%20blank%20slide.jpg "photoshop collage assignment")
First things first. Open your PowerPoint template. Then click on the Insert tab. Select New Slide, and from the drop-down menu, choose a blank slide.
This gives you a clean slate to start with.
2. Load Your Images
Next, load all the images you want to use in your photo collage into your PowerPoint template.
On the Insert tab, select Pictures > Picture From File . Locate the folder with the pictures on your computer. Press Control-A to select all the images in that folder, and then press Insert .
%20Inserting%20pictures%20(1).jpg "photoshop collage assignment")
You can also open the folder containing all the images. Press Control-A to select them all and drag them onto your PowerPoint slide.
3. Make the Photo Collage
With all your images loaded, it’s time to make your PowerPoint picture collage. First, resize the images so that they all fit nicely onto the slide. Resize the images—drag the corner Anchor Points that appear when the image is selected.
Then, select an individual image and drag the middle to position it on the slide.
How you position the images on the slide is entirely up to you, but here are some of my go-to ideas to get you started:
- Put them side by side if you prefer a classic layout.
- Experiment with overlaying images for a more creative layout.
- Mix horizontal and vertical images for a dynamic look and feel.
- Use a combination of photos and shapes to create a layered collage look.

Once you’ve arranged the photos as you want them, you can adjust which photo should be on top.
Right-click on a photo and select Bring to Front to position it on the top. Or select Send to Back to place it behind a different image. Then, repeat this process for any other image on the slide.
Adjusting%20the%20position%20of%20the%20images%20(1).jpg "photoshop collage assignment")
4. Crop Images to a Shape
Do you want to add more photos to your collage but don't have enough room on the slide? Consider cropping some images to a shape. This is also an excellent way to get even more creative with the collage layout.
%20Cropping%20image%20into%20shape.jpg "photoshop collage assignment")
Select the image you want to crop and click the Picture Format tab. Click the Crop icon and select the Crop to Shape option from the drop-down menu. Then, select the shape you want.
In this example, I’ve selected the Oval shape.
5. Adjust the Image Crop

Sometimes, you may want to adjust the image's crop so that the desired portion shows up. To do this, select the image and click on the Picture Format tab. Then click the Crop icon and adjust the crop.
You can also move the image around to reposition it within the crop marks.
6. Play With Colors

This is my favorite part. Make some images stand out more by adding a color overlay. To do this, click the Picture Format tab and the Color options. You can then play with the saturation and tone or add a color overlay.
7. Adding Final Touches
Are you done arranging and cropping your images? Take a few minutes and step away from your presentation. Take a short break and return to see the PowerPoint collage design with fresh eyes.
%20Duplicating%20a%20slide%20(1).jpg "photoshop collage assignment")
You can then add more images if there are any blank spots or experiment with a different layout.
Consider duplicating the existing slide first to have a copy of the original layout. You can do this by right-clicking on a slide and selecting Duplicate Slide . This allows you to change the design as much as you want while having a backup.
We've covered how to make a photo slideshow in PowerPoint. Let's explore some of the latest image trends in 2024 . Following trends helps me avoid unintentionally creating slides that look dated.
Here are my top five image trends for 2024:
1. Create Depth With Gradients
Gradient backgrounds in PPT are a common trend that can applied to images too. Seamlessly blend hues and tones to create depth. This trend elevates the aesthetic of your presentation and will impress your audience.

Gradient Minimal Template is an example of a quick and easy way to create gradient images. Using a gradient overlay on black-and-white photo collages creates a unique style.
2. Create Fluid Custom Shapes
Are you bored of squares, rectangles, and circles? Photo masks apply custom shapes to your images, giving your slides a unique edge.

Doodle Creative PPT is a professional yet fun presentation. It includes a mix of creative doodles and custom-shaped photo collages.
3. Keep It Clean With Geometric Shapes
If you like the idea of custom shapes but don't like non-fluid shapes, geometric shapes are perfect. In my experience, you can't go wrong with a slide like Geometric Infographics. It's clean, professional, and super fun!

4. Stand Out With Color
If you're a pro at changing the background colors of images, you'll have fun with this colorful image trend. Let your images be the main design element of your slides. The example below showcases when minimalism meets color to create a professionally designed presentation.

5. Neutral, Organic, and Beige
In a loud, colorful design world, this unique trend creates calm and warmth. Neutral, earthy tones create a sense of sophistication and credibility for your brand. If you're looking to leave your audience with a sense of comfort and trust, this trend is for you.

Organic Aesthetic Minimalist PPT effortlessly creates this sense of comfort and trust. The images are minimalist, artistic, and earthy. The PPT template is elegant in beige with black fonts.
Once you've got the perfect PowerPoint template , it’s time to add your collage. Here are five quick tips to help you create unique photo collage layouts:
1. Pair Photos That Are Similar in Tone and Style
I find that photo collages look best if you pair similar photos. For example, pair light photos with light photos instead of mixing light and dark photos.
2. Combine Similar Shapes

If you want your images to look more creative, cropping them into shapes is a nice touch. To keep things consistent and cohesive, combine similar shapes, e.g. circles with ovals and rectangles with squares. This will look more aesthetically pleasing.
3. Pair Images With Color Blocks
You don’t always have to combine images to create a PowerPoint collage look. You can also pair images with shapes used as color blocks to achieve the same effect. This method can give your images an elegant border.
4. Keep Text to a Minimum

A PowerPoint photo collage presents a lot of information. If you've got to use text with your photo collage, keep it to a minimum. Doing so allows your photos to be the main focus of each slide and will stop your text from distracting your audience.
5. Alternate Photos and Text
If you want a minimalist collage look, consider alternating photos and text. This gives your presentation photo collage a dynamic look and feel. It's even a workaround if you've got a limited number of photos to work with.
If you’re looking for the best collage PPT templates , Envato Elements has got you covered. Envato Elements is a subscription-based marketplace with a unique offer.
PowerPoint Photo Collage

You'll get access to thousands of PPT templates and other digital assets for a low monthly price. Download unlimited:
- stock photos
- web templates
Envato Elements is a top choice for creative professionals who want to work smart. It gives you the best bang for your buck if you need creative assets on an ongoing basis.
But wait! I have something that'll help streamline your search for creative assets even more.

Find what you need faster with Envato Elements' powerful new AI-driven search assistant. Simply describe your creative project in a few words. And you'll receive a curated collection of digital assets to choose from.
It's a creative professional's dream come true!
Now that you know what PowerPoint collage layouts are and why you should use them, what's next? You’ll need a great PowerPoint template as a starting point. Let’s take a look at some of the best PowerPoint templates from Envato Elements:
1. Chime Photo Montage PowerPoint Template

First up, we've got the Chime presentation template from Envato Elements. This PowerPoint collage template has a clean but colorful design. It offers 110+ unique slides, some of which have built-in collage layouts.
This PowerPoint collage template helps make a collage quickly. Besides that, the template includes:
- infographics
- break slides
- minimalist slide transitions
2. Art Gallery PowerPoint Photo Collage Template

The Art Gallery template has a multipurpose creative design. Its focus on typography and creative image-based slides helps your content stand out.
The template includes 25 unique slides designed in 16:9 widescreen resolution. It also comes with image placeholders, free fonts, and editable graphics.
3. Porto & Profile Photo Montage PowerPoint

Try Porto & Profile if you want a minimalist photo montage PowerPoint template. It also comes with plenty of collage layouts built in.
This modern PowerPoint collage template includes 28+ unique slide layouts. Thanks to image placeholders, the template is also easy to edit. You'll also find subtle slide transitions.
4. Haluiva Pitch Deck PowerPoint Template

The Haluiva Pitch Deck template can be used as a pitch deck and for any other business presentation. The template includes several image slides with clean collage layouts. You'll also find drag-and-drop image placeholders for easy editing.
The PowerPoint collage template comes with:
- icon variations
- 2 theme variations
- 30 unique slides
- image placeholders with slide master
5. Shabil Business PowerPoint Template

The Shabil template is a business PowerPoint template with an elegant design. The template is a great starting point for quickly making photo collage layouts.
It has 30 slides with master slides and drag-and-drop image placeholders. The slides were designed in widescreen resolution.
Use a PowerPoint slide deck to create a great first impression for your creative brand. Let's show your audience how creative you can get.
Here are my top picks from the Ultimate PowerPoint Tutorial Guide . That'll help bring any presentation to life.

Adding photo collage layouts to your presentation makes them more appealing. And helps your creative work stand out. Now that you've read this article, you're all set to make great photo collage layouts. It's time to present your creative projects in style.
Do you still need a starting point for your presentation? Check out our top collage layouts with built-in PPT templates on Envato Elements. They'll save you from going through all the steps of how to make a photo slideshow in PowerPoint. You’ll also find other digital assets that are perfect for all your creative projects.
Editorial Note: This post was originally published in September 2021. It's been comprehensively revised to make it current, accurate, and up-to-date by our staff—with special help from Barni Rajah . Also, we've added a short video from Andrew Childress to help you get started quickly.


Red Sox shortstop to begin rehab assignment at Worcester on Sunday
- Updated: Aug. 30, 2024, 7:14 p.m.
- | Published: Aug. 30, 2024, 5:51 p.m.

Red Sox shortstop Trevor Story will begin a rehab assignment Sunday. (AP Photo/Reed Hoffmann) AP
- Christopher Smith | [email protected]
DETROIT — Red Sox shortstop Trevor Story will begin a rehab assignment with Triple-A Worcester on Sunday.
He will serve as the WooSox’ DH on Sunday at Polar Park against Toledo. The plan is for Story then to play shortstop Monday.
If you purchase a product or register for an account through a link on our site, we may receive compensation. By using this site, you consent to our User Agreement and agree that your clicks, interactions, and personal information may be collected, recorded, and/or stored by us and social media and other third-party partners in accordance with our Privacy Policy.
Student fatally shot in apparent murder-suicide at Rice University

A college student was found fatally shot in her dorm room in Houston on Monday afternoon, and the suspect in the shooting, whom she was dating, was found dead nearby, officials said.
Rice University identified the woman as Andrea Rodriguez Avila, a junior from Maryland. Campus Police Chief Clemente Rodriguez said members of her family were concerned about lack of contact and requested that officers check up on her.
Once university police discovered she missed at least one class Monday, officers moved in shortly before 4 p.m. for a welfare check, Rodriguez said at a news conference Monday evening.
That's when they found her body in her room at the Jones College on-campus residence hall, alongside the suspect's body and a note he is believed to have written, Rodriguez said. The note suggested to investigators that the two were "having a troubled relationship," he said.
"They were dating," he said.
Detectives believe the suspect died from a self-inflicted gunshot wound, Rodriguez said. His identity was not released. The chief said he may be from Florida.
Investigators believe the man got into the residence by accompanying Avila, who had access, Rodriguez said.
There was no sign of forced entry, administrators said in a message Monday night addressed to students, parents, staff members and faculty members. Counseling is available to students 24 hours a day, administrators said in the message.
“I want our students, parents and Rice community to know that the Rice campus is safe, there is no immediate threat, and tonight we will wrap our arms around our students," Rice University President Reginald DesRoches said at the news conference.
Jones College started out in 1957 as Mary Gibbs Jones College with $1 million from the Houston Endowment, according to Rice University . It was developed as a rare place where women could reside on campus, and it evolved into a full-fledged, coeducational institution.
If you or someone you know is in crisis, call or text 988 to reach the Suicide and Crisis Lifeline or chat live at 988lifeline.org . You can also visit SpeakingOfSuicide.com/resources for additional support.
If you or someone you know is facing domestic violence, call the National Domestic Violence hotline for help at (800) 799-SAFE (7233), or go to www.thehotline.org for more. States often have domestic violence hotlines, as well.
Dennis Romero is a breaking news reporter for NBC News Digital.
- Cast & crew
- User reviews
My Hero Academia: You're Next

Izuku Midoriya, a U.A. High School student who aspires to be the best hero he can be, confronts the villain who imitates the hero he once admired. Izuku Midoriya, a U.A. High School student who aspires to be the best hero he can be, confronts the villain who imitates the hero he once admired. Izuku Midoriya, a U.A. High School student who aspires to be the best hero he can be, confronts the villain who imitates the hero he once admired.
- Tensai Okamura
- Yôsuke Kuroda
- Kôhei Horikoshi
- Kaito Ishikawa
- Kenta Miyake
- 1 User review

- Shoto Todoroki

- Giulio Gandini
- Anna Scervino
- Katsuki Bakugo

- Ochaco Uraraka
- Izuku Midoriya
- All cast & crew
- Production, box office & more at IMDbPro
More like this

Did you know
- Trivia This is the final My Hero Academia movie, as the manga ended a few days after the film's release.
- Connections Spin-off from My Hero Academia (2016)
User reviews 1
- October 11, 2024 (United States)
- Official website
- 我的英雄學院劇場版:You're Next
- See more company credits at IMDbPro
- $19,003,869
Technical specs
- Runtime 1 hour 50 minutes
Related news
Contribute to this page.

- See more gaps
- Learn more about contributing
More to explore
Recently viewed.
- SI SWIMSUIT
- SI SPORTSBOOK
- Frogs in the Pros
- More Sports
- MEM'RIES SWEET
Women's Soccer Poll Watching Week 2: Frogs Drop Out of Top 25
Barry lewis | aug 28, 2024.

The TCU women's soccer team (2-1-0) debuted in Week 1 of the United Soccer Coaches Top 25 after starting the season 2-0 with wins over Alabama and Charlotte . However, this week, after losing to No. 15 Notre Dame , the Horned Frogs dropped out of the Week 2 poll. They are now in the "Receiving Votes" category.
Florida State (3-0-0) remains the top team in the nation. The Big 12 has three teams in the Top 25: No. 11 Oklahoma State (3-0-0, up six spots), No. 16 BYU (1-0-2, down 12 spots), and No. 22 Colorado (3-0-0, previously not ranked). Arizona State (2-0-2) joins TCU in the "Receiving Votes" category.
United Soccer Coaches Top 25 - Week 2
1. Florida State (3-0-0), no change 2. Stanford (3-0-0), no change 3. UCLA (3-0-0), up 3 4. Michigan State (2-0-1), up 4 5. North Carolina (3-0-0), no change 6. Arkansas (2-0-1), up 3 7. Virginia (3-0-0), up 14 8. Memphis (2-0-0), up 2 9. Notre Dame (2-1-0), up 5 10. Santa Clara (2-1-0), up 1 11. Oklahoma State (3-0-0), up 6 12. Penn State (2-1-0), down 9 13. Auburn (3-0-0), up 2 14. Texas (3-0-1), down 2 15. Xavier (2-1-0), up 4 16. (tie) Ohio State (3-0-0), up 2 16. (tie) BYU (1-0-2), down 12 18. Wake Forest (3-0-0), previously receiving votes 19. (tie) Saint Louis (1-0-2), up 4 19. (tie) Utah State (2-1-0), previously receiving votes 21. South Carolina (1-0-0), previously receiving votes 22. Colorado (3-0-0), previously not ranked 23. Georgetown (2-0-1), previously receiving votes 24. Georgia (1-1-1), down 8 25. North Carolina State (1-1-1), previously not ranked Other Big 12 teams receiving votes - TCU (#28) and Arizona State (#36) Bold teams = Big 12 Conference teams
Want to join the discussion? Click here to become a member of the Killer Frogs message board community today! Follow KillerFrogs on Twitter to stay up to date on all the latest TCU news! Follow KillerFrogs on Facebook and Instagram as well. Download the KillerFrogs app on Google Play or in the Apple App Store.

BARRY LEWIS
Barry is the publisher/managing editor for KillerFrogs.com. He has been a Horned Frog since the Jim Wacker era and loves covering all of TCU's sports.
Follow barryrlewis
COMMENTS
Step 3: Create a new file for your Photoshop collage. Every Photoshop collage needs a background file where all the images will eventually be assembled. While you can use an old collage template, if you're making your first-ever collage, you'll need to create a new document. So select File>New in the Menu bar (or tap Ctrl/Cmd+N):
Creating your first collage is as easy as doing some importing and movement. Import it: With a new document open, select File › Scripts › Load Files into Stack, click Browse, and select all the images that you want to bring into Photoshop. Protect it: Turn each of your image layers into Smart Objects by selecting them in the Layer panel and ...
ASSIGNMENT: Using what you have learned in Chapters 1-5 of The Design Collection Revealed - Photoshop, and digital pictures, you will create a collage using Photoshop. GOALS: To produce a full-color collage portraying you, your interests, and a logo that represents you as an artist using the skills acquired in Chapters 1-5.
Step 3: Add Frames To The Canvas With The Frame Tool. Now, you can start designing the collage by adding frames to the canvas. These frames will determine where the images will be placed, so you can try out a few different arrangements before adding the photos. Select the Frame Tool from the Toolbar or press K.
Step 1: Create a New Document. With Photoshop open, press Ctrl + N or Command + N to create a new document. Alternatively, you can go to File in the menu bar and choose New. Think carefully about the size document you need. If you want to post your collage on Instagram, you'll want a square document.
Creating a Photo Collage in Photoshop: Step 1 - Select Your Photos. Once you finish choosing the theme of your project, you need to select the pictures you will include in it—double-click on the Photoshop icon on your desktop to open Photoshop first. Often, five to seven photos will be enough.
Step 3. Press Control-J on your keyboard to create a new layer using the selection. Then, name this layer Subject. 3. How to Add the Background. In this section, we are going to add the background. Select the Background layer, go to File > Place Embedded, select the background from the link, and click Place.
The New Document window provides a choice of pre-loaded templates, which are a good starting point for any project (Image credit: Matt Smith/Future Owns/Adobe). When you create your document, the size of the canvas will depend on the intended output of your collage, namely whether it's for digital or print (most collages look better in landscape format).
Step 3: Create a new document. To create a new document, go to the top menu and choose File, New. A dialog window will open with different preset choices. Otherwise, you can input your own settings on the right-hand side. I recommend you to make a document that's bigger than the final size of the collage.
Visual Design Collage PowerPoint. Visual Design Collage Project. Download. 3,265 Views. 9th - 12th Grade Higher Education 3rd - 5th Grade 6th - 8th Grade. Art & Design. Students will create fun and spontaneous projects using Adobe Photoshop to exercise and develop their digital literacy and creative skills. Learning Objectives Tools.
Press Ctrl + C to copy the image. Click the collage window (called "untitled 1" unless you saved it). Press Ctrl + ⇧ Shift + N to open a new layer. Find the Layers panel and click "Layer 1.". Type in a new name: "background.". Press Ctrl + V to paste the image into the background layer.
Instructional video to show beginning Photoshop students how to make a VERY simple photo collage project.
Choose the crop tool (make sure delete cropped pixels is OFF) and drag to set the shape for the collage. Press enter to apply. Choose the layer that contains the 2nd image with the move tool (V key). Press Ctrl/Cmd+T for free transform. Drag to size and position the image on the left side.
Description. Learn how to use a non-destructive workflow with Smart Objects to make a photo collage in Photoshop. Crop and resize images without losing resolution so that you can dial in the look that you want! This is Day 18 of our 30 Days of Photoshop series. Follow along with all 30 episodes as we explore the magic of Photoshop together!
Create a collage. Choose File > New to create a new blank image. Specify image size based on the desired print size (such as 8 inches x 10 inches at 150 pixels per inch on a white background). Note: If your images differ in resolution or pixels per inch, they could display at an unexpected size in the collage image.
Step 1: Set a Theme. There are many themes teachers can use when collaging with their students, but for this specific lesson, I stick with the theme of "self.". I tell students they will be creating a type of "self-portrait" collage. Instead of a traditional portrait, however, they will use colors, textures, magazine images, text ...
Step 07: Copy the Layer Style to the other layers. With the top layer still active, go to Layer > Layer Style > Copy Layer Style. Then, in the Layers panel, press and hold the Shift key. and click the bottom shape layer (this selects all shape layers). Next, go to Layer > Layer Style > Paste Layer Style, and the stroke/border will be applied to ...
Photoshop Graphic Design Projects 1 - 9: How to properly edit your photos like a pro. Your first 9 projects will consist of learning new skills for editing images. These are essentials skills for increasing your income and improving your clients' designs. Photoshop Graphic Design Projects 10 - 11: Next, the fun begins! That is if you weren't ...
29 Collage Photoshop Tutorials for Beginners. By Nancy Young. in Photoshop. Updated on October 10, 2019. If you loved making collages with scissors, glue, mom's magazines and dad's subscriptions when you were growing up, there is no reason to stop now. The only difference is that these days, you can make an awesome Collage by using Photoshop!
Students develop and practice their photoshop skills with this creative and interactive project. "Food for Thought" Photoshop Collage Assignment. Previous Next; View Preview. JR Design. 31 Followers. Follow. Grade Levels. 6 th - 12 th, Higher Education, Homeschool, Staff. Subjects.
Add-Ons Adobe Photoshop. Before you can start your Photoshop projects and ideas, you need to learn the basics. Even the most complex digital artworks are built on a foundation of simple actions. These 100+ free Adobe Photoshop tutorials are aimed at the clever beginner who wants to master Photoshop from the roots.
Welcome to Photoshop Essentials, where everyone can learn Photoshop! We offer fun, exclusive, step-by-step tutorials for all skill levels, and all written with beginners in mind. From Photoshop Basics to Photo Editing and Retouching, Photo Effects, Text Effects and more! Check out our latest Photoshop tutorials below.
Apr 26, 2018 - Explore Jimmy Yu's board "Photoshop collage assignment" on Pinterest. See more ideas about photomontage, surreal collage, collage art.
Work with Photoshop and Illustrator creative assets. ... Create assignments; Share assignments ; Provide feedback on assignments; Troubleshoot issues with assignments; Assignments and classrooms FAQs; ... To easily replace your image, select the collage and select the ...
5 Quick Tips for Making Collage Photo Layouts. Once you've got the perfect PowerPoint template, it's time to add your collage. Here are five quick tips to help you create unique photo collage layouts: 1. Pair Photos That Are Similar in Tone and Style. I find that photo collages look best if you pair similar photos.
DETROIT — Red Sox shortstop Trevor Story will begin a rehab assignment with Triple-A Worcester on Sunday. He will serve as the WooSox' DH on Sunday at Polar Park against Toledo. The plan is ...
Once university police discovered she missed at least one class Monday, officers moved in shortly before 4 p.m. for a welfare check, Rodriguez said at a news conference Monday evening.
My Hero Academia: You're Next: Directed by Tensai Okamura. With Kaito Ishikawa, Yûki Kaji, Kenta Miyake, Mamoru Miyano. Izuku Midoriya, a U.A. High School student who aspires to be the best hero he can be, confronts the villain who imitates the hero he once admired.
Chicago Sky guard Dana Evans (11) dribbles the ball on Sunday June 16, 2024, during the game at Gainbridge Fieldhouse in Indianapolis. The Fever beat the Sky 91-83.
/ Brian McLean, KillerFrogs/On Assignment Photo The TCU women's soccer team (2-1-0) debuted in Week 1 of the United Soccer Coaches Top 25 after starting the season 2-0 with wins over Alabama and ...