How-To Geek
How to control when a picture appears in powerpoint.

Your changes have been saved
Email is sent
Email has already been sent
Please verify your email address.
You’ve reached your account maximum for followed topics.

Microsoft Office vs. Google Docs, Sheets, Slides: Which Is Best?
If ubuntu exists, why use another ubuntu-based distro here are 5 reasons, what is zorin os linux for people who don’t want to leave windows, quick links, animate your objects, setting the animation start time and speed.
Animating objects in your PowerPoint presentation, when done properly, lets you help control the pace at which you give your audience information. We’ve shown you how to hide an object in PowerPoint . Now, let's look at the various ways to make an object appear.
In a bit, we’re going to go through how to set the start time and speed of an animation, but first, we need to decide which type of animation we want to give our objects.
If you haven’t already inserted an image in your presentation, go ahead and do that now by heading to the "Insert" tab and clicking the “Pictures” button.

Go ahead and position the image where you want it and apply any formatting you want. Then, with your picture selected, switch over to the "Animations" tab.

You’ll the most common animations displayed right on the ribbon; click one to use it.

If you don't see one you like, click the little down arrow at the bottom right of the animations to see the full list.

In the drop-down menu, you'll see a lot more animations you can use, and you can find even more by clicking any of the "More..." options at the bottom of the menu. PowerPoint offers a lot of animations.

We're going to go with a simple Fade animation for our example here, but the same techniques apply no matter what you choose. Once you select your animation, a number will appear at the top-left of the object. This number indicates the order in which the object will appear on the slide if you have more than one animation. In this example, we have only one object with an animation, so we’ll only see the number “1.”

Now, if we play our presentation, the image will appear after you click your mouse (that's the default method for initiating an animation, but more on that later).
If we throw in another image into the mix and give it an animation, we’ll see the number “2” appear next to it, meaning it will be the second object to appear on the slide. Let’s try it out. On the second image, we’re going to select the “Float In” animation.

Now you’ll see the number 2 appear next to the object.

And here’s what it would look like in the actual presentation.
Pretty neat, right? As you can see, you can control which image appears first and how it appears in the presentation.
You can also apply multiple animations to a single object. This is handy for all kinds of things. You could use multiple animations for extra emphasis, or you make an object appear on and then disappear from the slide before moving on.
In this example, we’re going to make an object appear, then give it a little extra emphasis afterward.
First, select the object and then head over to the “Animations” tab. This time, click the “Add Animation” button. You must select the animations from here if you want to apply multiple animations.

Once selected, a drop-down menu will appear that looks just like the expanded animations drop-down we showed you earlier. We already applied the Fade animation to our object, so this time we're going to select the "Teeter" animation from the "Emphasis" section.

Now you’ll see both the number 1 and 2 next to the object, indicating the order in which the animations will happen.
Here’s what it looks like in action. First, it fades in, and then it teeters a bit.
Now that you understand how to use animations let’s talk about how to control their timing.
There are three options available for making your animation start:
- On Click: This makes the animation begin when you click your mouse. It's also the default trigger.
- With Previous: This initiates the object animation at the same time as the previous animation.
- After Previous: This makes the animation begin after the last animation finishes.
To find these settings, select the object you're animating, head to the “Animations” tab, and then click the box next to “Start.”

Select the start option you want from the drop-down menu.
You can also set a duration for the animation. Changing the duration makes the animation run slower or faster. If, for example, you have an object enter by flying in from the left, but it's flying in a little to quickly, you could increase the duration to make it move more slowly.

You can also add a delay that happens before the animation starts. This delay happens based on what start setting you use. For example, if your start setting is "On Click" and you have a delay of two seconds, the animation will start two seconds after clicking. If your start setting is "After Previous" and you have a delay of five seconds, the animation will start five seconds after the previous animation finishes.

The options you have available for manipulating how and when objects appear are nearly endless. Play around with these features a bit, and you'll be making a great presentation in no time!
- Microsoft Office
- Office 2016
How to Add, Delete or Change the Order of PowerPoint Slides
Whether you’re creating a new PowerPoint presentation or editing an existing one, knowing how to efficiently manage your slides is an important skill. In this article, I’ll walk you through the basics of adding , deleting , and reordering slides in PowerPoint.
Adding Slides
Deleting slides, changing slide order, helpful tips.
Here are some additional pointers for efficiently managing your PowerPoint slides:
About The Author
Vegaslide staff, related posts, how to create and insert a pyramid in microsoft powerpoint.

Open Keynote in PowerPoint on macOS Catalina
How to split a picture into pieces in powerpoint, how to use triggers to control what happens next in powerpoint.
Living Social Voucher Redemption Information
- Sign up for an account on this page .
- Stop at the billing screen since you already paid for a voucher.
- Send us a message, via the contact page , that includes the email address that you used to sign up for an account and the Living Social voucher number.
Once we have verified the voucher number, we will update your account and the 30 days of access will begin. At this time, we will send you an email update that confirms the account update.
| Email: | |
| Pass: |
| | | | | | | | | |
Change Presentation Slide Order Using the Slide Sorter
| --> | Available and Tutorials -->
| Tutorial Length (mm:ss): | --> | |
| Downloadable Files: | ||
| Microsoft Office Program: | ||
| Keywords: | training power point powerpoint change slide order sorter view |
| Tutorial | Length (mm:ss) | Office Program |
|---|---|---|
| 10:15 | Microsoft Office PowerPoint | |
| 3:28 | Microsoft Office PowerPoint | |
| 4:18 | Microsoft Office PowerPoint | |
| 3:19 | Microsoft Office PowerPoint | |
| 1:40 | Microsoft Office PowerPoint | |
| 6:12 | Microsoft Office PowerPoint | |
| 7:00 | Microsoft Office PowerPoint | |
| 2:47 | Microsoft Office PowerPoint | |
| 9:42 | Microsoft Office PowerPoint |
Start Presentation from Current Slide
| Tutorial Length (mm:ss): | |
| Microsoft Office Program: | |
| Keywords: | training powerpoint presentation start from current slide |
Put Pictures Photos Images into PowerPoint Slides
| Tutorial Length (mm:ss): | |
| Microsoft Office Program: | |
| Keywords: | training insert add pictures photos images to slides powerpoint power point format effects |
Add Speaker Notes to PowerPoint Slides and Presentations
| Tutorial Length (mm:ss): | |
| Microsoft Office Program: | |
| Keywords: | training speaker presentation notes page view slides print format bullet points powerpoint |
Add Bullet Points to Speaker Notes for Slides
| Tutorial Length (mm:ss): | |
| Microsoft Office Program: | |
| Keywords: | training powerpoint power point bullet points numbered list speaker user notes |
How to Run a Slide Show - In Depth Overview
| Tutorial Length (mm:ss): | |
| Microsoft Office Program: | |
| Keywords: | training powerpoint power point run slide show presentation first introduction overview beginner comprehensive |
| TeachMsOffice.com provides HD Online Video Tutorials and Training for Microsoft Office programs such as Excel , Word , and PowerPoint . We use a specialized video player interface to teach a vast list of Microsoft Office Tutorials and we add new tutorials on a weekly or monthly basis. How to Shuffle Slides Randomly in PowerPoint? [Here’s How!]By: Author Shrot Katewa ![How to Shuffle Slides Randomly in PowerPoint? [Here’s How!]](https://artofpresentations.com/wp-content/uploads/2023/01/ezgif.com-gif-maker-1.webp "powerpoint presentation slide order") There are times when you want to not run the presentation in a systematic order. Instead, you may want to shuffle the slides at random. For instance, if you want to generate a random number on the slide during a game, you can set it up using a PowerPoint file. But, can you shuffle slides randomly in PowerPoint? By default, PowerPoint doesn’t allow to shuffle slides randomly. However, you can use a macro to do the same. First, enable the “Developer” tab. Then, click on the “Visual Basic” option, create a new “Module”, paste the special code, and save it. Click on the “Macros” option and “Run” the macros. This will shuffle the slides in a random order. Make sure to save your file as a “macro-enabled” file to retain the macros in the presentation. In this article, I’ll share all the details in a step-by-step manner with pictures. I’ve also included the VBA code to implement the macro. That, and much more! So, let’s get started! 1. Can You Shuffle Slides in PowerPoint?Microsoft PowerPoint does not have any feature that allows you to shuffle the order of the slides in a presentation at random. However, you can shuffle the slides by dragging them to random positions manually. Besides, the “Macros” option in PowerPoint allows you to run VBA codes to automatically shuffle the slides at random. 2. How to Manually Shuffle Slides in PowerPoint?In Microsoft PowerPoint, you can shuffle the slides in a presentation using the “Slide Sorter” view. However, it may not be as randomized as doing so using the “Macros” feature. To manually shuffle the slides in a presentation, follow the 4 quick steps. Step-1: Click on the “View” tab 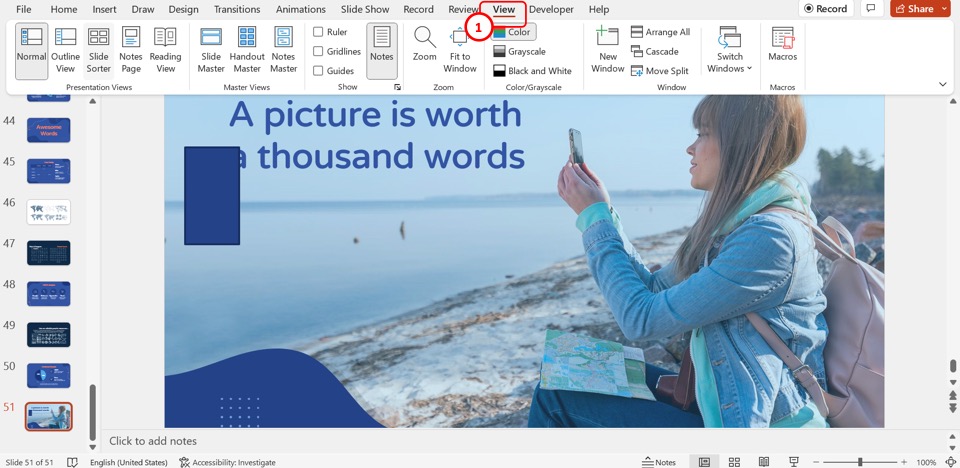 The first step is to open the “Slide Sorter” screen. To do so, you have to first click on the “View” tab in the menu ribbon at the top of the screen to open the “View” menu. Step-2: Click on the “Slide Sorter” option 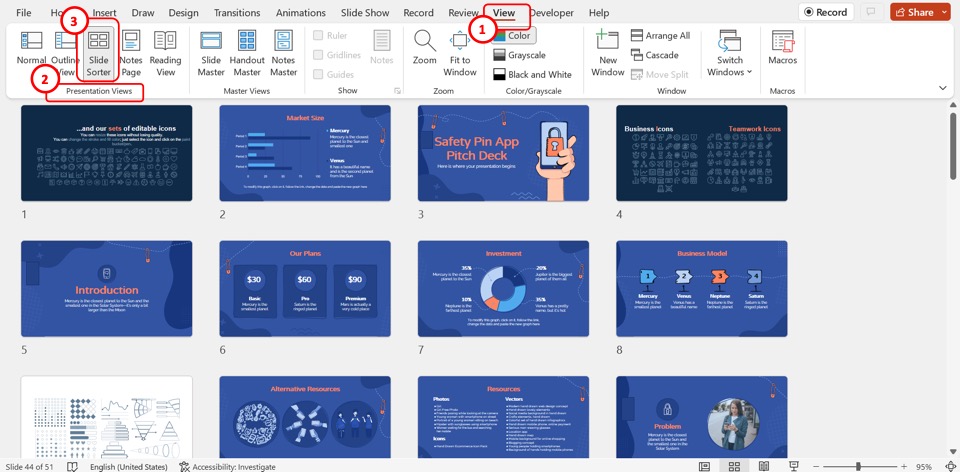 In the “Presentation Views” group of the “View” menu, click on the “Slide Sorter” option. You can now see the slide thumbnails on your screen. Step-3: Click on the “Zoom Out” option 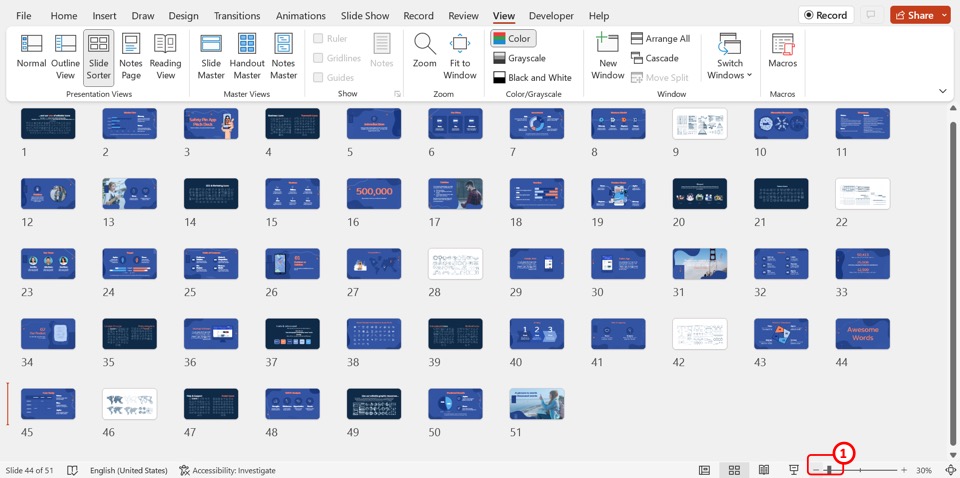 The next step is to click on the “Zoom Out” option which is the “-” icon at the bottom toolbar. Keep clicking on the “Zoom Out” option until you can see all the slides in the presentation on the screen at once. Step-4: Rearrange the slides 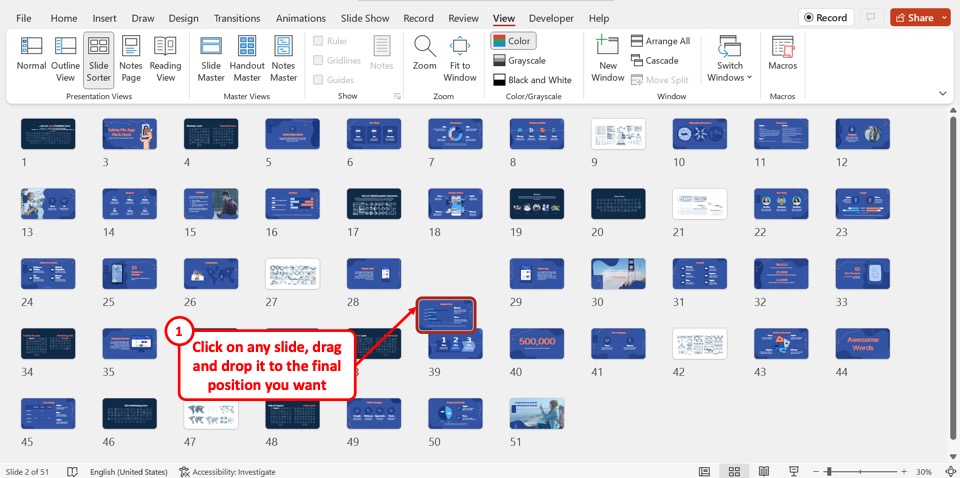 Now all you have to do is click on a slide and drag and drop it at a random position on the screen. Repeat this step with random slides until all the slides have been shuffled. 3. How to Shuffle Slides Randomly in PowerPoint?In Microsoft PowerPoint, you can use a VBA code to create a random shuffling order of slides in the presentation. To do so, all you have to do is follow the 15 simple steps. Step-1: Click on the “Customize the Ribbon” option  The first step is to “Right Click” on the menu ribbon located at the top of the screen. In the right-click menu, click on the “Customize the Ribbon” option. This will open a dialog box. Step-2: Click on the “Developer” option 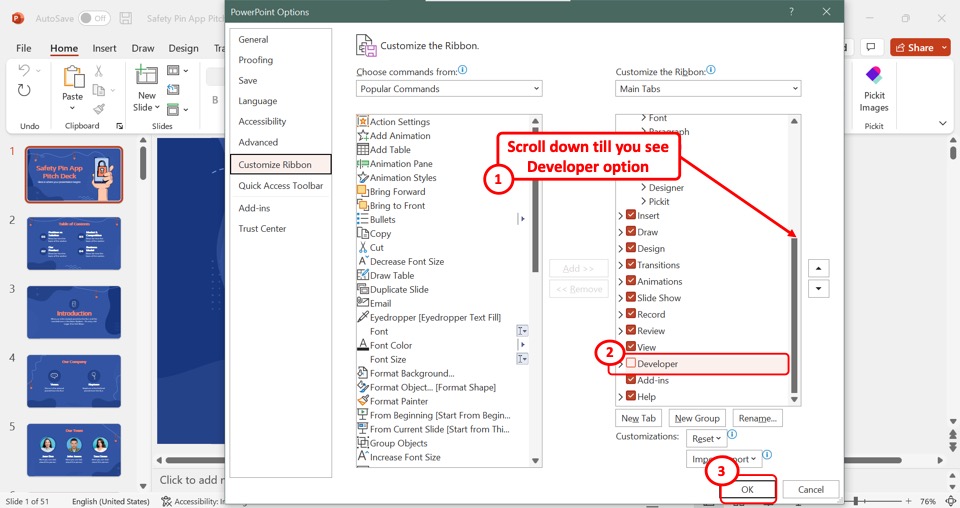 In the “PowerPoint Options” dialog box, scroll down under the “Main Tabs” box on the right column. Then click on the “Developer” option to select it. A red checkmark will appear by the “Developer” option. Step-3: Click on the “OK” button Now all you have to do is click on the “OK” button at the bottom of the “PowerPoint Options” dialog box to enable the “Developer” tab (as shown in the image above). Step-4: Click on the “Developer” tab 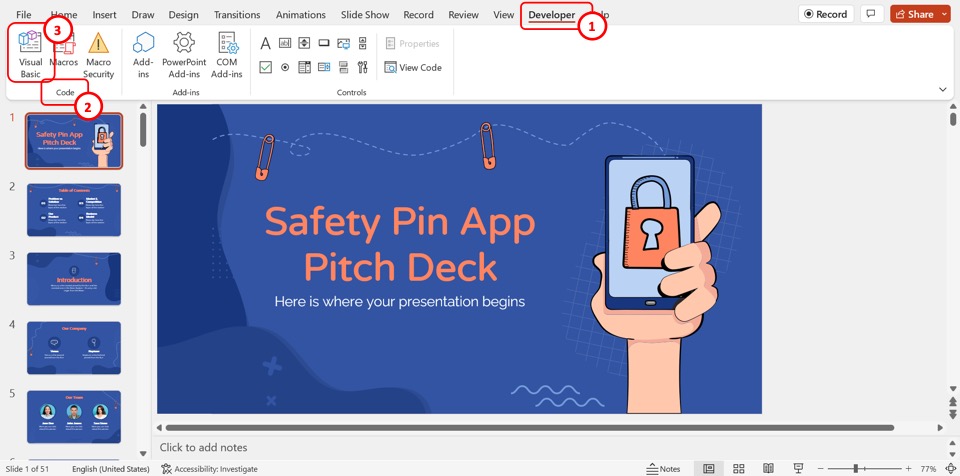 The next step is to click on the “Developer” tab in the menu ribbon. In the “Code” group of the “Developer” tab, click on the “Visual Basic” option. This will open a pop-up window. Step-5: Click on the “Module” option  In the “Microsoft Visual Basic for Applications” window, click on the “Insert Module” icon. It is the orange icon that is located second to the left in the toolbar. Then click on the “Module” option in the dropdown menu under the “Insert Module” icon. Step-6: Paste the VBA code 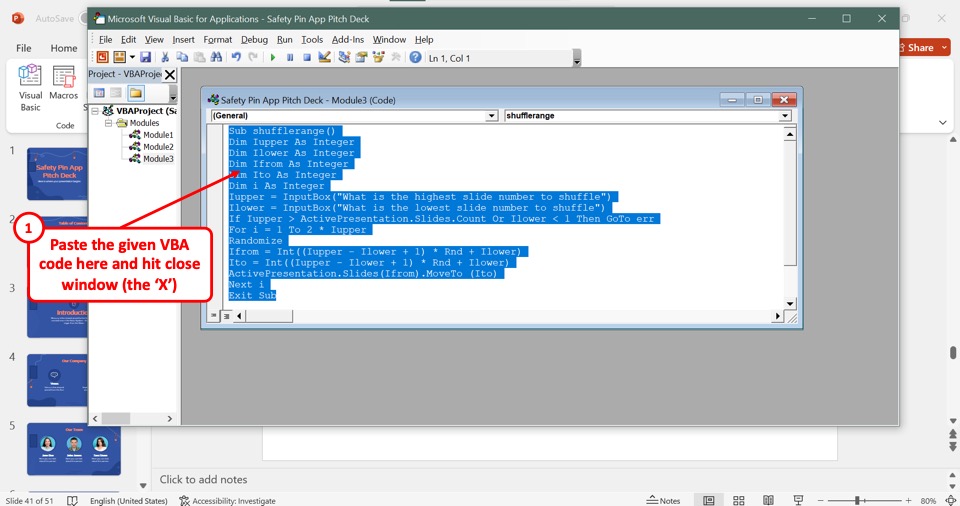 Now all you have to do is paste the following VBA code into the new module: Sub shufflerange() Dim Iupper As Integer Dim Ilower As Integer Dim Ifrom As Integer Dim Ito As Integer Dim i As Integer Iupper = InputBox(“What is the highest slide number to shuffle”) Ilower = InputBox(“What is the lowest slide number to shuffle”) If Iupper > ActivePresentation.Slides.Count Or Ilower < 1 Then GoTo err For i = 1 To 2*Iupper Randomize Ifrom = Int((Iupper – Ilower + 1) * Rnd + Ilower) Ito = Int((Iupper – Ilower + 1) * Rnd + Ilower) ActivePresentation.Slides(Ifrom).MoveTo (Ito) Next i Exit Sub err: MsgBox “Your choices are out of range”, vbCritical End Sub Step-7: Click on the “Close” option Now you can close the “Microsoft Visual Basic for Applications” window. To do so, click on the “Close” option which is the “X” icon at the top right corner of the pop-up window (as shown above). Step-8: Click on the “Macros” option 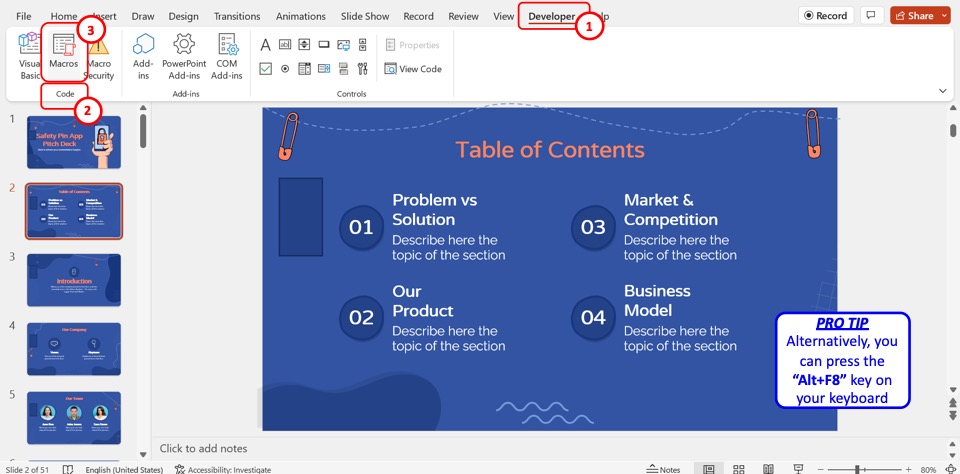 The next step is to run the VBA code. To do so, you have to first open the PowerPoint Macros. Click on the “Macros” option in the “Code” group of the “Developer” menu. Alternatively, you can click on the “Alt+F8” keys on your keyboard to open the Macros. Step-9: Click on the “Run” button 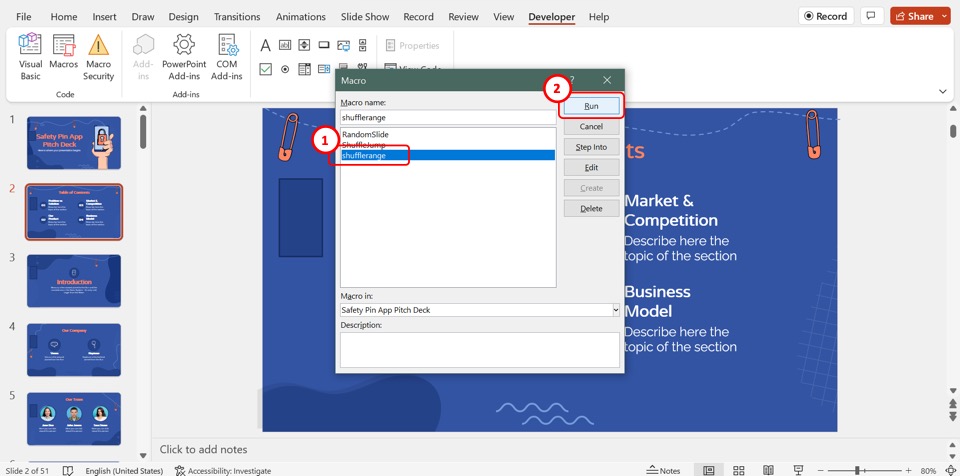 In the “Macro” dialog box, click on the “shufflerange” option to select it. Then click on the “Run” button in the right column of the dialog box to run the VBA code. Step-10: Add the last slide number 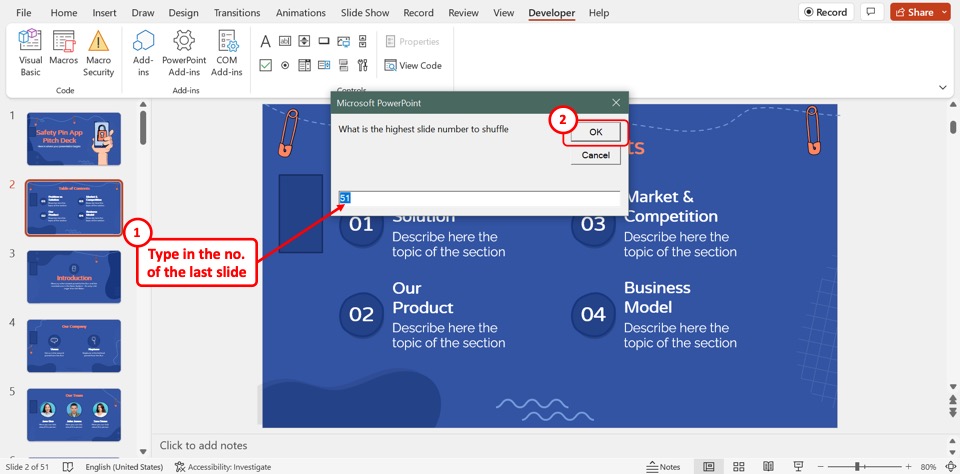 In the dialog box asking “What is the highest slide number to shuffle?” , type in the slide number of the last slide in the presentation. Then click on the “OK” button in the dialog box. Step-11: Select the start of the random shuffling 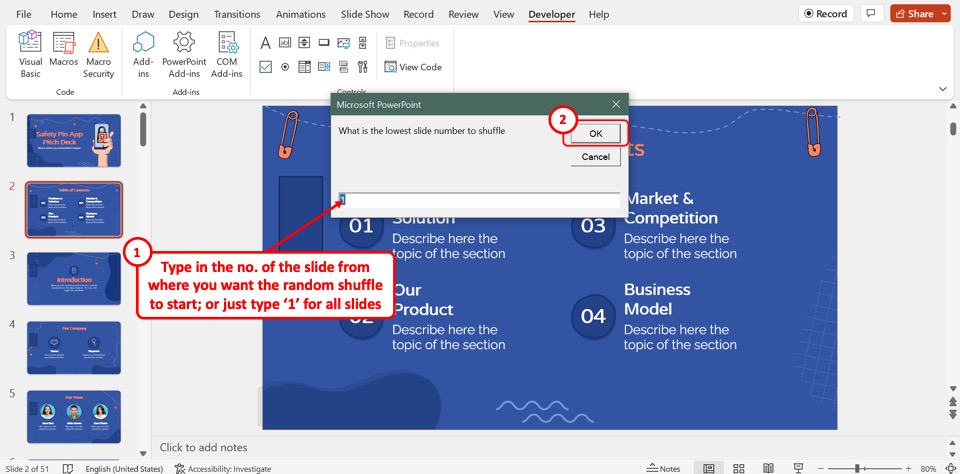 In the next dialog box asking “What is the lowest slide number to shuffle?” , type in the slide number where you want the shuffle to start. If you want to shuffle all the slides, just type in “1” . Then click on the “OK” button to shuffle the order of the slides randomly. Step-12: Check the shuffled order 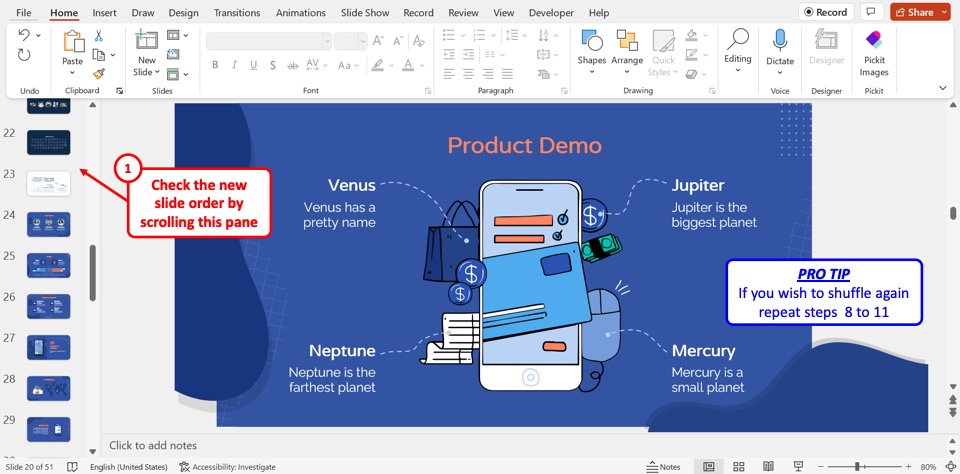 You can now simply scroll through the slide thumbnail pane on the left side of the screen to check the new random order of the shuffled slides. If you want to shuffle again, all you have to do is repeat the process from Step-8 to Step-11. Step-13: Click on the “File” tab 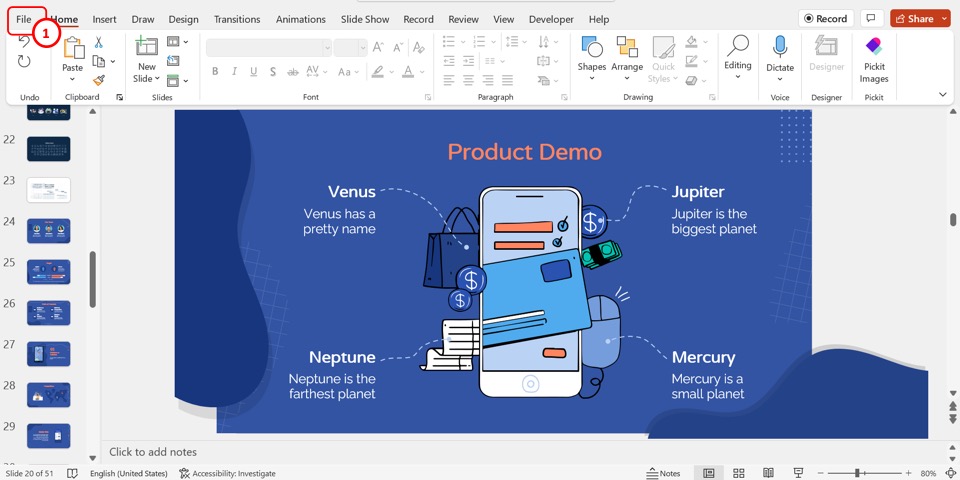 The final step is to save the presentation as a macro-enabled file. To do so, you have to first click on the “File” tab in the menu ribbon located at the top of the screen. Step-14: Click on the “Save As” option 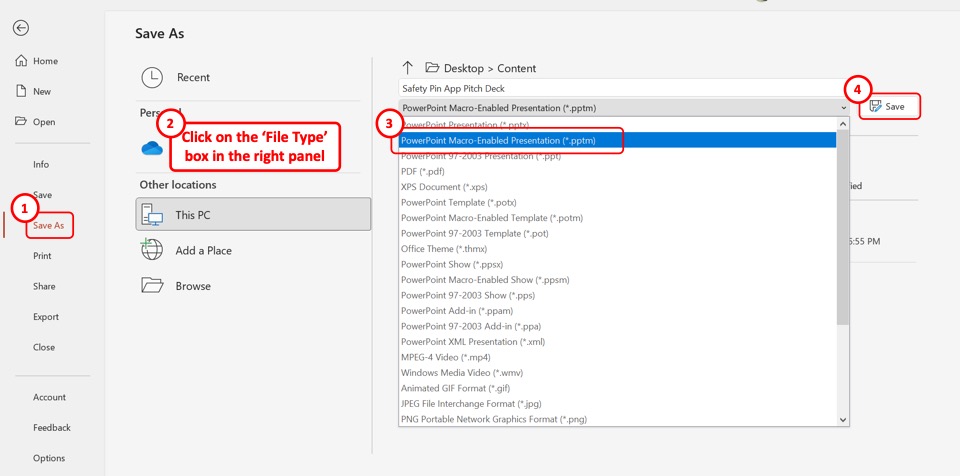 In the “File” menu, click on the “Save As” option from the sidebar on the left side of the screen. Then click on the file type box in the right column of the “Save As” screen. In the dropdown menu, click on the “PowerPoint Macro-Enabled Presentation (.pptm)” option. Step-15: Click on the “Save” button Finally, all you have to do is click on the “Save” button by the file type box to save the macro-enabled presentation with the slides shuffled in random order (as shown in the image above). Credit to cookiestudio (on Freepik) for the featured image of this article (further edited). PowerPoint Slide Sorter: What is it and How to use it?Last updated on August 19th, 2023  Some PowerPoint slide decks contain dozens of slides. Sorting through those slides or rearranging them using drag and drop from the default ‘Normal’ view in PowerPoint can be difficult. If you have too many slides, you might even end up mixing them up when attempting to drag and drop them in the Normal view. This is why you should use PowerPoint Slide Sorter view to better manage your slides. What is the Slide Sorter?PowerPoint Slide Sorter is one of the views available in Microsoft PowerPoint that lets you view all your slides in the form of thumbnails sorted horizontally. This helps better organize the slides, as you can rearrange them using drag and drop. Furthermore, you can zoom your slides (in or out) to increase or reduce the size of the thumbnails according to your convenience. The definition of Slide Sorter by Microsoft is as follows: Slide Sorter view gives you a view of your slides in thumbnail form. This view makes it easy for you to sort and organize the sequence of your slides as you prepare to print your slides. How to use the Slide Sorter to Prepare Presentations in PowerPoint?The following instructions regarding the use of PowerPoint Slide Sorter are applicable to all recent versions of PowerPoint, including PowerPoint 2019 (PC and Mac), PowerPoint for Microsoft 365 (PC and Mac), and PowerPoint for the web. These instructions are also applicable to older versions including PowerPoint 2016 for Mac, PowerPoint 2013 (PC), and PowerPoint 2010 (PC). How to View PowerPoint Slides in Slide Sorter View?Here are multiple ways to open and access the Slide Sorter view in Microsoft PowerPoint. View Tab in PowerPoint: PowerPoint Slide Sorter button appears under Presentation Views from the View tab in the Ribbon menu via View -> Slide Sorter to access it. To switch back anytime, choose a different view from the View tab or the bottom of the presentation deck. Keyboard Shortcut: You can also access Slide Sorter via a keyboard shortcut. In this case, in Windows, press Alt + V then D key. The Alt + V combination will highlight the View tab in the Ribbon, and then pressing the D key will open the Slide Sorter view. Bottom of the Taskbar: You can also access the Slide Sorter view from the bottom of the taskbar via the slide sorter icon.  Use the Slide Sorter to Drag Your Slides in the Presentation to Find the Right OrderHow to rearrange slides in PowerPoint using the Slide Sorter View? Go to Slide Sorter and drag the slides to organize how they appear along the presentation. The GIF animation below shows how you can easily rearrange your slides to better manage them in Slide Sorter view. For the purpose of this demo, we have used the free business proposal presentation template to demonstrate the Slide Sorter view and arrange some of the slides in the desired order. Source: FPPT.com Have a Better View of Your SlidesDo you know how to design and use PowerPoint Slide Sorter View for maximum effect? Unlike the Normal view or the Outline View, the Slide Sorter view provides a great interface for the presentation designer to view all the slide thumbnails in a single place. As a presentation designer or presenter, you can have a more cohesive view of your presentation. Moreover, using the zoom option, you can fit all the presentation slides within the same view, to zoom in or zoom out to view large or small thumbnails for your slides. Organize Your Slides in SectionsSlide Sorter view also enables you to sort your slides in sections, similar to how you would organize them in folders. You can create a section via right-click context menu, name it and drag slides to organize it. These collapsible menus can then be used to organize your slides according to the subsections of your presentation, e.g. introduction, agenda, main topic, and conclusion. While you can also add sections from the Normal view the same way via right-click menu, you would be better off using Slide Sorter view to arrange them more conveniently.  Final WordsPowerPoint Slide Sorter can help you better organize your slides by improving the way you view and sort your slides. Whether you have a handful of slides or dozens that you need to sort through, using Slide Sorter can save you a lot of time and effort in getting control of your slides. Leave a Comment Cancel replyYour email address will not be published. Required fields are marked * Save my name, email, and website in this browser for the next time I comment. Sign up to our newsletter We will send you our curated collections to your email weekly. No spam, promise! Unsupported browserThis site was designed for modern browsers and tested with Internet Explorer version 10 and later. It may not look or work correctly on your browser.
30 PowerPoint Presentation Tips to Make Good PPT Slides in 2024 (+ 6 Expert Tips)
Here are 30 quick PowerPoint presentation tips to help you improve your presentations.  Plus, get PowerPoint tips on changing your slide design to make your content shine. We've even called on six presentation experts for their best tips. How to Make a Good PowerPoint Presentation (Watch & Learn)This screencast is a speed round of my very favorite PowerPoint tricks. It's a great resource to learn how to make a presentable PowerPoint. I'll walk you through ten of my favorite PowerPoint tips and tricks to create a better presentation.  Keep reading for an illustrated version of these good PPT tips (and more) that you can use to improve your PowerPoint presentations. You'll see 30 of our favorite PowerPoint presentation tips and tricks, including techniques to update slide master PowerPoint 2024 designs. Jump to content in this section:
30 Tips: How to Make Good PowerPoint Presentation Designs Fast in 2024A few tried and true tips can help you speed up your PowerPoint presentation design. Check out 30 of my favorite PowerPoint tips to do just that. Each of these give you PowerPoint slideshow help to create good PowerPoint slides: 1. How Do You Give a Memorable PPT Presentation?If you're learning the top PowerPoint presentation tips and tricks, you're probably asking yourself: how do I give a presentation that won't be forgotten? We all want to be remembered. The best PowerPoint slideshow help to make a mark on the audience. There are tried-and-true ways to do just that, and expert Neil Tomlinson shares expertise on being remembered: Get your main point into the presentation as early as possible (this avoids any risk of audience fatigue or attention span waning), then substantiate your point with facts, figures etc and then reiterate your point at the end in a ‘Summary’. 2. Practice Makes PerfectAlso, don’t forget to practice your presentation. Go through your slide deck a few times to make sure you know it like the back of your hand when the big day arrives. Doing so helps you feel more confident. It'll reduce any anxiety and nervousness you might feel as the presentation day approaches. What's the best way to rehears for a good PowerPoint? Here's one of the top PowerPoint presentation tips from expert presenter Sandra Zimmer : Once slides are ready, practice one slide at a time aloud until you feel like you know it and like the flow of speech. Be willing to change anything that does not feel in flow. At the end of learning all your slides, practice the whole talk. If you want even more great PowerPoint presentation tips and tricks, check out the following post:  3. Adapt Your Presentation to the AudienceLet's say that you're a seasoned presenter with a pretty standard set of presentation topics. Maybe you're an expert in your field, and you're asked to give a PPT presentation frequently on similar topics. That's the value of being an expert. You might have a standard spiel that you give your audiences, and your content won't totally change from one presentation to another. That's why it helps to make only slight tweaks to adapt your presentation to each audience. Leading presentation expert Suzannah Baum offered up this advice: Different audiences will have different needs and different challenges, which requires me to re-sequence the slides, or create new ones. I tend to do a lot of research on my audiences – via surveys, interviews, and conversations with the hiring manager – to help me better understand what information would be most relevant to them. How do you adapt to your audience? Here are a few more tips:
 Learn everything you can about your audience. Learning how to make a presentable PowerPoint is all about thinking of the recipient, not the presenter! 4. Use a Custom FontA PowerPoint presentation tip that'll make your slideshow more interesting and more engaging is to use a custom font. Fonts set the tone for your presentation. So, when you use a premium font, you’re opting for a high-quality font while also adding a personal or creative touch. When choosing a font, remember that you want everyone to read your text easily. 5. Use Contrast One PowerPoint trick is to use contrast to make some of your text stand out or make it easier to read. If you’re putting text over an image on our PowerPoint slide, you may need to use a white box with black text in it to make your text easier to read. You can also use contrasting colors to highlight important text. 6. Avoid Too Many AnimationsAnother PowerPoint tip is to avoid having too many animations or transitions. When you've got too many animations, it can be distracting to the audience. It’s not only distracting, but it's unprofessional. It’s best to stick to one or two animations throughout your presentation. Also, if you've got any animations in your presentation, make sure to test them to see if they work before presenting.  7. Add AudioInclude audio on a slide on PowerPoint to increase audience engagement. Audio can be anything from fun sound effects to interview clips. You can even add an audio clip of your voice. Audio gives you a break from speaking while also engaging the audience. Envato Elements has hundreds of premium audio clips if you want to add some.  8. Use the Rule of ThreeOne PowerPoint tip and trick is to follow the rules of PowerPoint. One of those rules is the rule of three. It's where you start by dividing your presentation into thirds. Everything should come in thirds, so if you use bullet points, you should only have three. If you use icons, you should only have three. When things come in threes, it's easier to remember them. For more information, read this informative article:  9. Use a Custom PPT Theme DesignAbove all, consistently use custom PowerPoint themes. Microsoft has built-in themes that you can use for free, sure. But the premium themes that are on Envato Elements are a major step-up from PowerPoint's built-in themes.  When you subscribe to Envato Elements, you'll have access to unlimited downloads of all the PowerPoint themes. Right now, Envato Elements has almost 4,000 PowerPoint themes and that number is always growing. You'll learn tips for a good PowerPoint presentation by using the best templates.  10. Make Use of Charts and GraphsIllustrate your data with the use of charts and graphs. Not only will you be able to make your presentation more visually appealing, but you'll also help your audience remember the information better.  Many PowerPoint templates already include chart and graph elements. Easily customize them to make your data and stats more interesting and easier to understand. Want to learn more about how to use data? Turn to expert Adrienne J ohnston , a presentation professional: When it comes to visualizing data in presentations, we have to remember that our audience does not need all the fine details of the data - they need the main takeaway and we need to make sure that's evident to them when looking at the slide. 11. Use the Built-in Slide LayoutsInside of PowerPoint themes, you'll find layouts , which are custom slide designs. Most themes include a selection of content layouts that you can use as a starting point for your own slide designs. You can leverage slide master PowerPoint 2024 designs with the help of layouts.  Layouts are like a starting point for your PowerPoint presentation slides. They contain combinations of placeholders for text boxes, images, and more. Instead of clicking and drawing individual objects onto the slide, use one of these layouts to start your slide off. It's one of the top PowerPoint presentation tips and tricks to save time. 12. Align Text ConsistentlyWhen you're working with text on your slide, it helps to ensure that it aligns consistently. Keeping your text aligned in the same orientation really makes a slide look clean. In the example below, I've basically got three text boxes:
Notice that all this text is aligned left.  Aligning text was the " aha " moment that I learned when I started studying slide design. It's one of those steps that makes a slide look much neater and professional, so keep it in mind when designing. 13. Make Your Exports User-FriendlyNo matter how great your PowerPoint presentation slides look, you need to think about how your user will use the presentation file. Any of these are likely scenarios if you're regularly sending presentations to other users:
 In this case, my favorite tip is to export the presentation as a PDF. To do that, go to File > Export > Create PDF , and then save your presentation as a PDF. This is sure to help most of your users see the presentation just the way you intended. 14. Try a Different Color SchemeMany PowerPoint themes have more than one color scheme that you can apply to your presentation. On the Design tab, click on the drop-down next to Themes to try out a different color scheme.  Typically, these will restyle your entire presentation. Premium themes that you might get from Envato Elements, for example, may have many versions inside the original presentation zip file. 15. Edit Slide Masters for ConsistencyThe slide master controls the design for your PowerPoint slide. Instead of making the same change to each slide, apply a change to a slide master. It'll affect all the PowerPoint presentation slides that use the same master.  It's ideal to apply a logo to the slide master itself, for example. This keeps the logo the same size and in the same position on each slide. To do that, go to View > Slide Master. On the right side, you're likely to see a variety of slide masters that control designs for many slides. Drop the elements that you want to remain consistent onto one of the slide masters. 16. Use the Alignment FeaturePowerPoint presentation slides look better when the objects on them are in line with one another. There's a certain visual rhythm that occurs when objects line up in the center or along certain boundary lines.  When you start dragging objects on your slide, you'll see guiding lines that pop up. These are very intuitive, and you'll likely notice that they help you line up your objects. You might seem them pop up when you've got a box that's equidistant between two other objects on the slide, for example. This is one of the best tricks for improving the look of your PowerPoint slide. Spend some time making sure that your key elements line up cohesively. 17. Use Stock AssetsEarlier, I mentioned using Envato Elements to grab PowerPoint themes. But there's more that comes with an Envato Elements subscription for presentations. That includes a wide variety of stock photos, graphics, and custom designed fonts that you can use in your presentation. Instead of reusing the same stock photo or clip art, Envato Elements has everything you need to supplement a presentation. Again, Envato Elements is the perfect subscription if you build presentations. It's a one-stop-shop that you can use to fill content. 18. Reduce Your ContentThere's nothing that makes an audience tune out faster than being overloaded with slide content. Sometimes we try to make so many points that the audience misses all of them due to information overload. Less is truly more. When you cut the weaker points of your presentation, the audience's attention will follow your key points accordingly. It seems like cheating, but one of the best steps that you can take for your slide is to simply reduce the number of items that are on it. Convert some of your typed points to things you'll speak verbally. 19. Rethink Your Slide OrderSometimes, I find that my presentations are out of order. I might spend too much time explaining my decision before I get to the conclusion. In these cases, I like to use Slide Sorter View to re-sequence the slides in my presentation. To access this view, go to View > Slide Sorter on PowerPoint's ribbon.  From Slide Sorter view, you've got a top-down view of all the slides in your presentation deck. It sometimes becomes obvious that the slides can be reordered into a better sequence from this view. 20. Use PowerPoint AnimationsOne of my favorite PowerPoint presentation tips is to complement your major points with a bit of animation. Using animation can bring a key point onto your slide with style! Check out ten of the best PowerPoint tips for how to use animation from expert Sven Lenaerts below: 21. Invite CollaboratorsBuilding a presentation often benefits from a second set of eyes. That's why it helps so much to invite a collaborator to work with you side-by-side in Microsoft PowerPoint. Pushing your presentation up to OneDrive and inviting collaborators is easy. Thanks to the cloud-based approach, more than one user can edit a slide deck in real time. Learn how to do that in the tutorial below:  22. Add Supporting Video ClipsBuilding impactful presentations is all about adding other perspectives and angles to the content. One of my favorite ways to do that is to add a video clip. Maybe that's a production that you built on your own or found on sites like YouTube. Either way, learn how to add and auto play a video clip in the quick tip below: 23. Use Infographic TemplatesMore presentations than ever will feature visuals that tell stories with data. But it's easy for an audience become overwhelmed with data. That's where infographics come into play. Learn to use them in PowerPoint in the tutorial below: 24. Use Impactful Closing TechniquesI've sat through many presentations in my life. I can only remember a few that really stick out, thanks to techniques that highlighted key points. You need PowerPoint tips and tricks that help leave your audience with an impact. To do just that, make sure you use some of the techniques highlighted in the article below:  To do that, just drag and drop the thumbnails into the order you want. When you return to Normal view, the PowerPoint presentation slides will be in the resequenced order you set here. 25. Include Data in the AppendixMany PowerPoint presentations include data in the form of charts and graphs. That means that you'll condense specifics into a few easy-to-follow charts. But what if your audience wants more of the backing details? Maybe they want to validate and review the detail for themselves. In that case, a set of appendix slides with extra data is sure to help.  Appendix slides are included at the end of a presentation deck for backup purposes. You might not present them, but your audience is certain to appreciate that you included them. That helps your presentation continue to be useful even after you leave the room. Here's a great tip from: pro presenter Graeme Thomas of Johnny F Designs: If (my clients) are sending the deck straight to clients however, I would then put all the information on the slides but will often use more slides so that they aren't too cluttered. In cases where there is a lot of content, like financial statements, I would use appendix slides. Including an appendix helps your audience understand data without overwhelming them with that data. Follow these tips so that you get the best of both worlds. 26. Alternate Between Solid Color and White SlidesAlternating between solid color and slides with a white background can produce an interesting visual effect and engage your audience. You can use the solid-colored slides to signify a new section in your presentation.  Not to mention, solid-colored slides are the perfect way to re-enforce your brand colors and build your brand recognition. 27. Present Information With MapsIf you’re trying to make a case for a global expansion or need to report on how other branches are performing, consider using a map to help your audience visualize the data. There's no shortage of quality PowerPoint templates with maps built in so be sure to take advantage of them. 28. Keep the Design Best Practices in MindThe design of your presentation matters just as much as the content of your presentation. That’s why you need to devote an equal amount of time to making sure the design of your presentation is on point as you do to the actual content. Familiarize yourself with best design practices and keep them in mind as you go about customizing your template. 29. Set a Time LimitHow many slides is the right number for you? Well, it all depends on the time limit you set for your presentation. Believe it or not, setting a time limit is helpful to create good PowerPoint slides. If you want to learn how to make a presentable PowerPoint, it's a must to lock in the time limit and ensure that your slides support that timeframe. Expert presenter Stephanie Ottavan offers one of our top tips for a good PowerPoint presentation based on time limits: A presenter is usually limited to a specific time frame and you want to adhere to that as closely as you can. If you have animations and transitions in your deck, these take added time so make sure to rehearse in “show mode” of PowerPoint or Keynote and time yourself. Believe it or not, setting a time frame is one of the most important part of creating a PPT presentation. It helps you influence how many good PowerPoint slides you should design. 30. Test Your Content EverywherePowerPoint in 2024 could take place anywhere. Maybe you present, online, in-person, or beam it to mobile devices. It's important to remember that the content will appear differently on each device. PowerPoint Online is a different medium than many other apps. Make sure that your presentation design appears the same by testing it with the help of this tutorial. It shows you how your PPT presentation appears even in a browser:  Discover Great Premium PowerPoint Templates With Google Slides (For 2024)Creating a great presentation starts with a great template. And a great PowerPoint slide design use the best presentation practices, for example:
Designing a great template doesn’t mean you've got to start from scratch, though. Take a look at some of the best PowerPoint templates we've got on Envato Elements. 1. Neo PowerPoint Template The Neo PowerPoint template features a modern and bold design and includes five color variations to get you started. Along with this, you'll also get 10 master slides and 30 individual slides for all your presentation needs. 2. Vexana PowerPoint Template The Vexana template is a great choice for brands that need a touch of elegance. This template works with PowerPoint and Google Slides and comes with a grand total of 150 slides. It also has five color variations and includes infographic elements and photo placeholders. 3. Sprint PowerPoint Template The Sprint PowerPoint template features a professional and modern design. The template is easy to customize. You'll find 20 masters in the standard 4:3 size, allowing you to choose the best layout for your information. 4. Travelicious PowerPoint Template For any presentation that deals with the topic of travel, check out the Travelicious template. This template is compatible with both PowerPoint and Google Slides. It includes three premade color variations as well as 30 unique slides. As you can see from the examples above, there's no shortage of beautiful and professional PowerPoint slide designs on Envato Elements . What’s more, Envato Elements allows you to download as many PowerPoint templates as you want. Plus, get thousands of other design assets such as fonts, photos, and icons—all for one low monthly price. Want to see even more great PowerPoint template examples? Be sure to check out our related roundup: Need Help? Grab Our Making Great Presentations eBook (Free)We've got the perfect complement to this tutorial. You can find more information in our eBook on making great presentations . Download this PDF eBook now for FREE with your subscription to the Tuts+ Business Newsletter. It'll help you master the presentation process from initial creative ideas through to writing, design, and delivering with impact.  PowerPoint Frequently Asked Questions (FAQ)Now that you’ve read about PowerPoint tips and tricks, if you want to learn more about PowerPoint, here are some FAQs: 1. What Is a Placeholder?Placeholders in your slide on PowerPoint help you easily add text or images to your slide without changing your design. In a template, sometimes the placeholders have prompts such as “Click to insert a picture” or “Click to add text.” These prompts let you know what kind of placeholder it is. To learn more about placeholders, read this article:  2. How Can I Automatically Play a Video?A PowerPoint tip is to insert an automatically played video in your presentation. When you've got a video that'll play automatically, it saves you the trouble of starting your video manually. Videos can illustrate topics or specific points. They're also a great way to keep your audience engaged. If you want to learn how to play a video automatically, read this tutorial: 3. How Can I Add a Map to my Slide?Another PowerPoint trick is to add a map to your slide. If you're discussing a specific location, then a map can help your audience visualize the location you're presenting. To learn how to add a map to your PowerPoint slide, read this tutorial: 4. How Do I Add a GIF to My Presentation?Adding a GIF to your slide on PowerPoint is one way you can grab your audience's attention. To add a GIF to your slide, you’ll need to download a GIF. Once you download it, upload it into PowerPoint and use it on your slide. For more information about how to add a GIF to your slide on PowerPoint, read this article:  5. Can I Recover My Unsaved Presentation?Another PowerPoint trick is to learn how to recover unsaved PowerPoint files so that you can be prepared in case of an emergency. If you want to learn more, read this tutorial: Learn More About How to Make Presentable PowerPointsThese quick PowerPoint Presentation tips are some of my favorite ways to rapidly improve a presentation. Keeping them in mind while you build a presentation can help you build a deck that you'll be confident about presenting. Check out these tutorials to keep learning more about PowerPoint. These tutorials will give you more ideas for fixing up your PowerPoint presentation slides efficiently:  Find More TemplatesDidn't see a template you like? Here are some more:  Use These PPT Presentation Tips on Your Next PresentationNow that you've studied some of our best PowerPoint tips, it's time to put them to use. Download one of our top-notch PowerPoint themes from Envato Elements to get started. These PowerPoint presentation tips and tricks give you confidence to make you a skilled presenter. Editorial Note : This post was first published in February of 2019. Our staff updates this post regularly — adding new, exciting PowerPoint tips and templates (with special help from Brenda Barron , Andrew Childress and Sarah Joy ).  Blog > How to structure a good PowerPoint Presentation How to structure a good PowerPoint Presentation08.09.21 • #powerpoint #tips. When creating presentations, it is particularly important that they are well organized and have a consistent structure. A logical structure helps the audience to follow you and to remember the core information as best as possible. It is also important for the presenter, as a good presentation structure helps to keep calm, to stay on the topic and to avoid awkward pauses. But what does such a structure actually look like? Here we show you how to best organize your presentation and what a good structure looks like. Plan your presentationBefore you start creating your presentation, you should always brainstorm. Think about the topic and write all your ideas down. Then think about the message you want to communicate, what your goal is and what you want your audience to remember at the end. Think about who your audience is so that you can address them in the best possible way. One possibility is to start your presentation with a few polls to get to know your audience better. Based on the results, you can then adapt your presentation a little. Use the poll function of SlideLizard and have all the answers at a glance. SlideLizard makes it possible to integrate the polls directly into your PowerPoint presentation which helps you to avoid annoying switching between presentation and interaction tool. You can keep an eye on the results while the votes come in and then decide whether you want to share them or not. 
Typical Presentation StructureThe basic structure of a presentation is actually always the same and should consist of: Introduction Make sure that the structure of your presentation is not too complicated. The simpler it is, the better the audience can follow. Personal IntroductionIt is best to start your presentation by briefly introducing yourself which helps to build a connection with your audience right away. Introduce the topicThen introduce the topic, state the purpose of the presentation and provide a brief outline of the main points you will be addressing. Mention the lengthIn the introduction, mention the approximate length of the talk and then also make sure you stick to it. The introduction should be no longer than two slides and provide a good overview of the topic. Icebreaker PollsAccording to studies, people in the audience only have an average attention span of 10 minutes, which is why it is important to increase their attention right at the beginning and to arouse the audience's interest. You could make a good start with a few icebreaker polls for example. They lighten the mood right at the beginning and you can secure your audience's attention from the start. For example, you could use SlideLizard to have all the answers at a glance and share them with your audience. In addition, the audience can try out how the polls work and already know how it works if you include more polls in the main part.  Get to know your audienceAs mentioned earlier, it is always useful to think about who your audience actually is. Ask them questions at the beginning about how well they already know the topic of your presentation. Use SlideLizard for this so that you have a clear overview about the answers. You can use both single- and multiple-choice questions or also open questions and display their results as a WordCloud in your presentation, for example. Include a quoteTo make the beginning (or the end) of your presentation more exciting, it is always a good idea to include a quote. We have selected some powerful quotes for PowerPoint presentations for you. Present your topicThe main part of a presentation should explain the topic well, state facts, justify them and give examples. Keep all the promises you made earlier in the introduction. Length and StructureThe main part should make up about 70% of the presentation and also include a clear structure. Explain your ideas in detail and build them up logically. It should be organized chronologically, by priority or by topic. There should be a smooth transition between the individual issues. However, it is also important to use phrases that make it clear that a new topic is starting. We have listed some useful phrases for presentations here. Visualize data and statistics and show pictures to underline facts. If you are still looking for good images, we have selected 5 sources of free images for you here. Focus on the essentialsFocus on what is most important and summarize a bit. You don't have to say everything about a topic because your audience won’t remember everything either. Avoid complicated sentence structure, because if the audience does not understand something, they will not be able to read it again. Make your presentation interactiveMake your presentation interactive to keep the attention of your audience. Use SlideLizard to include polls in your presentation, where your audience can vote directly from their smartphone and discuss the answers as soon as you received all votes. Here you can also find more tips for increasing audience engagement.  Repeat the main pointsThe conclusion should contain a summary of the most important key points. Repeat the main points you have made, summarize what the audience should have learned and explain how the new information can help in the future. Include a Q&A partInclude a Q&A part at the end to make sure you don't leave any questions open. It's a good idea to use tools like SlideLizard for it. Your audience can ask anonymous questions and if there is not enough time, you can give them the answers afterwards. You can read more about the right way to do a question slide in PowerPoint here. Get FeedbackIt is also important to get feedback on your presentation at the end to keep improving. With SlideLizard you can ask your audience for anonymous feedback through star ratings, number ratings or open texts directly after your presentation. You can then export the responses and analyse them later in Excel.  Presentation styleDepending on the type of presentation you give, the structure will always be slightly different. We have selected a few different presentation styles and their structure for you. Short Presentation If you are one of many presenters on the day, you will only have a very limited time to present your idea and to convince your audience. It is very important to stand out with your presentation. So you need to summarize your ideas as briefly as possible and probably should not need more than 3-5 slides. Problem Solving Presentation Start your presentation by explaining a problem and giving a short overview of it. Then go into the problem a little more, providing both intellectual and emotional arguments for the seriousness of the problem. You should spend about the first 25% of your presentation on the problem. After that, you should spend about 50% of your presentation proposing a solution and explaining it in detail. In the last 25%, describe what benefits this solution will bring to your audience and ask them to take a simple but relevant action that relates to the problem being discussed. Tell a Story A great way to build an emotional connection with the audience is to structure a presentation like a story. In the introduction, introduce a character who has to deal with a conflict. In the main part, tell how he tries to solve his problem but fails again and again. In the end, he manages to find a solution and wins. Stories have the power to win customers, align colleagues and motivate employees. They’re the most compelling platform we have for managing imaginations. - Nancy Duarte / HBR Guide to Persuasive Presentations Make a demonstration Use the demonstration structure to show how a product works. First talk about a need or a problem that has to be solved. Then explain how the product will help solve the problem and try to convince your audience of the need for your product. Spend the end clarifying where and when the product can be purchased. Chronological structure When you have something historical to tell, it is always good to use a chronological structure. You always have to ask yourself what happens next. To make it more interesting and exciting, it is a good idea to start by telling the end of something and after that you explain how you got there. This way you make the audience curious and you can gain their attention faster. Nancy Duarte TED TalkNancy Duarte is a speaker and presentation design expert. She gives speeches all over the world, trying to improve the power of public presentations. In her famous TED Talk "The Secret Structure of Great Talks" she dissects famous speeches such as Steve Jobs' iPhone launch speech and Martin Luther King's "I have a dream" speech. In doing so, she found out that each presentation is made up of 4 parts:
Related articlesAbout the author.  Helena Reitinger Helena supports the SlideLizard team in marketing and design. She loves to express her creativity in texts and graphics.  Get 1 Month for free!Do you want to make your presentations more interactive. With SlideLizard you can engage your audience with live polls, questions and feedback . Directly within your PowerPoint Presentation. Learn more Top blog articles More posts How to mask images to crop to shape in PowerPoint Record voice narration for PowerPoint Get started with Live Polls, Q&A and slidesfor your PowerPoint Presentations The big SlideLizard presentation glossarySlide transitions. Slide transitions are visual effects which appear in PowerPoint when one slide moves to the next. There are many different transitions, like for example fade and dissolve. Solution PresentationA solution has already been found during a solution presentation. The only thing that remains is to find a solution on how to realize the decision. Learning on DemandLearning on Demand means that the content is available extactly when it's needed by the learner Virtual RealityWith Virtual Reality people can practice situations and important processes in a virtual room by putting on special digital glasses. They can influence what happens themselves. Be the first to know!The latest SlideLizard news, articles, and resources, sent straight to your inbox. - or follow us on - We use cookies to personalize content and analyze traffic to our website. You can choose to accept only cookies that are necessary for the website to function or to also allow tracking cookies. For more information, please see our privacy policy . Cookie SettingsNecessary cookies are required for the proper functioning of the website. These cookies ensure basic functionalities and security features of the website. Analytical cookies are used to understand how visitors interact with the website. These cookies help provide information about the number of visitors, etc. You’re using an older browser version. Update to the latest version of Google Chrome , Safari , Mozilla Firefox , or Microsoft Edge for the best site experience.
How to Structure a PowerPoint Presentation content creator Helen Colman See full bio →  Think of a movie that has breathtaking special effects but no storyline. Does it have any chances of becoming a blockbuster? Of course not. The same is true with a PowerPoint presentation. No matter how beautiful the visuals of your slide deck are, it will never be a success if it doesn’t follow a logically sound structure. In this post, we’ll cover the typical presentation structure in PowerPoint – what sections it should include – and provide some practical tips on how to arrange the slides and implement these ideas technically. Use these practical guidelines to organize your slides in a clear and simple way and save time on their development. But first, let’s see why your PPT deck needs to be guided by a structure. Why Is Structuring a PowerPoint Presentation Important?A sound deck structure is crucial for audience understanding. When the information is presented logically, it’s much easier for a viewer to get the message. The research supports this idea – it shows that people are 40% more likely to retain structured information than unstructured information. If you’re going to accompany your slideshow with an oral presentation, a good structure is also important for you as a speaker. It will help you feel confident, stay on topic, and avoid any awkward silences, so you’re more likely to win your audience over. What Is the Typical PowerPoint Presentation Structure?A good PowerPoint presentation always has a story to tell and, like any narration, it consists of three basic parts: introduction, body, and conclusion. Let’s look at each part in greater detail with some examples. IntroductionThe introduction sets the tone for the entire presentation and explains what the audience will come away with after viewing it. Here are the multiple slides you may need to add in the intro:  This is the main part of your presentation, which should keep the promises you made in the introduction. This is where you explain your topic and present all your information. Depending on the nature of your presentation, divide it into segments/points. Arrange your points in a logical order and then provide information to support each of them. There are many different ways to organize your key points, for example:
A good conclusion summarizes the key points you made or highlights what the audience should have learned. It clarifies the general purpose of your presentation and reinforces the reason for viewing it. Here are the slides you may want to include:
Tips for Structuring a Presentation in PowerPointNow that you know which parts a typical presentation should consist of, let’s see how to structure it in PowerPoint. 1. Combine slides into sectionsWhen working with a large PowerPoint presentation (PPT), you can create sections that can be collapsed and expanded. This will help you keep presentation slides organized and facilitate navigation in editing mode. To do that, follow these steps: 
As well, you can access these settings by choosing Slide Sorter under the VIEW tab.  This kind of segmentation is a great way to overview the logical flow of your slides all at once and see if there are any changes required. For example, you may decide to break one slide into two or three, or the other way around. 2. Use the Outline ViewOne other way to structure a PowerPoint presentation in the editing mode is to use Outline View . You can choose it from the VIEW tab.  This view doesn’t display sections, but it shows the title and main text of each slide, which can give you a quick overview of the presentation contents. Here you can go through the entire text and edit it instantly. You can also work with text (on the left) and slides (on the right) simultaneously, as the latter is shown on the right side of your screen. Note that, to be displayed in an outline, text needs to be typed in a text placeholder, not a text box . A text placeholder is a box with the words “Click to add text” or “Click to add title”, and it appears when you choose a standard layout. You can also use Outline View to promote bullet text to titles and the other way around. To do that, right-click on a relevant title or text and select the Promote or Demote options.  Be attentive about demoting a title, as this will delete the original slide and move its title and text to the adjacent slide. PowerPoint only allows users to promote and demote text, not entire slides. Therefore, there’s no possibility to change the hierarchical order of slides. 3. Create a table of contentsAll the aforementioned tips help you organize a presentation when formatting it. However, it’s crucial that your viewers can easily navigate through entire presentation too. One sure way to provide them with this opportunity is to create an interactive and structured table of contents. Though there’s no native automatic outline in PowerPoint, it can be created manually: 
 You’ll need to repeat this procedure to link all the chapters to corresponding slides. For more information, read this step-by-step guide on how to add a hyperlink in PowerPoint . Now all the chapters can be accessed from a single table of contents, which is very convenient. However, you will also need to link them back to that unifying page. You can do this by inserting an Action Button on every slide of your presentation in Slide Master mode:  Now there is a single page from which all the other pages can be easily accessed. As well, it’s possible to go back to the table of contents at any time with the intuitive Home button. Depending on the size of your presentation, the time it takes to create an interactive outline may vary, as you will need to add hyperlinks to every chapter manually. Be aware that if you rename a slide or simply delete it, these changes will not be automatically registered in the table of contents. For example, if you delete a slide, its title will still be displayed in the table of contents, but clicking on it won’t lead the viewer to another point in the presentation. This is what our sample presentation looks like:  A Better Way to Structure a PowerPoint PresentationCreating a table of contents manually might be fine for a small presentation, but if you have 122 slides, it would require too much time and energy to do so. That’s why, instead of manually creating a table of contents, we took advantage of iSpring Suite and simply enabled the automatic outline. iSpring Suite Fully-stocked eLearning authoring toolkit for PowerPoint. No training required to start!  Note: iSpring Suite turns slides into HTML5 format, so your audience can view them online, right in their browsers.  As you can see, the new presentation has a pop-up outline and a navigation panel, which make it possible to move to any slide at any time without leaving the slide show mode. How to set up navigationTo create navigation in your presentation, follow these simple steps:

How to configure an outlineWhereas PowerPoint requires the outline to be designed manually, iSpring Suite has already prepared it for you. At the same time, you don’t have to stick with the standard outline template, as you can easily customize the player’s final look and feel:  We recommend leaving Enable Search marked, as this will allow viewers to search for any content at any time, including the texts on the slides. This is especially useful for large presentations with a lot of text. If you have previously arranged slides into multiple levels in the Slide Properties, then leave Multilevel outline marked. That way, the outline will display the nesting structure of the presentation, facilitating navigation. You can learn more about the other outline options here . 
While a standard PowerPoint slideshow is straightforward and limited, iSpring Suite saves viewers from having to follow a strict slide order. An interactive and searchable outline allows non-linear navigation, where any information can be accessed at any time at a glance. Also read : → How to Convert PowerPoint to MP4 Video Also read : → How To Record Presentations With Audio Another perkiSpring Suite comes with Content Library , which provides a great collection of presentation templates and allows you to create professional-looking presentations in a matter of minutes. Each template includes basic course elements: a title slide, a table of contents, chapters, a timeline, and info slides. Organize them in the order you prefer, populate them with your texts and images, and your presentation is ready to go.  We hope this article will help you develop an ideal structure for your PowerPoint presentation and do this quickly and easily. Captivate your audience with a powerful and persuasive presentation! Do you have any other insights on how to simplify PowerPoint slides design? Please share them in the comment section. We’d like to hear from you. Table of Contents Create online courses and assessments in record time.  Content creator Helen Colman She enjoys combining in-depth research with expert knowledge of the industry. If you have eLearning insights that you’d like to share, please get in touch .  How to Compress a PowerPoint Presentation 22 PowerPoint Add-ins and Plug-ins – Free & Paid for 2024 The Best Interactive Presentation Software and Tools in 2024  We use cookies to collect info about site visits and personalize your experience. See our Cookie Policy for more details. Manage your cookies Essential cookies are always on. You can turn off other cookies if you wish. Essential cookies Analytics cookies Social media cookies How to create a random order slide show in PowerPoint
 Now here’s a curious concept. Viewing your PowerPoint slide show in a completely random order. When everything we do here at BrightCarbon is about telling your stories more effectively with a logical and linear flow it might seem like a very strange thing to want to do. So why would you want to do this? I love PowerPoint. There, I said it and I feel better as a result, just as my therapist told me I would. I use it to create all sorts of things from the obvious presentations, to print documents, videos and even animated GIF images. I love PowerPoint even more when I can get inside it and use VBA code to make it do stuff most people don’t even know is possible. I recently organised a birthday party for my wife and, as I have a high-quality projector mounted on the ceiling, I thought it would be cool to have a slide show of pictures from across the years playing on the wall. But pictures weren’t enough, I wanted them to be ‘presented’ with an attractive design, a timeline indicator and captions. It was an obvious choice to use PowerPoint to design the content.  The completed presentation has one slide for each of my wife’s years, which will get me into a lot of trouble! Playing it back in order was ok but I wanted to mix it up and have the slides appear in a random order to make it a bit more interesting. Jumping from college years to a baby, to an adult, back to a teenager made it more interesting than running in a linear timeline. There’s no native feature in PowerPoint that lets you run your slides in a random order. So, I opened up the VBE (Visual Basic Editor) built into PowerPoint and wrote a quick VBA macro to do it for me. The macro does a couple of things. It firstly works out how many slides there are in the presentation and creates an array (a bit like a table of data) in which all of the unique slide IDs are stored. You might not know, but slides in PowerPoint have a couple of identities. The one we all know is the slide number. But that changes if you move the slide around the presentation. The next one is the slide ID and this is both unique and constant. It gets created when a new slide is added to the presentation and never changes, regardless of where the slide is in the presentation. This array of slide IDs is then shuffled like a deck of cards using a randomise function. Finally, the randomised array is used to create a custom slide show that is then set to run. And the really cool bit is that every time the macro is run, you get a different slide order. The full VBA (Visual Basic for Applications) macro is included below and if you need to know how to use it in your presentation then check out our How to use VBA in PowerPoint article. The comments in green tell you what each part of the macro is doing. Each time you run the RunRandomSlideShow macro you’ll see your slides appear in a slide show in a different order. When you quit your slide show, you can then see what the macro has done by clicking the Slide Show tab in PowerPoint. First, click the Custom Slide Show menu and choose Custom Shows…  This opens the Custom Shows window and you’ll see that a new custom show called Random has been created:  If you select this custom show and then click the Edit button you’ll see all of your slides on the left hand side and the randomly ordered list of them on the right:  Remember, each time you run the macro this order will change. This is how the macro creates the random order slide show but how does it actually run it? Close the windows above and back in the PowerPoint Slide Show tab click the Set up Slide Show button. This opens up the settings for your slide show:  Here you’ll see on the right hand side that instead of showing All your slides, the macro has instructed PowerPoint to run a Custom show called Random . It also set the show to Loop continuously until ‘Esc’ so that it never ends! You could use the same technique to add some spice to your PowerPoint Karaoke – also known as PowerPoint Roulette or Battledecks – an improvisation game where you give a presentation to an audience without knowing the content of the slides! Roll the diceIn this downloadable example , you can click a button in the ribbon to randomly roll the 3D PowerPoint dice. There you have it. Now you can go out into the world and play random slide shows to your heart’s content. And if you want to know more about macros, check out our other VBA blog articles . If you’re interested in add-ins, we have a very cool free one called BrightSlide and should you be interested in having us develop a custom solution for you, get in touch here . Got something extra you’d like PowerPoint to do?Check out our PowerPoint automation service which provides you with a custom solution to your specific needs.  Jamie GarrochPrincipal technical consultant, related articles, how to consistently brand graphs and charts across microsoft office.
How do you make sure that your graphs and charts have consistent branding across Excel, PowerPoint and Word? Learn how to create and use custom templates that support your brand identity across Microsoft Office.  Protecting your prized PowerPoint content
Our comprehensive guide to password protecting PowerPoint files so your precious presentations stay just they you made them!  Hacking PowerPoint to create custom colors
Tints and shades auto-generated by Microsoft from Theme Colors often take your content off-brand. How can you get the custom colors you want in PowerPoint? Read on to find out!  This is great, thanks for sharing. I am a bit of a novice with VB and I’m trying to modify your code slightly for my own purposes. But, I cannot make it do what I need. Perhaps you could suggest how I could do these two things: 1) specify a range of slides to use (as opposed to all of them) 2) trigger the macro from a button (or only when advancing to a specific slide within the range) Many thanks Paul Hi Paul and thanks for the questions. For the first, you’d need to modify how the array of slides is created which currently uses this bit of the code: For Each oSld In .Slides aSlides(oSld.SlideIndex) = oSld.SlideID Next The question then is “how will the range of slides be determined?” For the second part, you can trigger a publicly declared Sub procedure from a shape on a slide during a slide show by using the Insert / Links / Action / Run Macro feature in the PowerPoint ribbon. The challenge here is that the slide show is already running so calling the RunRandomSlideShow macro won’t do what you want. That makes a solution quite complex and not easy to provide here. If you would liek us to take a look at this as a project, please send us a message in the Contact page mentioning me. I have been looking for something like this and was having trouble. I am an educator and I like to show my students flashcards and wanted to randomize the flashcards. A colleague of mine sent me to this site. This is very helpful – thank you! Love thus! Creating materials for k teachers. Been writing a new one for each randomize. Its perfect for creating a lesson say learning counting numbers and then randomizing the flashcards for practice. I’ll try this now! I copied your macro exactly, but it doesn’t run a new random order each time. It did a random order the first time, but each subsequent time, it ran the slides in the same mixed order as the first time, so it is no longer random. I tested this in various ways, including closing the file and the app and re-opening it, but I still got the same order. I thought I followed the instructions perfectly, but perhaps I missed something? I have reviewed and can’t see anything I missed. Hi S Mason. Are you running the macro each time or just running the slide show? Once the VBA code is in your file you should be able to close the VBE and run it by pressing Alt+F8 which creates a new random order and starts the slide show. So you have to run the slide show using Alt+F8 in order to have it run a new random order each time? Just want to clarify. Is it possible to have this kind of presentation including the macros publish on a Webpage? Hi James. Office content that contains macros only work on the desktop versions of their applications for Windows and macOS. You can however create interactivity within your presentation and publish as web-compatible HTML5 using the iSpring plug-in. Hi Jamie, Many thanks for your advice. I find it useful and I will update you on my progress and findings. Kind regard James Hi Jamie, Your code is inspirational. I am developing randomized slides with powerpoint 2016. My presentation has multiple questions on each page and require answers from my students. I have two questions. 1.) Once I get this up and running I will like to have it on a webpage. What do I have to do to achieve this? 2.) Currently, I have the presentation saved as pptm. Any thoughts. Regards James See above James. I think iSpring could be your best option. What exactly am I copying into the Module box in PowerPoint? Everything from above (blue, black, & green font?) starting with “option” and ending with “end sub?” I am a complete newb, obviously & trying to randomize some flashcards for speech students. Also, does this just run automatically or do I click “next” or whatever to advance to the next slide (preferred method)? Thank you. That’s right Kristi. All that you described is the code. The colours just indicate the meaning of various elements eg. green represents comments. Once your flash cards have been randomised you could either click next (or space-bar or return or arrow keys) manually, or go to the transition tab and set a time on the right hand side of the ribbon to automatically advance each slide. It works perfectly! Thank you!! This is CLOSE to what I wanted… but not quite. What I want is to be able to create short PowerPoints (3 to 10 slides each). Create multiple Power Points and make a list of the PowerPoints. Then have the PowerPoint presentations run in random order on a continuous loop. I have a “Safety Vision” display monitor set up so that employees can watch a presentation at their leisure during the workday. I have been using the “Safety Vision” to present a 5 minute loop of ONE PowerPoint, but it has been suggested that a 30 to 60-second loop followed by a DIFFERENT 30-60 second loop may go over better. If I can show a list of multiple presentations would be good… to do so in a random order would be even better. Thanks! That’s certainly doable with VBA although quite complex as multiple files need to be managed. I wonder if an alternative method could be to create all the content in a single file and then create Custom Slide Shows for each. Then you could write some VBA code to randomize the order of the custom shows. Thank you from the bottom of my heart! I just took a “manual” math bingo game displaying geometry figures as the caller cards that I am using as a review before the test and easily converted it to a randomized bingo game. I can easily run this from the promethean board (massive touchscreen computer) at the front of my math class room! Perfect! Great to hear you’ve found a practical use for this Julie 🙂 Hi Jamie, nice tip with lots of potential applications. Just curious: have you thought of developing random CrossFit workouts using a modification of the technique? It would be great to have gifs in slides and a timer for say 40 seconds. Once the slide gets active, the timer starts countdown and the gif shows the exercise. then a transition of say 15 seconds, to another slide. That way one can have a workout of the day which varies and plays so that all one does is follow along. Duration can vary from 8 to 40 minutes (the whole set of exercises), and the exercises may vary between weightlifting, gymnastics, calisthenics, obstacle race type, cardio (machines), strongman, etc. I would think there would be a commercial interest in the product now that many need to take training home. Hi Hamilton. There are certainly lots of potential uses for this as it stands and of course it could be extended to all sorts of other applications as you described. We typically don’t make products out of presentations but you could take this free sample and develop it further for other use cases. just what I want.. Thanks a lot Thanks for this! I am running a training online that I usually do in person, and this is enabling me to use ppt like a deck of cards 🙂 That’s great to hear Kathleen and thank you so much for letting us know you’re finding it useful. This is wonderful and incredible and thank you for sharing it! Join the BrightCarbon mailing list for monthly invites and resources A big and sincere thanks for all of your superb help and effort in preparing such fantastic material and for all your excellent coaching tips. Look forward to working with you again soon. Greg Tufnall Siemens  
PowerPoint Tips - Simple Rules for Better PowerPoint PresentationsPowerpoint tips -, simple rules for better powerpoint presentations, powerpoint tips simple rules for better powerpoint presentations.  PowerPoint Tips: Simple Rules for Better PowerPoint PresentationsLesson 17: simple rules for better powerpoint presentations. /en/powerpoint-tips/embed-excel-charts-in-a-slide/content/ Simple rules for better PowerPoint presentationsHave you ever given a PowerPoint presentation and noticed that something about it just seemed a little … off? If you’re unfamiliar with basic PowerPoint design principles, it can be difficult to create a slide show that presents your information in the best light. Poorly designed presentations can leave an audience feeling confused, bored, and even irritated. Review these tips to make your next presentation more engaging. Don't read your presentation straight from the slidesIf your audience can both read and hear, it’s a waste of time for you to simply read your slides aloud. Your audience will zone out and stop listening to what you’re saying, which means they won’t hear any extra information you include. Instead of typing out your entire presentation, include only main ideas, keywords, and talking points in your slide show text. Engage your audience by sharing the details out loud. Follow the 5/5/5 ruleTo keep your audience from feeling overwhelmed, you should keep the text on each slide short and to the point. Some experts suggest using the 5/5/5 rule : no more than five words per line of text, five lines of text per slide, or five text-heavy slides in a row.  Don't forget your audienceWho will be watching your presentation? The same goofy effects and funny clip art that would entertain a classroom full of middle-school students might make you look unprofessional in front of business colleagues and clients. Humor can lighten up a presentation, but if you use it inappropriately your audience might think you don’t know what you’re doing. Know your audience, and tailor your presentation to their tastes and expectations. Choose readable colors and fontsYour text should be easy to read and pleasant to look at. Large, simple fonts and theme colors are always your best bet. The best fonts and colors can vary depending on your presentation setting. Presenting in a large room? Make your text larger than usual so people in the back can read it. Presenting with the lights on? Dark text on a light background is your best bet for visibility.  Don't overload your presentation with animationsAs anyone who’s sat through a presentation while every letter of every paragraph zoomed across the screen can tell you, being inundated with complicated animations and exciting slide transitions can become irritating. Before including effects like this in your presentation, ask yourself: Would this moment in the presentation be equally strong without an added effect? Does it unnecessarily delay information? If the answer to either question is yes—or even maybe—leave out the effect. Use animations sparingly to enhance your presentationDon’t take the last tip to mean you should avoid animations and other effects entirely. When used sparingly, subtle effects and animations can add to your presentation. For example, having bullet points appear as you address them rather than before can help keep your audience’s attention. Keep these tips in mind the next time you create a presentation—your audience will thank you. For more detailed information on creating a PowerPoint presentation, visit our Office tutorials . /en/powerpoint-tips/three-tips-for-beautiful-powerpoint-presentations/content/
How to Create a Webinar Using Free PowerPoint Templates? Webinars can sometimes be a pretty complicated affair, be it in terms of driving registrations, practicing scripts or otherwise. However, one part of the planning process really can be very simple: getting ready in presenting your webinar slides. It is therefore always wise to mine the depths of the internet in search of free PowerPoint templates that can be used to create nice looking and professional webinar presentations. Here in this blog, I will explain how you can make an elegant and professional webinar presentation using some free slides templates . Here, we will discuss how to plan your content, use animations and make your presentation look professional and interesting. Here are some steps you can follow to create a webinar presentation using free PPT templates:

 Plan Your ContentBefore beginning to work on your PowerPoint templates, I can’t stress enough: decide on your topic and what engaging content you want to include in the presentation. Being mindful of the concepts you’re covering, the media you’re including, and the content you’re writing at an early stage will make creating the slides infinitely easier. What’s worse is adding new sections here or there, or even extra lines with bullets, when you have worked out your slides and filled them with content. Avoid this by having a discussion beforehand about what needs to be included. Consider the goals of the webinar, your target audience, and the structure and flow of the main content slides. You can also include supporting content like visuals, videos, presentations, and handouts. Let’s Talk PowerPoint SlidesNow, it’s time to discuss your PowerPoint presentation. Once you’ve entered the workspace and created a New Presentation, you can begin adding new blank slides. But now is the time to decide on the topic and arrangement of your slides. Many would consider this an afterthought and dive straight into adding the content, but my view is that experimenting with colors and fonts that work for your presentation slides is best done at the start. That way, you are in a position to decide what works first, and at the very beginning apply the theme to all slides. You will save time applying changes later on each individual slide. An annoyance, especially if time becomes tight. Websites like Slideegg, MicrosoftPowerPoint template and Canva offer some of the best PPT templates for free download, which you can use to streamline this process. Back to the Webinar ContentOnce the webinar slides follow a particular theme, it is now possible to make the webinar slides more interesting by incorporating appealing content. PowerPoint offers the ability to create text boxes that can be filled with various elements, such as: PowerPoint offers the ability to create text boxes that can be filled with various elements, such as
The text can be typed in direct from PowerPoint, and pictures, videos, and graphs can be brought into the slides from files on your computer. Some of the above combination works best for an engaging webinar slide deck. Don’t forget to educate the audience, but also do keep them interested in what they are watching. Keeping all this in mind, here is a super-quick tip for webinar slides: Keep the text content of the slides short and concise; brief, bullet-pointed fragments of text are best. The person speaking will enlarge on these in their script, so don’t put too much text on slides. Keep the images relevant to what you are saying. If you have images that are a talking point, great. If not, at least keep them somewhat relatable to what’s being discussed. Animations, But Not Too ManyOnce you’ve typed in most of your text into your slides, you can use many of the umpteen animations that PowerPoint supports. For webinars, I’d say you could use basic transitions between slides and use the auto-play feature for videos. Too many animations (text flying in, spinning), and it can get a bit too much for a webinar being watched by many professional viewers. Videos absolutely are a feature worth including that autoplays. Just be careful to run this by those speaking in the event beforehand. Nothing will derail whoever is speaking like having a video autoplays over their monologue. Check It, Then Check It AgainOnce the content is finalized, it’s time to proof everything you’ve created before uploading into your webinar platform. PowerPoint supports spell-checking, but for extra peace of mind, make sure nothing slips through the cracks and check it through manually beforehand. Be sure that the text aligns correctly, formatting is consistent, images show up clear and not pixelated or distorted in any way—any of the usual checks which would take place when you’re preparing content for the web. Additional Tips for Creating a Webinar PresentationHere are some of the guidelines for developing a webinar presentation: Outline: Webinar goals, target audience, and flow and structure of key content slides, but can also include supporting content, such as: Slides with visuals Videos Presentations Handouts. Slides: The slides should be light and with a call-to-action slide. Some other slides you can include are a title slide, table of contents, “about” slide, instructional slides, testimonials, offer slide, Q&A slide, and thank you slide. Using free PowerPoint templates will help in making the process of creating a webinar much easier and professional at the same time. Plan your content, select the appropriate template, be consistent in your slides, and double-check all for a really engaging and informative webinar. Be it as a marketer, educator, or business professional, leveraging free slides templates will make your message reverberate clearly and leave audiences agape in awe. Remember, what really matters for a great webinar is not your content but how you present it. So take time to go through these free PPT templates and play around with the styles to see which one will help you out the most. Spread LoveRelated blogs.  Pramod MalnatchiPramod Malnatchi is an experienced content strategist with over 3 years of active practice. He excels at using his broad experience to provide clear, concise, and interesting data-driven content in different niches. With his skills in PowerPoint presentations and Google Slides, Pramod is capable of making an idea visually interesting in terms of presentation. He ensures the quality and accuracy of information in every project by doing thorough research and consulting with experts in the field. Recent Blogs How to use Google Slides offline and Work Anywhere?Google Slides is equally a perfect tool that can be used in the creation and sharing of presentations. Use is...  How To Make A Graph In Google SlidesGoogle Slides is a powerful tool for creating presentations, but it also offers a variety of features for visualizing data....  How to Discuss Sales Targets Using Agenda PresentationWant to make your sales meetings more effective? Here are simple tips using an agenda. Any successful organization must communicate... SIGNUP FOR NEWSLETTER
 Create slides with an accessible reading order Put the content in your PowerPoint slides in the intended reading order so the screen readers read it correctly for users with a vision or reading disability. Create slides with proper reading orderOn the Home tab, select New Slide . Select any pre-existing slide layout. Add your slide content. Make sure that you don't delete or rearrange the default slide elements. Group objectsIf you have complex diagrams or illustrations made of many objects, group the objects into logical units. That way, the screen-reader user can read the grouped units rather than all of the individual objects in them. With grouped units, you'll only need to order the grouped units and not all of the objects in them. Select Review > Check Accessibility > Reading Order Pane . In the Reading Order pane, to select multiple objects, press and hold Ctrl and then click each object you want to include in the group. To group the selected objects, press Ctrl+G. To add alt text to the group, double-click the group name, type a description for the group, and then press Enter. Modify the reading orderIf you need a custom slide or you've modified the pre-existing slide layout, you can change the object reading order to match the visual layout order. Objects are read from top to bottom order. In the Reading Order pane, to change the reading order, rearrange the objects in the list. Do one of the following: Drag an object to a new location.  Tip: If an object is not important for understanding the meaning of the slide, unselect the item checkbox to exclude it. To double-check the order, read the objects in the Reading Order pane from top to bottom. Make your PowerPoint presentations accessible to people with disabilities Download free, pre-built templates Save, back up, and recover a file in Microsoft Office Excel video training Word for Windows training PowerPoint for Windows training A screen reader helps PowerPoint users with a vision or reading disability better understand slide content. Place content in the intended reading order, so the screen reader reads the items correctly. On the Home tab, select New Slide . Pre-existing templates provided with PowerPoint already maintain an accessible reading order. Select a layout, add text, images, and other content. Note: If slide items are rearranged, the reading order may no longer match the visual order. On a custom or modified slide, the reading order may be different from how the items are visually laid out. Users will not understand the content if the screen reader reads the items out of order. [Screen reader reads:] Picture 22, rectangle 7. Text box 2, Customer Focused Approach. Text box 18, Robust Product Line. Text box 17, Commitment to innovation. Text box 19, 30 years of great customer service. [Screen reader stops reading.] To set the reading order, go to the Review tab, select the Check Accessibility dropdown, then Reading Order Pane . Group items together with Ctrl, click, then Ctrl+G. Give alt text to the group that helps users understand the content. Items are read from top to bottom order. Select and drag the items to its new spot to match the visual layout order. If an item is not important for understanding the meaning of the slide, uncheck to exclude it. Read the items in the pane from top to bottom to double check the order. Now screen reader users will read the slide content in the same order as sighted users.  Need more help?Want more options. Explore subscription benefits, browse training courses, learn how to secure your device, and more.  Microsoft 365 subscription benefits  Microsoft 365 training  Microsoft security  Accessibility center Communities help you ask and answer questions, give feedback, and hear from experts with rich knowledge.  Ask the Microsoft Community  Microsoft Tech Community  Windows Insiders Microsoft 365 Insiders Was this information helpful?Thank you for your feedback. |
IMAGES
VIDEO
COMMENTS
In a single location, it lets you change the sequence, triggers, and more. Go to Animations > Animation Pane to launch the control center for PPT animations. Working on the Animations tab in PowerPoint, click Animation Pane. You'll see it launch, as a sidebar menu on the right side of your PowerPoint slide.
Open the tab and select the animation you want to change. You can do this by clicking the animation number, not the item. On the right side of the ribbon, click "Move Earlier" or "Move Later" below Reorder Animations. If one or the other is grayed out, then that animation is already at the earliest or latest point.
Right-click between slides and select Add Section. An Untitled Section is added in the thumbnail pane, and the Rename Section dialog box opens. Type a name in the Section name box. Select Rename. To collapse a section, click the triangle next to the section name. The numeral by the section name shows the number of slides in that section. Select ...
Animations in PowerPoint bring dramatic effects to your slides. But the order they appear in is truly important. Fortunately, it's easy to adjust! In this vi...
To find these settings, select the object you're animating, head to the "Animations" tab, and then click the box next to "Start.". Select the start option you want from the drop-down menu. You can also set a duration for the animation. Changing the duration makes the animation run slower or faster.
We'll start out: Going to the View menu in the ribbon. Look in the Presentation Views grouping of commands. Click on the Slide Sorter command. This will open a window with thumbnails of each slide ...
Changing your slide order in PowerPoint is an easy task...provided you know where to look. In this lesson we cover how to reorder your slides in Normal view...
Microsoft PowerPoint 2016 tutorial on how to arrange, or reorder your slides around in your presentation quickly using the Slide Sorter view.All 87 of my Pow...
Right click on the slide you want to copy, select "Copy", then right click on the slide after where you want the duplicate, and click "Paste". Reuse Slides - If you have existing slides in another PowerPoint file that you want to add to your current deck, you can reuse those slides. Go to the "Home" tab, click the bottom half of ...
To add a slide from another presentation, see Reuse (import) slides from another presentation. Another way to see all your slides at once and rearrange them is to use the Slide Sorter view. Learn more here: Switch to different views in PowerPoint. See Also. Organize your PowerPoint slide into sections. Design in PowerPoint. Apply a slide layout
Your First PowerPoint Presentation: 10:15: Microsoft Office PowerPoint: Add Remove Insert and Move Slides in a Presentation: 3:28: Microsoft Office PowerPoint: Quickly Format a Presentation Add a Theme or Design: 4:18: Microsoft Office PowerPoint: Change Presentation Slide Order Using the Slide Sorter: 3:19: Microsoft Office PowerPoint
To manually shuffle the slides in a presentation, follow the 4 quick steps. Step-1: Click on the "View" tab. The first step is to open the "Slide Sorter" screen. To do so, you have to first click on the "View" tab in the menu ribbon at the top of the screen to open the "View" menu. Step-2: Click on the "Slide Sorter" option.
PowerPoint Slide Sorter is one of the views available in Microsoft PowerPoint that lets you view all your slides in the form of thumbnails sorted horizontally. This helps better organize the slides, as you can rearrange them using drag and drop. Furthermore, you can zoom your slides (in or out) to increase or reduce the size of the thumbnails ...
Change the page orientation in PowerPoint between landscape and portrait Article; Organize your PowerPoint slides into sections Article; Add a DRAFT watermark to the background of slides Article; Create, merge, and group objects on a slide Article; Guides for arranging things on a slide in PowerPoint Article; Change the order in which stacked ...
To do that, simply go up to the Home tab and click on New Slide. This inserts a new slide in your presentation right after the one you were on. You can alternatively hit Ctrl+M on your keyboard to insert a new blank slide in PowerPoint. To learn more about this shortcut, see my guide on using Ctrl+M in PowerPoint.
To do that, just drag and drop the thumbnails into the order you want. When you return to Normal view, the PowerPoint presentation slides will be in the resequenced order you set here. 25. Include Data in the Appendix. Many PowerPoint presentations include data in the form of charts and graphs.
Length and Structure. The main part should make up about 70% of the presentation and also include a clear structure. Explain your ideas in detail and build them up logically. It should be organized chronologically, by priority or by topic. There should be a smooth transition between the individual issues.
2. Use the Outline View. One other way to structure a PowerPoint presentation in the editing mode is to use Outline View. You can choose it from the VIEW tab. This view doesn't display sections, but it shows the title and main text of each slide, which can give you a quick overview of the presentation contents.
InArray(N) = InArray(J) InArray(J) = Temp. End If. Next N. End Sub. Each time you run the RunRandomSlideShow macro you'll see your slides appear in a slide show in a different order. When you quit your slide show, you can then see what the macro has done by clicking the Slide Show tab in PowerPoint.
Follow the 5/5/5 rule. To keep your audience from feeling overwhelmed, you should keep the text on each slide short and to the point. Some experts suggest using the 5/5/5 rule: no more than five words per line of text, five lines of text per slide, or five text-heavy slides in a row.
Select Arrange from the App Menu.; Select Selection Pane…; Slide objects need to be arranged in the Selection Pane from bottom (slide title) to top (last item).Drag and drop to arrange objects into a logical reading order reflecting the visual presentation. Tip: Use the arrow keys to move between layers in the Selection Pane to review the order.
Some people with visual impairments use a screen reader to read the information on the slide. When you create slides, putting the objects in a logical reading order is crucial for screen-reader users to understand the slide. Check the reading order of slides. With your presentation open, select Review > Check Accessibility.
Upload the PowerPoint to iCloud and open it in Keynote. On iPad. To convert a PowerPoint file to Keynote using an iPad, follow these easy steps: Email the presentation to yourself. Open the attachment and, using the "Open In" menu choose Keynote. The presentation may require some editing as Keynote and PowerPoint do some things differently.
The core functionality is available for free in both Google Slides Themes and Free PowerPoint Templates. Google Slides Free comes at no cost at all; there aren't any premium features or surprise Type-Of-Service fees. PowerPoint is available as a part of Office 365, but the full suite of features generally requires a subscription.
Here are some of the guidelines for developing a webinar presentation: Outline: Webinar goals, target audience, and flow and structure of key content slides, but can also include supporting content, such as: Slides with visuals Videos Presentations Handouts. Slides: The slides should be light and with a call-to-action slide. Some other slides ...
Download communications plan PowerPoint templates and themes for your next presentation. Including Google Slides, PowerPoint and Keynote. Unlimited downloads with an Envato Subscription!
Select the text. Under Drawing Tools, choose Format. Do one of the following: To change the color of your text, choose Text Fill, and then choose a color. To change the outline color of your text, choose Text Outline, and then choose a color. To apply a shadow, reflection, glow, bevel, 3-D rotation, a transform, choose Text Effects, and then ...
When I run the presentation on my computer, everything works fine: the audio plays over the slides and stops when the film clip slide arrives. However when I export the presentation to video, the audio clip plays on over the film. How can I make the export do what it's supposed to do? I've tried both .mp4 and .mov formats with the same result.
Select Review > Check Accessibility > Reading Order Pane. In the Reading Order pane, to select multiple objects, press and hold Ctrl and then click each object you want to include in the group. To group the selected objects, press Ctrl+G. To add alt text to the group, double-click the group name, type a description for the group, and then press ...